Imitation...flattery...all that :-p
I mentioned wanting to enter the PR contest because 1) Summer=skirts and 2) Fabric Mart. No brainer. 3) I had become obsessed with having a distressed denim skirt.
I scored this pattern for cheaper than usual at the Hancock liquidation sale.
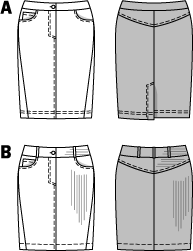
This skirt is very 'traditional denim skirt' in some ways and in other ways, not.
1) Why were there no back pockets included? SUPER weird.
2) I think I normally see denim skirts with a slit, not a vent. And the vent was handled weirdly.
3) The coin pocket is weird and not like 'normal' coin pocket
4) The waistband is shaped like a 'normal' skirt. This was different but good! Straight waistbands don't work for my figure.
Yes, I just used 'weird' in 75% of my list. HA!
BUT I LOVE THE SKIRT!!!! This is an epic post of epicness so settle-in for lots of construction info or scroll ahead for some photos!


I say very often that I am not a teacher. Anyone who knows me well will tell you to save yourself from me teaching you anything. I'm a doer. I just...do. And I am impatient (oh, you probably knew that!) :) But I love sewing denim (and shirts!) so much detail and nuance even if it's not quick. So I took a lot of photos this time around since it was progressing slowly anyway. Lots of these made it to IG already.
Fabric
I have a few cuts of denim in the stash. Long before I ever sewed a pair of jeans I was buying it all the time. Especially when SR Harris had Rock and Republic denim and Selvedge denim in stock. I chose this for the color; I am a fan of dark denim! What I didn't realize is that this is likely a cotton/poly blend vs being just 100% cotton. Which, my favorite pairs of RTW jeans area a blend; the poly helps them keep their shape I think. And I try to never go above 1% Lycra if it's present. I just hate super stretchy jeans.
Cutting
I cut wrong side, single layer, and trace my pattern piece instead of cutting around it. I take the time to line up the fabric and pattern piece, and measure the distance from grainline to the edge of the table in several places to ensure my piece is straight. Off grain fabric is bad and in denim seems to be WAY worse. I normally use a gel pen (ballpoint doesn't work well), but when I can't find it, I use a sharpie, and cut inside the line since it's so thick.

With the tracing paper I use (Bifeng paper from Blick Art), it's not completely transparent. I crease the grainline before flipping the pattern piece.

I don't know why but I cut the pieces as I need them. When sewing shirts, I don't cut the collar stand and collar until I'm ready to sew them. I don't think denim is as prone to stretching out as shirt collars but still...just my way!
Front
Skirts and pants with pockets drive me batty because I'm ready to GOOOOO and the pockets take time and are fiddly. I had my fronts constructed as of May 22nd and then it stalled due to being very busy.
The coin pocket is a rectangle, no shaping, and it's a rather large one at that. Should I make this again I'll make it smaller/position it slightly different.

Zipper
The fly is backwards. I mean, I did it 'right' according to the pattern, but I had a niggling thought about it being on the same side as the coin pocket. The Google confirms it's "normally" on the other side.
When inserting fly zippers I always use Wonder Tape to hold it in place and baste. All the time. It seems like extra work but it ensures great results. So worth it to take a few minutes and baste.

I'm kind of digging the angled fly stitching over the curved. A bit more precise for me. Most of us need a fairly short zipper in jeans so I ensure my fly topstitching will end well below the zipper stop. I didn't have any short jeans zippers and because I am having a major flare up with my hands, wasn't about to go trying to shorten one. I think a regular zipper in my skirt is fine, it won't take on near as much stress as it may in a pair of jeans.

By May 27th, I had my front piece fully assembled.

Back
On the 28th I assembled the back. I was confused about my pockets. Where is the pocket piece!? And realized the pattern doesn't include them. I used the pocket from my Style Arc Sandra jeans, cut one out and quickly decided, YES, the skirt needs back pockets.

I used a RTW pair of jeans to decide on placement. I think they're a tiny bit too large and too low. But not horrible.

There was some evil afoot with the back skirt vent. Burda will sometimes give a shortcut way to do a technique and while it works, if you're not a rank newbie, it can be more confusing than just doing it the 'right' way. The inside of my vent is sketchy!

The Rest
By the evening of the 28th, I had a waistband-less skirt! And there it sat, until the 7th!
Tuesday night I was able to get the waistband assembled and topstitched, and I did the hem and belt carriers as well. Oh! this is another place where Burda treats it less like a denim skirt IMO. The carriers are intended to be caught between the yoke and waistband on bottom and then topstitched in place on top. I thought that would be unnecessarily bulky and went ahead and attached them with bartacks. I did not use the place markers on the pattern, on back I measured from the side seam about 1 1/4" and from the front pocket opening 1 1/2". I also measured to ensure each carrier was the same length.

I love making belt carriers!!! I always fray check the ends after cutting.
As of Tuesday night I was so close to the finish line! On Thursday I seriously started to think about whether or not I was going to distress it.

It looked so good! I do have some wonky topstitching here and there, but the fit was nice, the color perfect and how on earth would I take this from everyday wear to just casual wear by slicing and dicing on it?!
Distressing
I was hemming and hawing and going back and forth. I walked across the room, grabbed my Ginghers and cut a slit right in front.
There. Done.
I have about 15 different skirt inspiration photos saved on my phone. I wanted it to look good. Not too much distressing but not one tiny little thing. No gaping holes, but not too perfect.

For the larger areas I cut slits and pulled out the blue threads with a tweezer. You could also just cut, wash and dry and let it happen. For the lower cut on front, I cut about 5-6 slits of varying lengths. 1) cutting more slits makes removing the blue threads easier and 2) I would only pull some of the blue threads out, stopping short at the ends, to allow it to be a little mishapen. I cut some of the white threads away leaving more of an opening, but not a hole.
I cut a small hole in the hem, letting that fray in the washer/dryer. I cut several small slits in other places (front pocket, coin pocket, on the skirt front), also allowing those to fray open on their own.
I have a refinishing job I want to do on a table. When I get sandpaper for that, I'll do a little light distressing to remove a little color in a couple places.
Closure
I've now made 3 pair of jeans and this skirt. My machine does automatic buttonholes but denim gives me a hard time. The bulk at the waistband makes it hard to feed. I have to do it backwards. Not too bad with a skirt, but with jeans, it's a headache.

I got a fairly decent keyhole buttonhole, not perfect, but it's okay. I use fraycheck before cutting (with all buttonholes.) I attached a tack button (buy an awl! Seriously!!) but accidentally bent it with my final hit of the hammer. Boooooo! I was able to use a plier and bend it back in place enough to make it functional. Whew.
I am THRILLED with the fit and finish of this skirt! Thrilled!!
Helloooooo. Are you still here?
Cara top. Made mid-construction on the jumpsuit.
So fast. SO easy. So cute.
I always take a size 12 in Style Arc tops. The PDF is 22 pages I think and because of the layout, doesn't need to all be assembled together into one large sheet. Also, with simple patterns like this (front, back, sleeve, bands), I just assemble and cut the paper, I don't trace first.
Front and back are cut on the fold, sleeve is raglan-style so it gets set flat. Front band is interfaced, back band is not.
The front band is fairly straight and I think it would have been nice if it had a little curvature to it. I ended up taking 2 darts because it was standing away from my body. And I was CERTAIN not to stretch it. I cut it and immediately interfaced it.
SA patterns typically have a 10mm seam allowance. If I made this again I may add a little more at the back piece and band. It was difficult to close that up while also stretching it. I guess another option is to leave one side open and create a casing? But casings are evil so...
It wasn't impossible, just a little challenging.
My fabric is a floral cotton(?) from Fabric Mart. The description was just "linen look woven". But I loved the colors and bought 2.5 yards of it. And this pattern takes under a yard. So I can still have another top from it! :) Or a skirt even! It is opaque but lightweight so if I made anything for my lower half I would use some cotton batiste as lining.
Anyway, it handled beautifully. But the markings. OY! They got lost. Mind your markings with respect to the bands and neckline. Don't be like me. That also gave me trouble...trying to find notches in a 3/8" SA in fabric that was a bit ravelly wasn't fun.
I did narrow hems on the sleeves and serged and turned up the bottom hem. That was a lot of circumference and a double-turned hem was not going to happen. Lastly, I have a short torso and wouldn't want it any shorter than it is currently falling. Keep that in mind if you're more average or tall.
I'm so glad I went out of my comfort zone! I think it's super cute and great for casual days. Obviously, an off-the-shoulder top isn't going to be extremely practical, but sometimes, just being cute is enough!
More photos!! :)

I wasn't being artsy. I heard a noise! LOL!!!!


I'm really digging this little corner of the backyard for photos!


