Wednesday, October 28, 2015

New Look 6301 (In Triplicate)

Epic. Sewing. Session.

As mentioned before, my sister has found a new job after dealing with unemployment for quite awhile. While we are not close and don't talk often, I got the bug to make her a new dress for her new job. And then I had this bonus yardage of cobalt ponte and decided I'd make 2! A classic black version and a fun, sleeveless blue version.

I told her to be watching her mail and sent her the USPS tracking number. Just to show how little we talk, I had no idea she's moving at the end of the month! Good thing I got them done and in the mail first thing Monday! They showed up today :)

I went with size 12, totally guessing, putting her square in between my daughter's measurements and my own. I am smart!

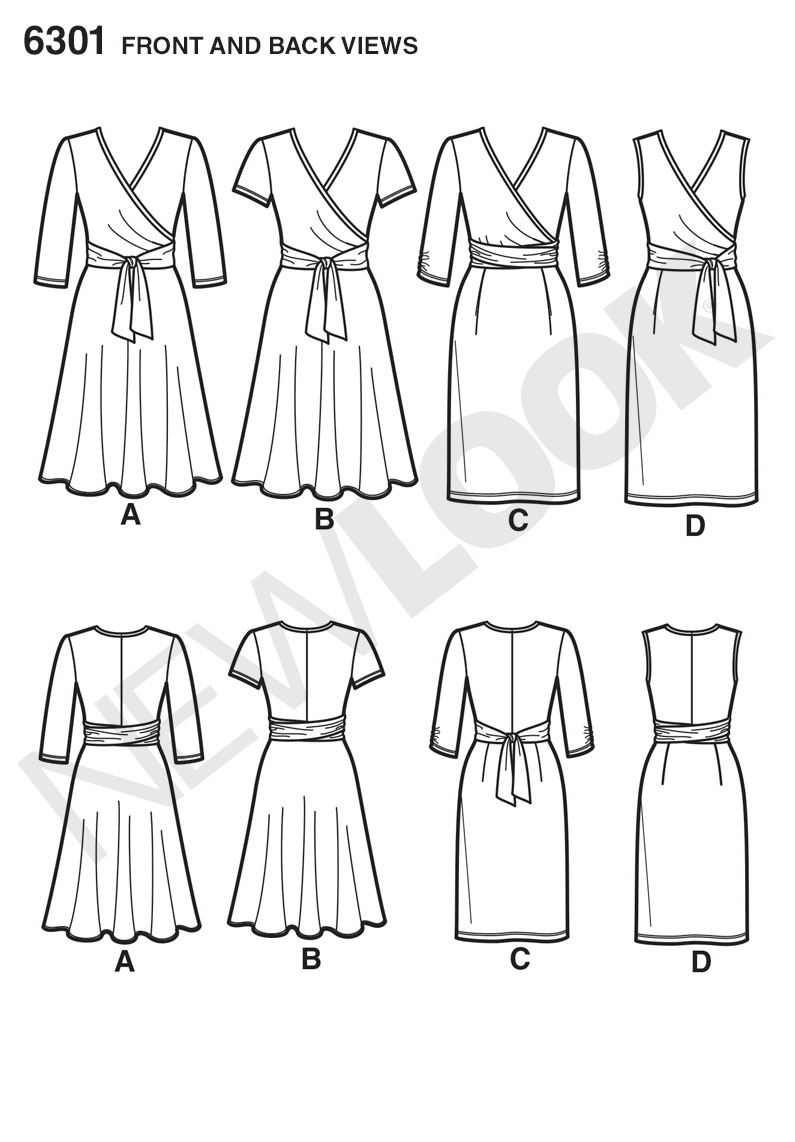
This pattern is a surplice with an IMO unnecessary pleat on the right (under) bodice, two side pleats on the left bodice, pleats in the front skirt and darts in the back skirt. It has a center back seam on the back bodice, a narrow neck binding and tie belt.

Does it sound like there's too much going on? I kind of think there is. I'll start by saying the pattern is okay but unless she wants some other variation, I probably won't sew this one again.

It's one of those where it's like eh...it's not bad but meh... Know what I mean??!

**Knowing New Look, I took the liberty to remove 3/8" from the back neckline grading to nothing at the waist. I took a 3/8" tuck across the fronts.

**For myself I traced a size 14 neckline/armholes, grading out to a 16.

**I fully intended to do a swayback adjustment. I forgot!!! And dang it, it shows.

**When I first tried it on I wasn't happy with the front pleats but then when I actually wore it I realized the entire bodice is just too long. When I hiked it up a bit (like an entire inch!), the pleats fell just fine. Ah!

**Also, the bindings are too long. It is a match to the length of the front pieces. I attached the blue one as is and knew it would stand away from the body a bit.

**On the black one (a rayon/poly/lycra ponte), I had 6" of binding left over after applying light tension throughout serging.

**On the green/black one (a poly/lycra ponte), I had less leftover, around 3".

**Same with the armhole bindings on the sleeveless versions. Blue one was as-is and just matched the opening. Green/black was shortened and is still too long. It doesn't pull it in to the body.

**As per usual with Big4 patterns and ties, they are always wrong. Either too long to just tie in front but too short to actually wrap around successfully.

The blue version was first and ties were sewn as is.
On the black version I used the full size 20 length; they can wrap around the body easily.
On the green version I used the full size 20 length AND cut them with stretch. So this is my favorite. They wrap around nicely and sit snugly against the body.

Blah blah blah words...here are the pictures!!! :)

As said above, she is in the middle of a move so she wasn't photo-ready :) Hence the headless shot!


This photo was taken before the black one was hemmed. 

I traced the pattern and cut the blue one Saturday morning. By around mid afternoon the black one was to this stage. My husband walked past and said, "Wait...that's ANOTHER dress?! WOW! You made that really fast!". Yeah, the second one went super quick! 

I pressed and pinned the hems and stitched them Monday morning. Then I pressed it and wrapped them for the mail! Sent them out Monday morning and she received them today. 

People complain but I *love* the USPS! 


Why did the hems wait? Because of MINE! LOL! I traced my pattern Sunday afternoon and cut it out and serged it up. And then realized that because mine was sleeveless, the bands went in super quick with the serger and hemming was fast. I still need to twin-needle stitch the neck binding on mine. It flipped out a couple times while wearing it today.

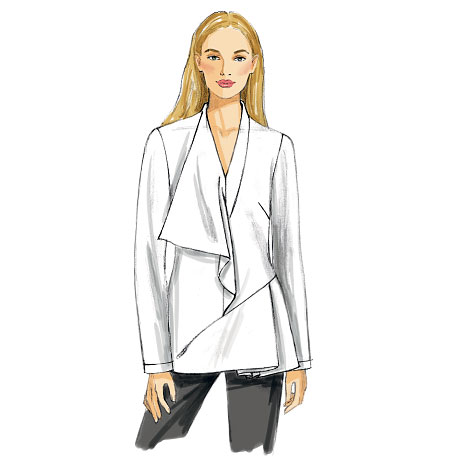
Styled with my M6884 cardigan, tights and black boots.  Which, I read on PR today that "dresses with tights and boots look bad". Ohhhh. Interesting.


Here you can see all that excess fabric length in back. And how bulky that side seam area is. 

There's got to be a way to make that work out better?? Maybe if the seam is sewn and serged separately?? Or would that create more bulk?

At any rate, the pattern worked just fine and if she really wanted another I'd consider it. 

But for me? I think I'll stick to M6884 (here and here) and S2369 (here) for my mock wraps, thankyouverymuch.


Thursday, October 22, 2015

Rounding Out October and RTW Snooping...

(this post has a lot of words!)

My failed Edith had a bit of an effect on my mojo. I couldn't work up the energy to start anything but that's okay because I had some minor mending to do and need to FINISH my NL6261 dress.

This is the type of thing perfect for sewing in 15-30 minute increments! I'll detail my timeline in the review post.


I am ecstatic over the fit through the back. No swayback wrinling. Yay! 
Post fish and chips belly non-withstanding :)

I managed to get just a touch of the white stripe at the side seam and it tricks the eye. dang it. The dress feels amazing on but I was thinking it was snug through the hips...but it is NOT the hips...it's my thigh. You can kind of see where my quads are just pulling the fabric forward a bit. I've already serged the side seams though so at most I can get about 1/2" and not sure all the unpicking is worth it. 

I'll try it on a few more times before hemming it, sit in it, etc to see how it feels. 

*******

Next up will be a blitz of NL6301. It has favorable reviews so far and I love all 4 views. 

I'll be using this green diamond print ponte I got ages ago from Fabric Mart for the sleeveless version. I envisioned it with my new thrifted blazer.


I will also be making views C (black) and D (cobalt) for my sister. 

Now, my sister and I aren't close. People seem to interpret that as 'we don't get along', but that isn't really true...we just aren't close. We never have been, not even as little girls. It's like extreme 
personality differences. So much so that it is almost comical! Shared parents, only 5 years apart yet light years away in who we are. But! she is starting a new job after a long period of unemployment and my thought process was:

I should make her an outfit! 
But I like surprises so it should be a surprise. 
Wait, sewing for someone else as a surprise is hard. 
Okay, then it has to be a knit. 
Wait, it has to be a dress. 
Okay maybe a knit top and skirt? 
But she wouldn't like an elastic waist skirt. 
Can I brave it and make a woven skirt? Heck no. 
Ok knit dress it is. 

NL tends to have a broad neckline/shoulder so I'm going to wing it and take a wedge out of the front to ensure it won't gape and narrow the shoulders a bit.

On sizing? Well...I don't have her measurements but ponte! :) I would take a 16 in this pattern and DD would take an 8 if she wore this kind of thing so I'm going to guess that my sister would need a 12. That seems about right.

So I plan to have an epic wrap-dress sewing weekend. I want to have hers in the mail by Tuesday at the absolute latest and prefer Monday.

*******

After that it'll be DD and mine's TNT M6964 pattern. 

I tested the Appleton dress for Cashmerette (I liked it and will remake it...just hated the fabric used for my muslin and the fit wasn't quite right. So hope to find something appropriate for it soon!)...Jenny sent over a paper copy of the final pattern and the bird fabric used in her model's version here:

Link to Photo

It's very nice jersey but I am just not going to wear a dress from fabric with birds on it (or owls or cats or pineapples or anything like that). No offense to anyone!!! It just isn't my thing. 

However! I will make a casual item from bird fabric! :) So DD and I will be twinning it in matching tees--she LOVED the fabric! I think mine will be long sleeved because the black/white will look cute with my vests.

*******
I have become obsessed with gingham. I need(!) a navy or black gingham top. I really liked this one at Target. It was $22.99 in store and on clearance for $6.88 online, but only in a XS! Booo!

I'll have to make my own. I might splurge on this purchase (let's just discuss the fact that it's been 10 weeks since I've purchased fabric, not counting lining for my Minoru!). So it won't necessarily be cheaper but it'll fit great and last awhile.


Bored on lunch yesterday, I went to the mall. I have never shopped Lands End and Sears had a bunch of stuff on clearance.

I really liked these white jeans! (I have one leg cuffed as they were pretty long). The waist was too big (of course), so I put them back. Blergh on the alterations. But I really liked them and should have snagged them for $13.99! whine!!


Then I went to the GAP which used to be one of my favorite retailers. They were having 50% off fall clearance and I saw lots of cute things. 

I really loved the color of these pants and was dubious about them fitting when I held them up. Well, they are basically jeggings. So, no thank you.


The peplum top was $10 final price and I was *this* close to buying it. Until I realized that in the 2 minutes I had it on, I tugged it down like 3 times. The waist seam hit at an odd place. I made myself put it back. If it is annoying to wear, I will rarely wear it and then the $10 isn't a bargain!


Lastly was this really cute sweater. It had split side seams finished with huge snaps. So cute. But you can see it's a bit snug and riding up in front. There was a crazy difference between the Medium and Large. The L looked oversized and sloppy but the M was tight. So weird.

So even though those  4 things would have cost under $60, I'm glad I didn't buy them because my car shut off today and then smoke was coming from under the hood.

Adult-ing is totally for the birds.

Sunday, October 18, 2015

Aaaand Sometimes we Fail...


Sigh. I knew I should have used my limited weekend sewing time to work on my dress but did I? No. No I did not.

I decided I had an hour Friday and 2-3 hours Saturday and a couple hours Sunday to sew. I knew I could get the dress complete. Yet I couldn't get the Style Arc Edith off of my mind.


It was the September freebie and totally pushed me to make my first ever SA paper pattern purchase.
I wanted the view with short sleeves and decided on a little color blocking...And then, Sue sewed it up (here) and I was sold. We have very similar tastes in patterns  and typically take the same size in tops and jackets (so many times I check her blog first to see if she reviewed a pattern!). When I saw that she'd sewn a size 12, I was happy - yay! That's what size I'd ordered.

Now, let's just make a list of how things went wrong.

1) Rayon challis. I have sewn challis a bunch. I like it. I have never, ever (EVER!) successfully sewn a solid colored rayon challis. So weird. But I made a TNT top (M6519) out of a teal challis and it was just wrong. Droopy and lifeless. Even though my 2 previous versions were challis as well. When I tried to make the white In-House top with white challis? Disaster. I cut the buttons off and tossed that thing. And now, this pretty pumpkin challis? MEH!!!!!!

2) Style Arc does not give very good directions. IMO it is much different from Burda. Burda may have you scratching your head and thinking 'what the hell?', but generally they give you all the info you need to get it done. Their instructions are generally very terse but you can manage. SA seems to just not give good info. AND people have noted some issues with drafting, etc.

2a) There were no directions to reinforce the area where you clip for the placket. Well, that's not a good idea. I did so anyway.
2b) The pocket flaps were too small for the pockets. I cut my pockets out, squared them back up before pressing seam allowances, etc. Both had a 3/8" seam allowance yet my pocket was wider than my flap. I was going to redo the flaps (easier than redoing the pockets), but thought I could just line the side seams up. Well, this resulted in droopy, saggy, wrinkly pockets.

3) I didn't do my reinforcing stitches wide enough so my front bands don't overlap perfectly. If those lines had been there, this probably would have been the best placket ever. There was some good here and I think if I ever attempt another placket (HA!) I will do it this way.

3a) The entire band is interfaced. The last one I did had separate band and facing and the facing wasn't interfaced.
3b) They have you finish the bottom of the placket (which is usually one of the biggest headaches) and when you go to finish the bottom you sandwich the little triangle between the two bands. This was so clean compared to 'normal' methods given on patterns!
3c) They instructed you to turn up both seam allowances. I didn't (and wouldn't) do this. Only do it on the 'facing' part. Stitch it, press the fold in place, stitch in the ditch.
3d) I liked the periodic horizontal stitching to secure the bands.

Okay, there is a lot about this top to like.

4) Soooo I have this silky soft poly crepe that I wanted to use for the bottom band. This is when the biggest woe began. You fold up the hem on the main part and then sew the bands side seams. You then layer the top over the bottom band and sew the hem in one -- catching both top and band.

Like so:


But in a slippery fabric? Oy! I spent a LONG time...a long time. I tried it 3 times. I tried Wonder Tape (which was a disaster). And then, I gave up.

Nope. Not revisiting this top. I will make the pattern again in something more stable (like a cotton lawn), but I am one of those who will toss it when it isn't working. I sew for fun, this top is no longer fun sewing!!!!


Notes:
1) NO FBA! Sue mentioned she never needs an FBA with SA patterns. This may prompt me to buy more of their tops! :)

2) Definitely need more room in the upper back.

3) Need a tad more hip room. My hip is 44" and so is the patterns.

4) Love the idea of the pockets but idk...Just probably not a great idea on a DD cup unless it's oversized.

5) Screw that bottom band instruction! Sorry. It was just insanely difficult. Next time I will do it "flat".

Before sewing front to back, I will fold up the hem and the band and 'hem' both front band back, and then sew the side seams. This will mean the top layer won't 'float' at the side seams but oh my gosh the headache I endured!!!

6) I was looking at their collar and thinking, Nope. And I just went back to Sue's review and she said she didn't use their collar and just made bias for the neckline. Yep. LOL! That's what I will do next time.


In other news...

My B5678 is finished and awaiting buttons and I think it's SO pretty!!! I cannot wait to wear this shirt!


The pretty scarf draped over was a $5 find at JC Penny! It may be more spring than fall/winter but it's pretty and it's blue!!!

Gail over at Today's Agenda is hosting a blazer sew-along using her TNT M6712. I have wanted to sew a blazer and get intimidated. I really do want to sew one and have a piece of fabric in stash that could serve as a great wearable muslin (e..g, I will actually muslin it but assuming v.1 isn't perfect, this fabric is wearable yet it isn't beloved).  I am thinking I might tackle it over the long Thanksgiving holiday.

I don't like cooking for Thanksgiving so I told my husband I will do on a year, off a year and this is my off year. We'll have dinner with family and I'll bake (I LOVE BAKING!) but this way I'll be free to relax a bit, and SEW! :)

In the meantime, I found a serviceable black blazer from the thrift store. The shoulders are a bit wide and the sleeves are too short, but otherwise I like the fit. It is an older style, I think you can tell, but I don't think it looks outdated. 


I don't know what the heck that face is but I decided it was worth publishing, as is! lol!!!

Luckily, rolled up sleeves are in.


Wednesday, October 14, 2015

WIPs and What Not

At the end of September, I had no definitive plans for October other than the Burda pants and Lekala jacket. But I can't sew any pants right now, as much as I want to.

I hate alterations. I know it's really whiny to complain about ripping out a few inches of stitches but MEH!!! With the exception of the very 1st pair I made, I need to take in all of my other V9032 trousers. Taking daily photos of my outfits has made this more important to me. I hate that my pants are droopy in the butt! I like my pants fitted, so this is not working.

As a palette cleanser (haha!) I cut out a pink version of B5678. Yes, a button-front shirt with collar and cuffs...Oy!  It's actually done now and awaiting buttons and buttonholes (I'm being gifted pretty shell buttons!); but I took this pic the other day and just never got around to writing this post until now.


My husband was genuinely disturbed by the color choice. He said I don't wear much pink and asked "But what will it go with?!". Oh boy...it will go with black, gray, tan, brown, blue, some prints...it will go! :)

As I neared the final stages of this, I was really uncertain of what to sew next. I'd posted this pic on IG for suggestions. 


Many suggested a jacket; but it's only 3 yards. And no way can I match the stripes on the front, sides, facings, sleeves...on a jacket with only 3 yards

Many others suggested a cape. I am not too into capes but even still, this is Minnesota! A cape will be good for about a few weeks at best. Then it won't be appropriate again until late April/early May. 

Husband suggested a skirt. I was sort of leaning towards a bias cut skirt or wrap skirt or something that breaks up the very regular plaid/stripes. 

I got the suggestion for a sheath and decided on that with New Look 6261 (made previously here)


This is only the front. He was adamantly shaking his head no. I told him that I like it, it's kind of preppy! He said, the preppy look is so 90s.

Oh boy.

THE 90s ARE BACK! Clearly he is not keeping up with fashion trends :-p

I've always like layered looks but always felt I was too columnar and too busty. But last year I started layering lightweight merino sweaters over my button fronts and loved it! So this is a trend I am kind of eager to try. And surprisingly, aside from 2 evening versions, I have no sheath dresses.

I was going to make this dress in navy before and something went wonky with the hips and I just hung it in the back of my closet and never finished it. But I have tried it on a couple times. I had almost decided to just finish this one, but I never staystitched the neck and armholes and they're probably all stretched out by now. Anyway, here is a version of B5678 under a version of NL6261

Looks better with the sleeves rolled up, IMO.


My sew-jo is on it's coffee break right now. Since the fabric is wool, I'll be lining it. I keep telling myself "all" I have to do is cut and sew the lining. And attach it. And insert the zipper. And hem it...and it'll be done. That's all. ;-)

We will see what, if any, sewing I get done this week!


Thursday, October 8, 2015

Finished: Vogue 8979

I'm trying to remember how I came across this pattern...probably just trying to find more interesting tops to sew??

At any rate, there were 4 reviews on PR (1 has no photo) and I could find no other reviews online for it. It's a gorgeous style!!! So I was surprised that not many had reviewed it and that of course made me go for it :-p


Right after deciding to make it I asked myself, "Self, what are you thinking?! Look at how complicated that is!!!!" But then my other self said, "You are easily an intermediate sewer, that pattern will be no match for you!"

Let's talk turkey...
1) The line drawing isn't entirely incorrect -- The pattern has back darts and there are no darts to be seen on that line drawing. (the sleeves on the tech drawing do not look full length to me, but the photo shows that they are). It oddly shows no hem stitching but the hem IS top-stitched.

2) I don't know how you would get the right side to look how it looks in the photo and line drawing with the method they provided. 

3) Vogue rates this pattern as 'easy'. From the Vogue site:

EASY
Easy-to-sew patterns but with more details than the Very Easy category. Perfect for those with limited sewing knowledge or little time. Expect a wide variety of sewing procedures—there will be more details when the techniques are simple and fewer details when the techniques are more involved. Some fitting knowledge required.

Now, this is fine if one reads the ratings and understands that easy does not mean novice or beginner. However, I often see suggestions to new sewers to get a pattern marked "easy" and I don't think they understand it doesn't mean what they think it means.

Is this pattern difficult? No. But there are techniques involved that could frustrate a new sewer. 
  • A pivot corner. 
  • Whatever the heck is happening with the right collar assembly
  • The left band is...Oddly shaped, oddly sewn plus some more oddities. It's too long too. I mean, it is cut on the bias so I assume it's a piece that could easily stretch out of shape, but other reviewers mentioned it too.
  • The way the front is finished can be confusing too.
  • The pleat in the sleeve hem is formed by making two buttonholes and then buttoning both over the button. Hmm. Interesting.
But it's so cute! And different!!! 

What I love:

1) I love the flounce. But I love all flounces. I will wear flounce any and everything so never listen to me :-p


2) I love the asymmetry. Duh. I love asymmetry.

3) I like the length more than I thought I would. I was going to shorten it but decided to leave it as-is.

4) I love the pleat! Other reviewers didn't seem to care for the smaller pleats below the larger one. I really like the effect.

5) I actually love the sleeves as-is, without the buttons. I hadn't done them yet because I didn't have anything appropriate. But I like them as they are. I even folded out the pleat and pinned it and while I like the little blousing it creates on the arm, I think I like the loose sleeve even more.

6) The sleeve set BEAUTIFULLY


What I don't love:

1) There's fabric for 3 people in the upper back. I was so distressed initially. I inserted one sleeve and thought there was excess fabric then thought, hmm, maybe that'll resolve when the other sleeve is in. Nope. Total hump-back thing happening.

****I forgot that it was suggested that the back is a length, not width issue until it was just mentioned again in a comment on my review.*****

2) I love this color and the thickness of this crepe. However, it shows every lump and bump and I am already self-conscious about my backfat. In fact, it is probably the only body-thing I am self conscious about! So combined with excess fabric and I hate the back view. Hate. Hate. Hate.

3) the narrow hem. I should have just serged and turned up a wider hem. Darn it.

4) My fabric is the same on both sides. BUT I should have hemmed the flounce the "other" way. It's hemmed before the front is assembled and I automatically hemmed it to the 'wrong' side. But the wrong side is showing! Doh! It does bother me a tiny bit.


  1. The front is 'connected' by overlapping the right over left and stitching in place. Because I am getting smarter in my old age, I used Wonder Tape to hold this in place.
  2. The underside of the flounce
  3. The pleats! :)
  4. The seam that connects the pleated lower portion to the rest of the top. I serged this and pressed it but it is bulky. I don't know what to do to make it less bulky.


  1. My invisible zipper is totes invisible! One reviewer left off her zipper. This was not an option for me.
  2. The inside of the left band (you can see some Wonder Tape! LOL!). I slipstitched by hand and still have a few inches to do. 
  3. The back is actually even up top! :) I need to insert a hook & eye. I feel some kind of way about that for a finishing but can't verbalize why.

Are you still here? WHEW!

I sewed a size 14 with the following adjustments:
3/4" swayback
1/2" narrow shoulder
1" bicep adjustment 
2" added to hip via slash and spread on back pattern piece
Moved the dart 'back' 1". I also meant to lower it a tad.
Next time I'll take a tuck across the upper back to remove excess length. 

I love the sleeveless version and will be making that one soon! 

****************
Misc:

My Making My Wardrobe Work page is updated. I've been adding photos in sets of 2, because I am also rating each outfit and it helps to do that soon after wearing it rather than later. 

I see my Rheumatologist again in December and *hope* to be 20 lbs lighter by then. I am only weighing at the end of each month because, ugh, scales. I finally took some measurements today and am 1/2" smaller at the bust and hip and 3/4" smaller at the waist. YAY! 


Sunday, October 4, 2015

Miscellany: Photo Edition


I've been wanting this style of boot but not quite sure it would fit in my wardrobe. 

Target was having a Cartwheel special so I was able to snag them for under $30. I wore them Friday with straight legged jeans and thought they were pretty cute.


Friday was my 5th Anniversary. The last 2 years have been an uphill battle but we are hopeful for the future.


Target had another Cartwheel offer for accessories. Yes. I am addicted to Target. I absolutely loved this necklace and it was well worth the $10! The earrings were on clearance plus an additional percent off so they were $1.66 each! And I *LOVE* the aqua pair!

Similarly, I have a lot of fun costume jewelry and some of it I have had for years. Like, YEARS! It's still in decent condition (probably because I have so many pieces to choose from!) but I think I'm tired of a lot of them.


So I have started a free trial subscription to Rocksbox. You get the first month free though you do need to enter your credit card info. It is $19/month and you get 3 pieces of jewelry at a time. You can keep the box as long as you like but also, once you return it you will get a new box. So the possibility exists of getting several boxes per month.

They claim each box is worth about $200 total. If you decide to keep any items you get 20% off the list price. You also get $10 credit each month towards purchases, but it expires each month. You can get $25 for each person that signs up using your referral link.  I won't be posting a referral link until I've had a chance to review.

Be clear that I am NOT shilling Rocksbox!!! :) I have yet to receive my first box so I will review the service after a few months of use.

I am also going to be taking daily outfit pics and posting them on my "Making My Wardrobe Work" page. I really want to have more fun with my wardrobe and I think documenting will help as will a fun assortment of jewelry!


When I picked out my new jewelry I happened upon the sleepwear clearance rack at Target! The top two are rayon/modal blend pajama pants ($4.48!), then there's a rayon romper ($2.03!) and a tank with a cute crisscross back detail ($1.94!). I wore my new jammies last night and they were awesome :-D


The kids' dad showed up to make the 17 year old happy! 


Yesterday I was doing laundry and noticed how many items in my closet are handmade! I was wearing 2 RTW pieces but of what you see pictured, I counted 21 items in my closet that were storebought and I think about 16-17 of them were from Target or JC Penney! LOL! 

Target is my kryptonite!

My closet is arranged by 
casual (non work) dresses
work dresses
cardigans (solids then prints)
jackets (prints then solids)
sleeveless tops (solids then prints)
shortsleeved tops (solids then prints)
long sleeved tops (solids then prints)
work pants
skirts
casual pants
And then random stuff.

I had some generic October plans but after looking at my closet, I really ned to add to my closet purposefully. 

I am still making my Burda pants, but I have the most ridiculous bloat every month and I don't trust pant making during this time. 


I fell in love with this top but I am head scratching at the directions. Hopefully as I go through it it will start to make sense.


I've done no stitching yet, but the darts on the back are pinned and on top, those are the sleeves, pinned and ready to sew.

I don't normally use a lot of pins but this is a polyester crepe so....yeah!

I have more on my plate for this Sunday than I'd like but I will do the above stitching and insert the invisible zipper. I also hope to get the front assembled (it has a lot of steps!!!!). It's one of those patterns that by the time you get to the side seams you have pretty much done 80% of the work. 

So we shall see.

Hope you're having a great weekend! What's on your sewing table?