Tuesday, March 31, 2015

A Long Time Coming: Burda 6907


When this pattern came out I had to have it. I even considered buying it at full price because I WANTED IT!!! On April 23, 2014 I blogged that the paper pattern was cut. And for some reason, I never sewed them!!!

I realized all of my casual (non-work) pants are black; black S2061, black/white print S2061, black faux leather/ponte pants (RTW), black V1411...Eek! I need non-black weekend wear - STAT!

I know how to rid myself of these butt wrinkles (my full inner thighs are to blame) 
and will adjust for the next pair

POCKETS! :-D


I cut a size 16 based on a 45" finished hip. I am starting to side-eye my pants with slant front pockets so I left them off of this pair (however, I think that caused some front wonky-ness).

What drew me to this pattern were the cargo pockets with inverted pleat on view C - YES please!  Now that I've read through the instructions, view B is on the radar! View B's tapered leg is made by taking a pleat up the pant leg. So cool! I bet you'd need something with drape though to pull that off.


I was VERY apprehensive though that you have to finish the side seams to attach the pockets. Eek! But what if they need tweaking?! Leap of faith and all that...

I stitched and pressed the pleat and because my fabric unraveled if you looked at it, I serged the edges. Then folded in and topstitched at 3/8". When I attached them to the pants I used this as a guide and sewed 1/4" away.

I removed 1.25" in length. Burda is drafted for a taller person than I! I also straightened out the hip curve.

I measured front and back crotch length and removed 1.5 inches from the front. Good grief!!! I added 5/8" to the back. I could have done without it but I have zero patience for low or low-ish rise pants. Drives me insane to have to pull my pants up every time I stand.

Dislike: The cut on fly; I do not like this. IMO a sew-on fly gives a much cleaner finish.

Construction "zoomed" right along until I realized I forgot my belt loops - oops! I attached them with a zigzag at the end of the loop and then near the fold at the waistband. Then made sure I adhered the buttons really well.

Can we talk about my buttons?!!? I had a great large button for the front of the pants but didn't have anything in stash to match for the pockets and belt loops. I went to JoAnn on lunch and almost bought some 'meh' buttons but didn't. Later that day I went to Hancock and SCORE! These are absolutely perfect!


You can see a hint of the zig-zag stitching here for the belt loops. 
I used my paisley bias tape just 'cause :-)

That stain on the lower left pic? Fraycheck. Could not get it out. 
But I'll never tuck my shirt in so hopefully I forget about it :(


Love the front pleat detail, the pockets - everything!!!

Fabric is a suiting material from FabricMart. I am not 100% sure of the blend but am sure that it's a poly blend with a natural fiber (or two?). Maybe cotton, maybe rayon...

It has some drape, took a press with a little coaxing but frayed like mad.

And can we also talk about the versatility of olive pants?!? I had no clue! After doing some Google searching I learned that you can pretty much treat olive pants like you would black pants - score!!!


red chambray NL6104 shirt, black/white Burda 6911 knit top, bright green V1436 top, mint green RTW top, chambray RTW top.

It also looked great with white (duh!), cream, navy...ahhhh! So cool!


Thursday, March 26, 2015

Me and My Bright Ideas...McCall's 5400/Simplicity 1374

I've probably mentioned my water aerobics class (idk, I'm getting old!) coming up next month. And my old swimsuit is 1) slightly too small and 2) a tankini and I really don't even like those things!

I think I bought it when I was all "but I'm a mom and so I should wear a one piece or this horrid thing" (even though I've been a mom nearly all of my adult life...) and now that I sew I get why I could never buy a one piece successfully! I am different sizes top and bottom and buying a suit meant sacrificing fit in one of those areas. Not to mention having a smaller frame with larger bust and it just never worked well.

ANYWAY, I decided I had to sew a suit! 

In the stash I have:


Simplicity 1374; I thought the gathering/ruching was very cute...


McCall's 6759: Which I planned to use for the one piece and then I opened it 
only to find I had the size that ended in a 14 ;(


Butterick 4526: which I bought because of the one piece with the little cut out. 
HOWEVER, this horrible pattern!!!!

I am being dramatic - a little bit. The pattern advertises cup sizing - yay! But that's only for the plain front. Seriously. The front with the cutout is for A/B cups and the plain front has a C/D option. How LAME is that?!?

So I decided I wasn't going to make that stinking suit. Yep. I am a 4 year old on the inside...


McCall's 5400: Bought long ago because it has tons of options and it has been made up quite a bit. 


Closet Case Files Bombshell: Bought it; planned to follow along with the sew along. Decided not to...realized there was something I didn't quite like...

It's the butt ruching. I hate it. But then SewBrunswick recently sewed it sans back ruching and I like it more! I might sew it up this summer.

So. When I get an idea in my head I have to do it now, now, NOW! I was able to snag some swimsuit fabric for muslin'ing at a recent meetup and then realized I had some other scraps in stash (FabricMart bundles). I had no clue how much little fabric would be needed!

I started with the ruched bottoms from S1374. Now, in the photo below (they are striped) yes, the top will be ruched down a bit but still; they were HUGE!!!!

I then cut a size and a half smaller (the orange pair). The navy pair is a pair of RTW that are just a bit too tight.


I knew then that the 16 top in that pattern would be too big. So I pulled out M5400 and traced off view E, the longer top.

It was too long/too short -- too long to be flattering as it hit right at the belly fluff! Ugh. But too short to just smoothly fall. I would have to make it a true tankini type top and have it bubbling around me in the water which I DID NOT WANT. So I decided to go shorter and make it more of a longline length.

No muslin photos as there was no lining, no support, no padding so uhhh...yeah :) 

I'm organizing for a garage sale so pardon my mess :)


I cut a 16 bottoms (S1374, view C) and added an inch to the rise at the side seams as I like the sides nice and wide but don't like a high-waisted look (I don't have much of a waist!).

For the top, I did NOT have enough room in the cups but had too much room in the body so I went down to a 14 C/D cup and added 1" to the cup at CF tapering to nothing at the side seams. This worked out great! It is very unfortunate that they included cup sizing for full busted women but no help on adding necessary support! WAH!!!!!

The strap at the neck is just bad. Far too long. I might turn them to cross back straps but for now I cut two 18" strips and it is tied at the back, halter style.

I lobbed 3" off the length of the center front tie. Also, the instructions have you leave part of the seam open near the end to turn it and then slipstitch it closed.  I left an opening in the center and topstitched it closed -- the center of the tie will be wrapped up in the knot and not visible.

I added Dritz foam cups in size C/D to the lining (this was SO HARD!!!). Hubby had to unpick stitches for me on the first one, then I got the second one in fine. And when I re-did the other one  -- success!

I also wanted to add elastic (like a shelf bra) once I realized I had no bloody clue how to do the boning in the sides. So the lower front lining/fabric was treated like one layer but I kept the upper lining/fabric separate. It's messy but it works how I envisioned. I also stretched the elastic while I sewed it here.


I read SO MANY blog posts that I can't even begin to share where I figured out what!!

I serged the lining to the fashion fabric, treating most everything as one piece. I then stitched as normal. I inserted my elastic by feel; attaching it to the wrong side of the suit with a zig-zag stitch and then turning in and topstitching with a zig-zag stitch. I followed the general wisdom to do a 1:1 ratio at the front of the leg and stretch through the crotch/back.

I will also add elastic to the top of the bra top and will hem it with my twin needle.

It certainly feels supportive enough for water aerobics as nothing seems to rise/fall/move while I'm moving around in it.

I am not nearly as eager to 'make a whole bunch of swimsuits!' as I was before I started! LOL!!!! Now that I know a 14 is more appropriate, I might try M6759, View B (with a thicker halter strap) as backup and I might post 'real' photos o_O we shall see.

And I might pick up M6569...Once you look past the pattern envelope

Because I could never wear a top or like that and would never wear all those ruffles and ruching...


...you see the gold mine that is view A!!!! That can be extended to a longline length and it already has the structure in place for padding/boning - yay!!!! 

I'd like to get the fit of that top down and use it to make one of these cute bikinis with a flounce for vacation.


Saturday, March 21, 2015

Top-A-Palooza! Burda 6911, New Look 6104, Vogue 1436

Hey, I warned you there would be a sew-a-palooza!! Of course now I'm burnt out! :) This is one epic blog post - sorry - but easier to just do it!


Vogue 1436 caught my eye when it was released. I love a good shirt and the details on this one were especially nice.

I would love to have used something sort of drapey but am not friends with those types of fabrics currently ;-) I chose a cotton lawn from Fabric Mart in "spring green".

When I pulled the pattern out I was surprised that I'd chosen the larger size range. I must have done that because of the pants...So I was stuck with a size 16 which, I normally cut a 14 and FBA. However, I have noticed that I do in fact need a 16 in Vogue patterns! Perhaps just a smaller FBA. Hmm. We will see on version 2 because there WILL be another one!


Next time I'll do an FBA and rotate the dart into the pleats (I know how to do that now!). Something went wonky with my casing for the strings. It's not noticeable but next time I'll baste it in place. It must have shifted while sewing the collar on. 


See? Need an FBA for extra length over the bust. And, I totally needed a full bicep adjustment. Sheesh. And the sleeve is just a bit too long. But not much, 1/2" max.

I removed 1" from the length as a 27.5" finished back length made me all crazy. I like where it hits now.


I love the front pleats and the mandarin collar! And I did my first rouleau! yay!!! I was so petrified about that and was going to leave it out. But once again, Fashion Sewing Blog TVs YouTube channel to the rescue! It was pretty danged easy.

The sleeve closure! LOVE!!!!!!  This is totally what drew me in to this pattern. Swoon. I had used a nice purple washaway marker to make all my marks and had the top ready for closures so I decided to wash it. Aaaaand of course washed away all my markings! LOL! So I just eyeballed the snap placement on the sleeves and this one is a little snug against the D-ring.  The pattern called for 1/2" rings but I could find no such thing locally. I used 3/4" rings.

Burrito method baby! The pattern of course has you folding the sa and topstiching and al that...nope. I'll just burrito it thankyouverymuch!

The saga:

I decided I had to do snaps vs buttons and went to look for my snap tool. Couldn't find it anywhere. I knew I had it because I used it in February for the Burda crop top. Looked high and low. Nothing. So I bought another one. (Of course I found the first one, this morning). 

Anyway, I set the 'male' side just fine and did the smaller ones on the sleeves. And then went to set the others. First one - great! Second one? All h3ll broke loose! I reset that thing 5 times. I thought I was going to ruin it! I moved on...Came back to the second one and set it. Great! 

Uh oh.

I had done one of them backwards. COCONUTS!! (A replacement word my then 3 year old nephew used when I told him "aw crap" was unacceptable)

I found a sturdy pair of tweezers and popped it off. Well I popped one off. The wrong one. SERIOUSLY!  Then the last snap well...I realized I had run out of 7/16" snaps what with all the ones I RUINED. Hmmph. The last snap is a 3/8". Shhhhhh. It's only 1/16th smaller, no one will notice! haha!

In the end, all is well with the green top :) It's a great addition to my spring/summer wardrobe!

*****

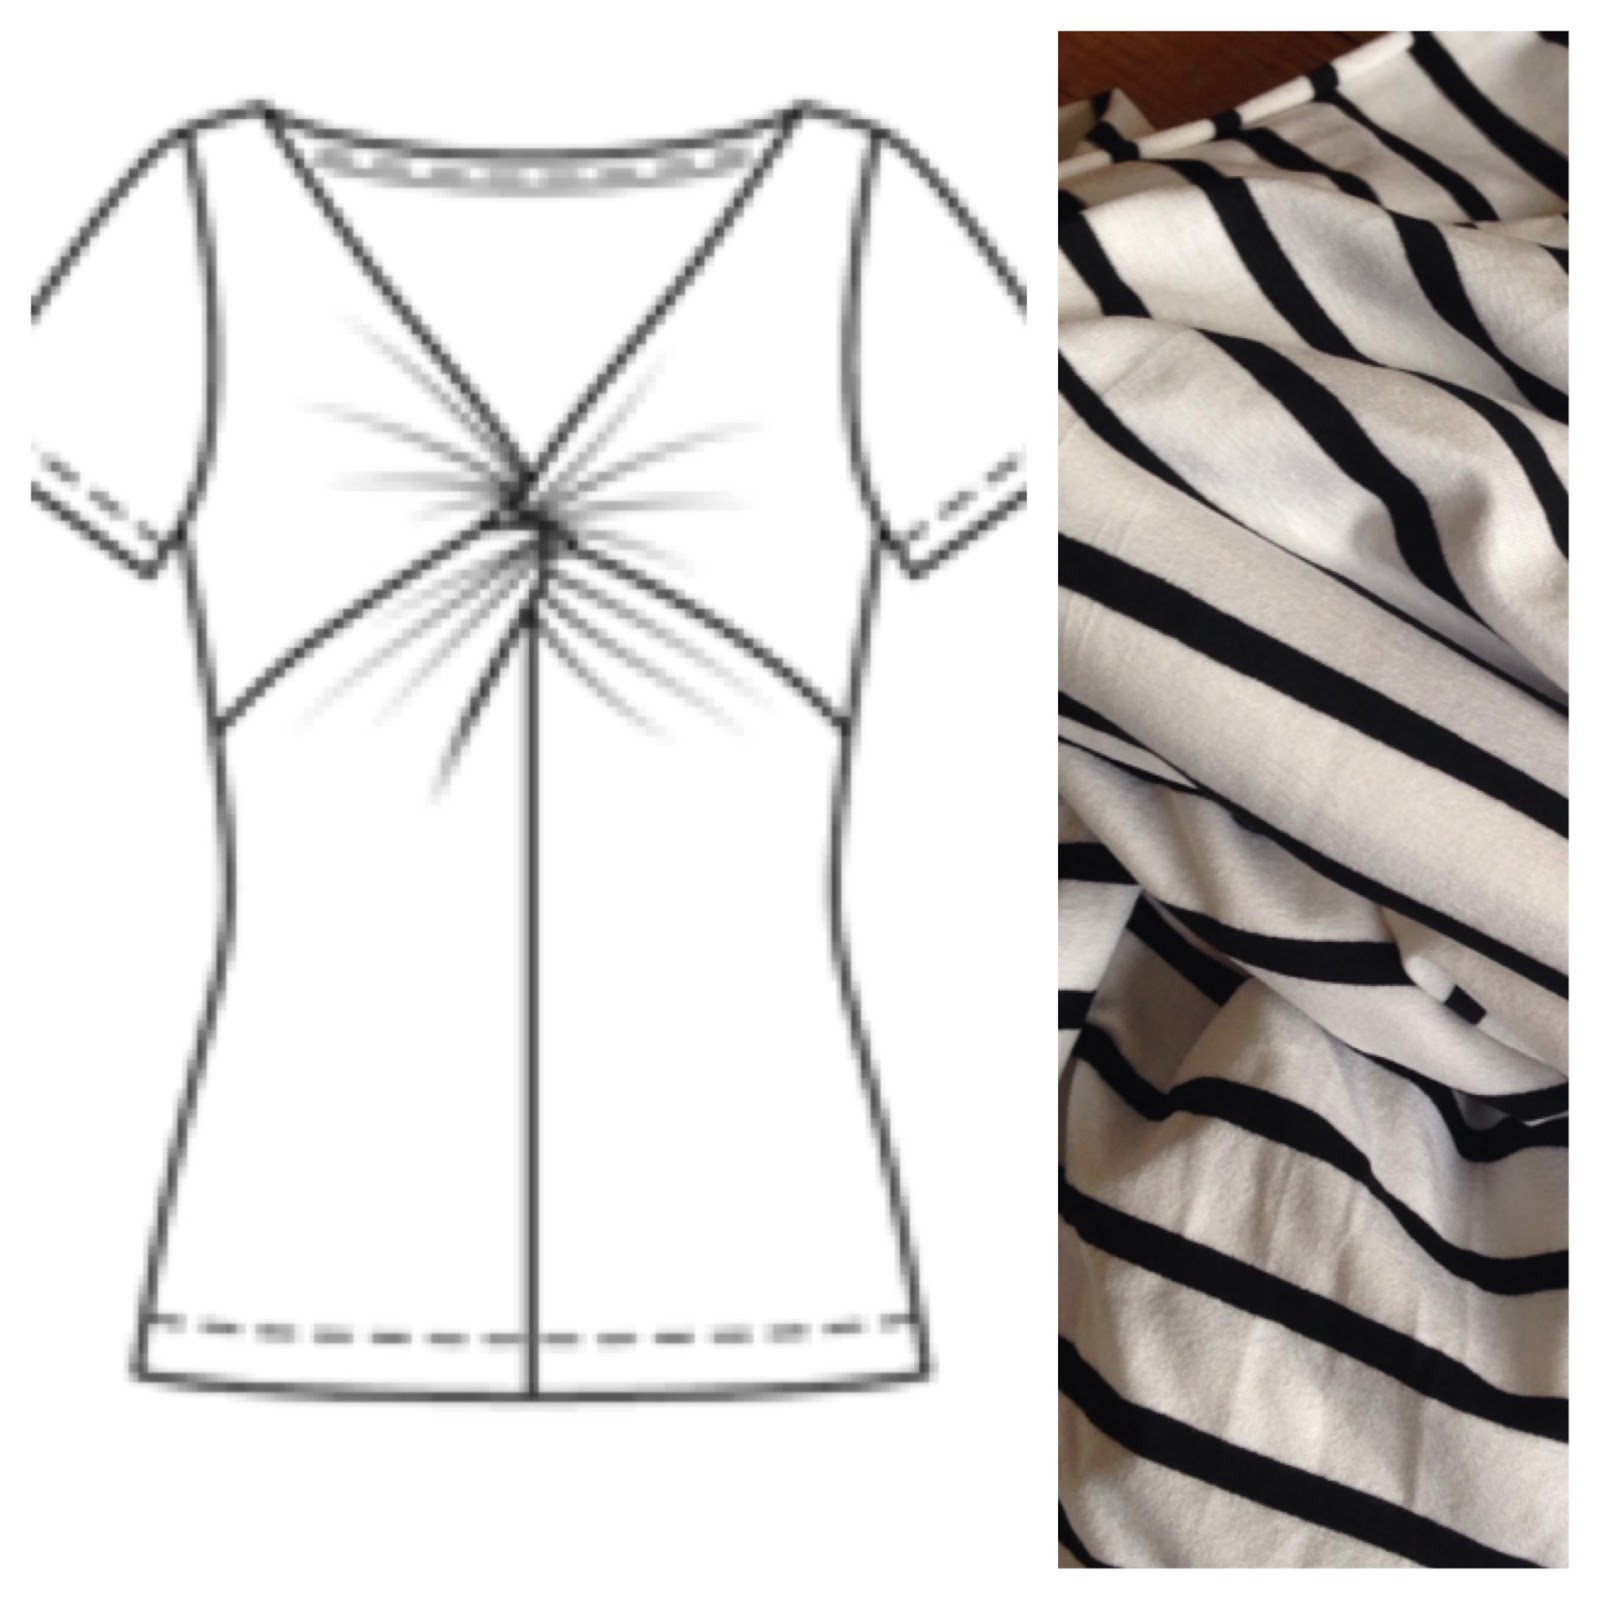
Next up was Burda 6911. I had 3 yards of this striped fabric so I figured it if it went horribly wrong, I could cut another one. I was feeling confident though after reading all of the reviews on it. 

The front is so convoluted that there was no finished bust measurement, but there was a finished hip measurement (I also measured the waistline too for that finished width). This top had tons of negative ease but I was afraid to cut an 18 because I didn't want the neckline to be big...yet I had no clue how to add to this crazy shaped front pattern piece!

I sewed the center front seam at 3/8", the shoulder seam at 5/8" and the sleeve/side seams at 1/4" (with the exception of the sleeve hem and under arm - those were at 5/8").

I did the majority of the construction on the sewing machine. Just easier to manage all those odd seams vs using the serger. I did finish the side/sleeve in one pass on the serger...but the bulk of the work was on the front pattern piece.


I wasn't sure about it when I finished it and then my friend said that it was hypnotizing her into staring at my boobs. HA! And then my husband was holding my phone hostage, staring at the picture, and then told me to "send him the pic" and that if I "wear that out in public I am "traveling down a slippery slope". (he jests, of course). :)

I like it and I like it A LOT with a cardigan/jacket. And I will be making it in grey for the wardrobe contest.


Also, this top is LONG. Is there draft for someone 5'8" or something!? I chopped 1.5" off the bottom and did a 1.5" double turned hem. 

I did an excellent job matching those seams on the front and side - yay me!!!

Do you see that line on the side view? I think now that I know that's the underbust seam, that I can do some sort of cheater FBA to get more bust room. I will also remove some of the curvature through the waist -- I'm not nearly as hourglass-y as Burda thinks ;-)


SOMEONE didn't read the directions thoroughly and stitched a gorgeous back neck band. When I went to attach the front to back I realized I was supposed to fold the back band to the inside. I didn't want that unfinished intersection so I handled it like one would a cowl. Wrapped the front facing piece around the back and stitched. It worked really well on one side; not so much on the other. I then topstitched the back with a twin needle.

The two lower pictures show 1) the front facing. So nice not to have to finish that front V! It gets caught in the sleeve seam! and 2) the twist is done by leaving a small hole in the end of this fold. Instead, I stitched the seam and stopped short of the dot; and then stitched up part of the other side so it would be reinforced on both sides of the hole.

*****
The last palooza top was one I made previously, New Look 6104. I've made it 3 times before; the first one was too big, the second was a lovely purple chambray that I had to sew with smaller seam allowances. But I didn't yet have my serger and it unraveled right through the seam. The last one suffered from bad fabric. Sigh.

This chambray is so nice. I originally got it for a shirtdress but I think it has too much body.


I like it more with my cardigans/jackets. The length is so perfect.


I cut a size 14 and did a 3/4" FBA (which I didn't know how to do yet the other times I made it!). I seem to still need more length over the bust.


I harvested a bunch of buttons and zippers during my closet clean out. I got these from an Express shirt and flipped them over so the text wouldn't show.

And I made PAISLEY bias tape! Yes! YES!!!!!

I used white thread cause uhmm...lazy?

I had JUST been complaining about how crap my buttonholes are lately on my machine and then it performed pretty well today. I think it's fine when it's real super sturdy fabric. Buttonholes on knits? Nope. My machine says NO.

So now I've got 5 of my list of 10 sewn, and one is being held off on til the start of the contest. I don't think I can sew the other 4 before March is out, I have to start my daughter's semi formal dress.

I'm tired. LOL!

Thursday, March 19, 2015

Finished: Butterick 6169

Nope, I didn't think I would make a lined jacket right after making a lined coat either...I am SUCH a glutton for punishment! I did make that little knit top in between...

ANYWAY :)

I have wanted this simple kind of asymmetrical zip moto-inspired jacket for a good, long while. There was Burda 3/2012  that was almost there (not asymmetrically zipped). The infamous Style Arc Ziggi (collared and too outerwear-y) and Kwik Sew 3764 (collared)...the "ehhh...maybe" Simplicity 2056 (collared, outerwear-y)...The new Burda young 6800 (so much collar)...

So many not.quite.right. options. (I'm being super dramatic, I know)


And then I saw the Butterick pattern and said, YES! Yes, that's it!

And then I cleaned out my closet and knew I needed a gray cardigan or jacket. And then I found this extremely lightweight wool in my stash (purchased from a Spot the Bolt! sale at Hancock I believe). And THEN I found this white zipper with silver (nickel?) teeth. Ah yes. Yes please!

I am on a slow decline (wrt my weight) and decided to go for a snug fit now -- e.g., wearable over sleeveless tops (woven or knit) or close fitting knit tops with sleeves -- and decidedly more 'jacket like' 10-15 lbs from now.

I cut a size 14:
finished bust of 42.5" (just barely 3" of ease)
finished waist of 39" (mine is 34")

Miraculously, the fullness of the bust was in the right spot (I usually have to lower it) and the shoulder wasn't insanely wide (usually have to narrow it!)

I sewed the seams between the front and middle front at 1/2" and I did a 1/2" swayback adjusment.

The sleeve width was 14.5" and 15" is more appropriate so I did a full bicep adjustment using the Fit for Real People method of slash/spread on the upper sleeve only. YAY ME!

Scored a hardcover version of the book on 
PR classifieds!

I should have measured where the jacket would hit (high-ish hip) but didn't, so I ended up sewing the side seams at 5/8" tapering to 3/8" after the waistline.

The sleeves are pretty much the perfect length so if you've got short arms, make sure you check that.

Hmm...other things I love:
  • There's a back facing - THANK YOU
  • There's a separate pattern piece for the back lining that has additional ease built in and ease pleats - YAY!!!!!
  • You're instructed to cut the lining pieces slightly shorter (I usually do this anyway)
  • wool. Sew all the things in nice, well-behaved woven fabrics like wool, cotton, linen or blends of these. Goodness gracious <3
Things that made me sad:
  • Oh.my.gosh. You are to assemble the jacket and lining and join them. Then attach the sleeve lining to the sleeve and do some crazy slip-stitch madness. I don't even KNOW what they were saying because I was all 'AIN'T NOBODY GOT TIME FOR THAT!' in my head.
  • The tiniest, useless pockets in the history of all the world.
Things I did differently:
  • Interfaced the hem (jacket and sleeve hems) to get a nice, crisp finish
  • Made my own shoulder pads
  • Bagged my lining (so sorry, so lazy for miles of slipstitching)

And now I've got a moto-jacket of AWESOMENESS!!!!!!!!!!!!!!!!!!!!!!

If you follow me on Instagram you have been subjected to half a dozen in-progress photos :) Aaaaaaand now a ton more! haha!


Absolutely LOVE it


The back unzipped


The back, zipped. See how it doesn't quite fit around my high hip? it's okay...


On Lily


It's so cute zipped!


My hand is all the way in the pocket. They're SO tiny.


Nice and tucked away zipper


I couldn't get this side as crisp as I'd like.


I used a matching lining! :GASP: 

Here I tried it on over this oversized shirt and it still fit but boy was it snug! LOL!


It was also pretty cute over a dress, with workwear and now I want a floral one!!! **What would one line stretch cotton sateen with??

I also sewed 2 tops today  (V1436 and Burda 6911) that need the last bits of finishing so hopefully this weekend I can get them done and photographed!!

Yes, I am now done with 4 of my list of 10! lol! I have also changed my wardrobe (of course) so now only 1 top from the list needs to be held out until after April 1.


Friday, March 13, 2015

Finished: McCall's 6078 and March Sew-a-Palooza!

Did you see my last post about the great closet cleanup? Look at this pile of hangers!!!


I've come up with 10 immediate "must haves". No, I'm not going to sew all 10 this month alone! haha! But I will make a nice dent. I will have lots of time to sew from next Tuesday through Friday and I will be making the most of it.

Besides, you all know if I need to get some fast sewing done, I can get some fast sewing done! ;)

So, I decided I need:
2 woven tops with sleeves
2 woven tops w/o sleeves
2 knit tops with sleeves
1 knit top w/o sleeves 
1 vest
1 jacket
1 cardigan

I could really use a pair of lighter pants and will try to squeeze those in in the coming weeks as well.

Tops:

Starting with the sleeveless knit, since it's done (yay for pattern's that have been made before and sergers!)

I made M6078, view B from this really pretty navy and white diamond print ITY from Fabric Mart

Size M
1/2" seam allowance through bust and waist
narrow hems on arm openings and 2" hem (turned up 1" twice and twin-needle stitched)

As worn on Thursday
This has become one of my most favorite patterns ever. Swoon.


Already mentioned B6169 was next, I cut the pattern pieces out today, will do some measuring and hopefully get it going this weekend.

It'll be made in a gray suiting fabric 


Burda Style 07/2013 #103 in an ivory rayon challis 


 Vogue 1436 in a springy bright green cotton lawn (this color is all wrong here)


New Look 6104 in red (not pink) cotton chambray (this pattern has been made 3x before)


Simplicity 1916 in a colorful jersey (pattern made twice before) 


Burda 6911 in striped jersey. I will muslin this one to check that twist and the depth of the v


Butterick 6026 in a lightweight navy polk-dot cotton sateen


Simplicity 1499 vest in a deep red-orange (more orange than red in real life) cotton twill


Lastly, I have this white jacquard double knit. I originally bought this for more of a jacket but it is not very structured at all. I need to do a little more thinking on what kind of cardigan I want from it. Initially I was thinking S1945, which I like, but I don't want it to read 'couch or curtain'. Maybe something more fitted?? We shall see.


At any rate, I kinda want all of these in my wardrobe like - NOW!!!!!!  With any luck I'll have the Butterick jacket done before Tuesday and can knock out at least two of the more time consuming tops (buttons, collars, etc) during my sew-a-palooza days :) and will go from there.

The wardrobe contest was just announced on Pattern Review!! I will angle the sewing plans to meet the contest rules:

4 tops
3 bottoms
2 choice (ONE item may be previously sewn or purchased)

Each top must coordinate with each bottom. If a dress is sewn it must coordinate but can be worn alone.  

I *love* the wardrobe contest! :-D

ETA: A Style Arc sale and a dress needed in May and ta-da! Mini wardrobe planned. 


So from my above plans; I will save the Butterick shirt, Burda tank and Simplicity top for the contest. Still...I'm going to be busy!!!

The moto jacket will be my one "previously sewn" item.

Happy sewing!!