You'll have to forgive the photos. I was losing daylight by the second and won't be able to do photos again until Saturday. And I already have FOUR other things to blog. I couldn't get further behind!!!!
On with it!
When the preview for October came out, all I could see was this "top". Then I learned it was a sleeveless top and capelet combo.

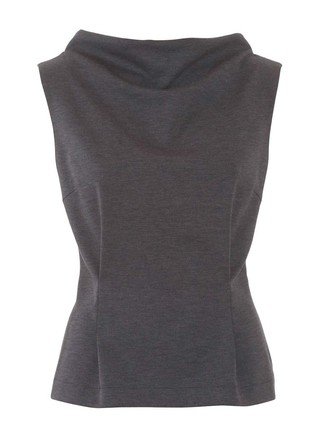

The cowl and back bands are integrated (it's a weird pattern piece!). It has release pleats in front, bust darts and darts that release in back.
It is shown once as a knit and once as a woven and includes a zipper. With the low back, in a knit, a zipper is not needed. Also, Dawn at Two On Two Off made it in a woven and still eliminated the zipper. So ymmv.
I was extra happy when I saw that it was the sewing lesson pattern - yay!
Sigh.
Still Burda-fied. I don't know what in the heck they wanted me to do with finishing the neckline. No clue. At all. Like, I don't even know. Total make it work moment.
Maybe one day someone more experienced than me will post a show and tell and make this make sense because it is a beautiful top. I have some fit issues that would need correcting but I would totally make this again!!!

The back bands are gaping on me. The top pic on the right is where I attempted to pull it in a bit closer to my back. I just sewed it diagonally, but I need a better fit at the shoulder as well.
I used a size 40 through the neck/shoulder and 42 for the rest.
I typically do not need an FBA or to lower bust darts with Burda.
I meant to do a swayback adjustment -- forgot. Dang it.
I used bindings on the armholes instead of the included facings. Bad idea. The shoulder is a bit dropped and I think it looks weird with the bindings.
I added a 1 1/4" hem allowance (which I normally skip hem allowances on regular sized Burda patterns). I removed 3/8" and still used a 1 1/4" allowance.

I think it's so cute!!!!!
I did make another silly mistake; there is another pattern that uses this cowl. For this pattern the top part should be about 7" shorter! hahaha! So I'm going to chop it off and re-hem. As is it's crazy 'tall'! FYI in the other pattern it is folded in half so still; not intended to be a ginormous collar :)
I can't say I'll make a bunch of these :-p but I will make the top again. I think it would be beautiful in a woven. I'll have to muslin that.
I kind of want the other pattern too that uses this collar; need to go digging in the stash for a fabric.

And FINALLY!!!!!! I made the skirt from the August issue!!!!

SWOOOOOOON!
I would totally make this in a stripe for chevron or in something with drape. Ahhhh.
As it were I used a double-sided suiting fabric (composition unknown; it doesn't love being pressed without lots of steam).
I used a 42 for the front and a 44 for the back (that's my new thing with skirts; works wonderfully!).
I added no hem allowance and hemmed it 1 1/4" using catch stitch. Next time I'll do slipstitch in the back, at least.
I added 1" side seam allowance (3/8" everywhere else). I ended using 3/4" seam allowance at the waist and 1" for the rest. I will do a slash and spread to add the needed waist room.
I used a lapped zipper instead of invisible and made a tab with button.
I. Love. It.

Love.
I can't tell you how many times I've tried it on. The asymmetry is very subtle. It's higher at CF and slopes down to the side seams, which then dips down in back.
Did I mention that I love it?

The front sits nice and flat. It sits a little higher on the waist

My daughter has this thrifted skirt (cobalt blue, 100% wool, lined...it's gorgeous) and I was looking (admiring!) at it recently. I loved the lapped zipper and button tab and decided to use that on this skirt.
I just seem to favor a lapped zipper on skirts lately :)

Insides!

Totally should have slipped stitch. Dang it.

I realized I was putting this project off and had to figure out why.
I was afraid!
Reading the directions I was all "WHAT THE HECK?!" with the back waistband but front facing. "WHY would they do that?!?"
And not nearly as complicated as I was allowing my brain to make it out to be. The back piece is just "short" the amount of the waistband...once the back waistband pieces are on then it's easy-peasy. I sewed the side seams through the facings, understitched the front facing, pressed everything, and stitched in the ditch on the back facing.
I like how it can read as grey; and plan to wear it as pictured Thursday or Friday!

*********************