Showing posts with label PR Contest. Show all posts

Sunday, July 20, 2014

Mini Wardrobe: V1395

First things first...

THIS DRESS TOOK SO DAMN LONG!!!!!!!!

I seriously thought I would finish up my projects this weekend but holy cow! Yes, we had a sort of busy one and I didn't sew at all Friday night but good grief! Between the binding and the french seams and the narrow hems...ACK!

But I finished it and I LOVE it!!!


My husband doesn't like it. But he doesn't like anything I make that is loose/flowy so I wasn't surprised. But then he said, "It makes you look wide." I happen to disagree. I think he dislikes the fullness from the elasticized waist but I am digging it so...I just won't wear it on date nights! :-p

Specifics:
*Time to complete: Forever

*Fabric: A lot of rayon challis and a little cotton voile 
I was going to get the bemberg but I didn't feel like going to JoAnn so I dug through the stash and found this pinkish-purplish cotton voile

*Thread: I went with red since it was the dominant color; it works.

*Size: Straight 16
I need to get it through my thick skull that I need an FBA. This has plenty of circumference but not enough length. It slightly rides up in front. Next time I'd cut a 14 and do an FBA. I'd also lengthen the bodice about an inch for some blousing.


Wide??


Construction wasn't difficult EXCEPT for the stupid shoulder sleeve! Will someone please read that and interpret what Vogue is trying to communicate!?!? Please!!!!

I hate this casing method. Hate. Hate. Hate.

I french seamed it all...time consuming but worth it. There are bias bindings applied to the neckline and armholes and it's done flat. THIS IS GENIUS!!!!!!!!!!!!!!!!! 

The lining was just serged (hey...no one will see it!). I serged the hem and turned up and stitched. For the fashion fabric I did a narrow hem.

Oh and if you're a tall person; this will be a mini dress...may want to lengthen it.

Hmmm....what else...the armholes area  bit low, even with the overlay. And the overlay makes it almost impossible to lift your arms up. I mean, how much arm lifting are you doing in a dress?? But still...

A very pretty dress that takes awhile but is worth the effort!

Thursday, July 17, 2014

Mini Wardrobe Update

I whined and moaned and groaned and decided to move forward with my sewing and whaddya know...I have a new mini-wardrobe plan!

One thing I've wanted to sew this summer is the Rebecca Taylor Vogue 1395


It's a simple but cute dress and has been made up successfully by several bloggers!


Morgan of Crab and Bee


Niema of Wearable Muslin 

Jamie on the Denver Sewing Collective blog

So I spent a whopping $5 on the pattern and put it in queue. Well my lime-sorbet-twill-disaster moved this dress right on up to the top of the list!

I only have the front of the bodice done; but it's a little bit of work; cut, apply bias bands to the neckline, top stitch, sew the CF seam, topstitch...Hopefully tonight I can get the rest of the construction done and hem it this weekend.

Can I line rayon challis with (poly) pongee? Or should I go for some lightweight cotton fabric? 

When I was still in my 'woe is me' state; I cut out M6754 in this mint(?) green ponte


I realized that with only a tweak or two; I am still well into having a 5 piece mini wardrobe completed!

Dress Progress:


With blazer:


So now my mini wardrobe will be:
B5926 kelly green blazer
V1395 dress 
M6841 white drape top
M6754 mint peplum top
NL6130 dark stretch denim pants


Thursday, July 10, 2014

Mini Wardrobe: Butterick 5926

Last year when I made this jacket, things went okay...but not well


 The collar gave me fits and the shoulders were WAY too wide.


When I decided to use this pattern again I was all "BUT THE COLLAR!?!?" The instructions are NOT good enough to get you a well-done collar. Not. At. All.

But I was determined to get a nice lapel so I didn't allow myself to freak out about it. I thought to myself, I thought, "Self; 1) you are a much more experienced sewer than you were in October and 2) get help before you start."

I was pointed towards this great tutorial by Sherry of Pattern, Scissors, Cloth: HERE. The only thing is she uses black fabric which we all know is a bear to photograph. So I missed some of the details and ended up unpicking stitches and checking and sewing a few stitches and checking and sewing a few stitches and...yeah. It went like that.

I think the ultimate takeaway is: 
  1. Mind your seam allowances!
  2. Trim/grade your seams!!(!!)
  3. Clip your curves!!!
And for all my hardwork...I got a nice notched collar!


I stabilized the hem with fusible knit tape


Back shoulder darts (need a better pressing - oops!)


IMO this pattern has a great sleevecap that barely needs to be eased in at all. They went in flawlessly on the grey version and this one too!


I'm a sucker for a little contrasting serger thread! I know it can be taboo for some but I like it! I'd bought extra spools of green thread (bless you 1034D and your ability to use regular spools) but after making some tests I decided I preferred the white.

(Facings will be catchstitched...)

I remembered to move the pockets forward a bit; but only like 1/2 an inch. They were just a tad too far back on the first version.


The center back seam that helps with the lovely swayback


I remembered to narrow the shoulder (by 3/4"!)...but didn't realize I needed a vertical FBA so I have some draglines again.

(I think I need to shorten the sleeves a little bit.)


It doesn't look so wrinkly in real life...And it's all soft and cuddly! It looks reallllly cute with my other mini wardrobe items too!! :-)

I was going to make 3/4 sleeves but duh. I live in the tundra. It will only be short-sleeved weather for about 8 more weeks. And then the 28 weeks of cold and then... :)

I think I'll take the sleeves up a little and give all those darts another good press. I need to do the buttonholes (even though I never even cut them open on the grey one!).

Oh! And I'm thinking about this button:

I think it works well with the color!

Other thoughts...

Beth of 110 Creations mentioned here, in her trials with this jacket about something strange happening when the facings are attached. I completely agree.

Something goes a bit wonky in the area where collar/shoulder seam/facing all meet. I don't have enough experience to say WHAT's wrong just know that it is a little off. And I don't think it's the bulk...when I made B5927, it's not weird in that area at all and that was with a denim-type suiting fabric. This is a not-quite midweight knit. But again, I can't say for sure.

This pattern was actually pretty fast.
7/5: I cut it out (~30 min)
7/6: sewed all 6 darts, sewed CB seam (~30 min)
7/7: sewed patch pockets, sewed fronts to back (~1 hour)
7/8 a.m.: interfaced collar (~15 minutes)
7/8 p.m.: sewed collar to jacket, interfaced facings (~30 min)
7/9 a.m.: sewed one side of collar/lapel/facing (~45 min - there was MUCH stitch unpicking!)
7/9 p.m.: finished collar/lapel/facing, set sleeves, hemmed (~2.5 hours)

The only "marathon" sewing was last night...I am a firm believer in squeezing in a few minutes of time where you can. I'll sew the buttonholes tonight, handsew the buttons and catchstitch the facings. Done and done.

We have a busy weekend of softball so I will probably start my cropped pants. Pants work very well being done in tiny increments. If I'm lucky I'll get them done over the course of the weekend and get my shirt done over the first half of next week. I have NO free weekends again until August 8th!


Saturday, July 5, 2014

Mini Wardrobe: S1373 and M6841

When I first saw McCall's 6841 I was all...meh...there's like 37 yards of fabric there...not flattering...


But then it started popping up allll over the place. And on other ladies that aren't twiggy like the model...and I got intrigued.

I am SO happy with this top!!!


At one point during cutting, I realized I was on the XS line and fixed it. But I really wonder if I cut my sleeves on the wrong line. Not complaining though as I am totally in love with this top!!

My only beef with the pattern is the lack of direction on finishing the sleeved version. The sleeveless and this one use the same pattern pieces. The directions stopped at finishing the armholes on the sleeveless version but doesn't tell you how to finish off the sleeves (there's a seam on top). I had to pin it to Lily to figure out what I needed to do.

The burrito method of finishing off the collar works well.

The only other thing I might do is some topstitching on the opening. There's a big seam allowance there but with the drapey fabric, it wants to flip out sometimes.

Oooh! I stitched up about 2" higher than what was indicated on the pattern.

But yeah...it's LOVE! :)

**************************

Shorts are Simplicity 1373 in an ikat cotton sateen. Easy, peasy, lemon squeeze.
2 darts each front and back
inseams and side seams
crotch seam
lapped zipper
hem (I did a blind hem)

I decided to add a 1" waistband because I'm not with the whole "twill tape to finish" thing. I used a straight one even though I really need a curved one.

I couldn't match across the side seams. I had my fronts cut out and matched across and then realized oops...I can't orient my back pieces in such a way to match the side seams. Ah well.


Next up is the Butterick knit blazer in kelly green!

Friday, June 20, 2014

A Mini Wardrobe Plan (And Finished McCalls 6654)

Last year I was SO excited (SO!) to sew a mini wardrobe for the competition on Pattern Review. And then disaster struck.

Mystery illness hit in September and I did not sew a single stitch, nor did I purchase any fabric or patterns or notions and I only had TWO blog posts that month!!!! The horror! I did not feel up to participating in the contest for October but I did sew my own little capsule wardrobe. Sadly it mostly ended in tragedy.

Pants #1: Made out of mystery growing fabric; no longer wearable.
Pants #2: I sliced the leg open and my repair did not work.
Blazer: It's just too big in the shoulder to be comfortable.
Top: I did not check the waist placement and the elastic sat way too high to be comfy

The other two items are staples; the black ponte cardigan and white lace kimono tee.

This year's contest involves the sewing of 5 items in order to make 6 outfits. The 5th item can be an accessory as long as it's wearable (think hat, scarf, belt, etc).

I plan to sew 5 garments from these lovelies and yes...most are from my recent acquisition! :)

 Kelly green ponte
white slubbed jersey
navy cotton poplin, 
lime green stretch twill
black/white ikat sateen

My pattern choices:
Butterick 5926 blazer in kelly ponte
McCall 6841 top in white jersey
McCall 6702 in navy poplin
Simplicity 1696 in lime twill
Simplicity 1373 in ikat sateen

  • The blazer is the same as the aforementioned "failed" pattern. But I know what to do now to make it fit...I will probably pull the old one out and make some adjustments to it to ensure I'm on the right track.
  • The M6841 top hasn't been made but everyone swears it's relative easy with one tricky bit.
  • M6702 will be made in a r/w/b voile for wearing on Independence Day! So I'll get to work out any kinks then.
  • S1696 is new to me BUT since my now TNT pants and shorts are both Simplicity patterns and this is an Amazing Fit pattern, I feel confident about comparing them to the others and sewing them up.
  • S1373 is also new to me. I will work up a quick muslin (since I love that sateen!) to ensure they fit. I wanted an uncomplicated pattern to showcase the sateen and limit pattern matching. Initially I thought skirt but I will be more likely to wear shorts so...
Now, I cannot win this contest. I am ineligible because I won the Fitted Blouse contest. But that's okay! This little capsule makes me happy so I will take on the challenge!


*****************
I made a skirt. A simple pull-on knit skirt out of the yellow ponte I got from FabricMart. There is not a whole lot to say about a knit straight skirt, now is there?

The only thing is...WHY ON EARTH DID I HAVE THE SMALLER SIZE RANGE?!

The largest size in my envelope was a 14...with a 39.5" finished hip. Oh. Boy. No worries! Instead of complicating matters I just added it on the fold line...about 3/4" on front and back for a total of 3 inches...and then I sewed 3/8" side seams. 1" elastic at the waist and hemmed...DONE.


I did finally use Kathy's suggestion of fusible tape in the hemline and a twin needle. PERFECT! I love the results and what's not to love about an insanely bright, easy to wear skirt??


Thursday, April 10, 2014

I WON!!!!!!!! - And, New McCall's!

I'm so over-the-moon excited y'all! I am the proud, proud first place winner of the Beginner Fitted Blouse contest!!!

Check out the winners for the Intermediate and Advanced contest here:

PR Fitted Blouse Contest Winners

And check out the gallery too! There were some amazing entries! This and the mini-wardrobe contest are my favorites on PR. I love to see what turns up.

I win the fabulousness that is a pair of straight and pinked shears from Gingher and a lovely French curve! All courtesy of Fabric Place Basement!


********************************
New Patterns

Of course, lots of dresses here...and I feel the same about this release as the Vogue. Gorgeous offerings; dresses are awesome; dresses are not conducive to my everyday life, I am less enthused about them :)

But there are 3 patterns on my must have list
M6961M6961
This top is EVERYTHING. Swoooooon! The view with flutter sleeves isn't quite for me but still, SO feminine and pretty!

M6956
Ok, yes it IS a dress...but it's a SWEETHEART dress with a fit & flare and...yeah! :)

 Line ArtM6969

Ok jumpsuits seem to be love 'em or hate 'em but...I like the pants versions. Especially this view, belted.

I also like:
Line Art
Nice options here

Line Art
A solid basic (and it's a Palmer Pletsch!)

Line Art
I hate this on the model; the top is oversized but the skirt is cute...I bet the shorts would be too.

There are some cute kids patterns (or rather girls patterns), a rather sad men's offering, and some crafts. Oh, there's a bag pattern too!

Sunday, March 30, 2014

Fitted Blouse Contest Entry: B5678

So you know that in the planning of this I decided I need not reinvent the wheel. I had made this before and only needed to tweak it to get it good enough for contest entry.

What is REALLY amazing about this is that I used this same pattern for LAST years entry (after only sewing for 3 months) and am quite proud of my work that I submitted today. I can see development in my sewing and it makes me so happy!!!

With that said, I still entered the "beginner" contest and thank goodness they broke it out by skill level! There are some seriously professional tops posted! I think that I am still, very squarely in the Advanced Beginner category and felt the beginner section is where I belonged. I got backed up on the contest discussion thread too! :)

On with it!

I detailed the few fitting adjustments that I made in this post. "All" that was left was to cut and sew it! :)  Because it is a contest entry, I attempted to write a 
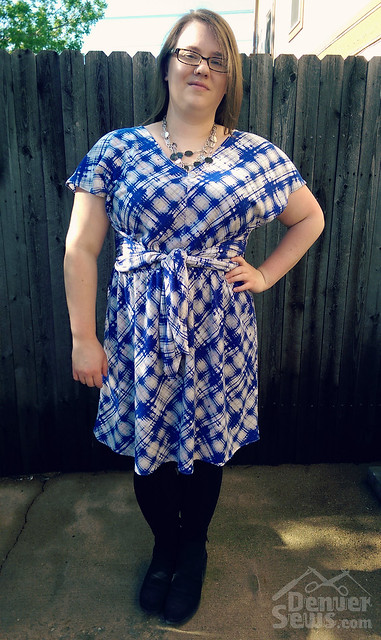
very thorough review. So, I'll just insert a boatload of pics here...review below :)


My wonky left side. My shoulder slopes, my hip is lower and LOOK! My hair is partial to the left side too!!


Like it tucked in!


I have pointy collar points!


My stripes MATCH!


Top stitching the cuffs proved to be a lesson in PATIENCE.


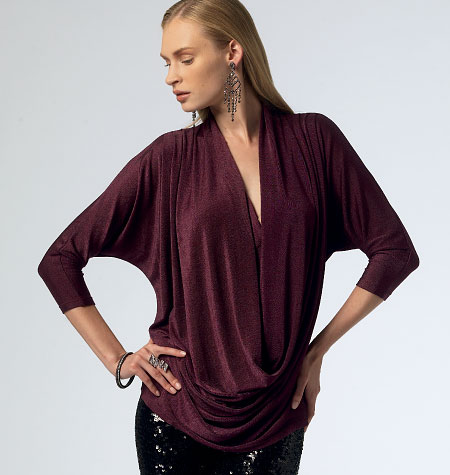
Pattern Description:
Semi-fitted shirt has shoulder princess seams and stitched hems. B: button tab belt carriers. C: roll up option with button tab on sleeve. A/B, C, D cup sizes.

Pattern Sizing:
6-14 and 14-20; with A/B, C, D cup sizing. I cut a 14D and graded to a 16 through the waist and hip.

Did it look like the photo/drawing on the pattern envelope once you were done sewing with it?
I didn't sew a straight view from the envelope. I guess view A with a collar or view C with no sleeve tabs :)

Yes it did.

Were the instructions easy to follow?
Yes. There are a LOT of elements to sewing this shirt and I think the instructions did a good job walking you through.

What did you particularly like or dislike about the pattern?
Funnily, I had a short list of dislikes from the last time I made this shirt. As I look at them (written down), I don't feel the same way now!

-Continuous lap: I would like to try a tower placket, but I don't hate it. It sewed in no problem this time.
-Folded button band: I do like a separate piece but I was making the folding unnecessarily complicated before.
-Length: I like the finished length. It can be left out or tucked in (and stay tucked).

Other likes; LOVE the curved hem and the close fit.

Fabric Used:
Shirting from Hancock fabrics. It's been in the stash for awhile. I assume it's a poly/cotton mix as it came out the dryer with virtually no wrinkles.

Pattern alterations or any design changes you made:
Based on my prior wearable muslins; I decided I needed to do a narrow shoulder adjustment of 1/2", lower the bust point of the princess curve 1" (Thanks L! ) and took about 1/4" out of the sleeve cap height.

I also sewed the princess seams with 1/2" seams (vs 5/8") after reading Mary's (from Idle Fancy) post Here. It really made a difference in ease of sewing the seams. It was "painless"!

Otherwise:
I did not clip the princess seams.
I did not topstitch the seams.
I used a contrasting interior collar stand and cuffs.
I serged all the interior seams.
I interfaced the buttonhole side of the button band because it just seemed sort of flimsy even with several layers of fabric. I think my buttonholes came out really well due to this decision!
I spaced my buttons 3" apart while the guide from the pattern had them spaced 3.5" apart.

Would you sew it again? Would you recommend it to others?
I think this pattern is on its way to being a TNT (still need a swayback adjustment). I would recommend it but even me, the anti-muslin lady says, make a muslin!!

Conclusion: 
I am really, really proud of my work on this top! I swear I unpicked and restitched the topstitching on the cuffs like 6 times! This forced me to learn to use my walking foot - yay!  I had to unpick serger stitches after sewing AND serging my sleeve inside out (thankfully I had a full 3/8" sa for re-sewing).  And I worked REALLY hard to ensure there was no gaping at the bust!

Walking foot magic:


I've done okay with matching stripes but this required no extra effort!! I pinned the top, middle and end of the piece and bam. MATCHING STRIPES!!!!!!!!

Good luck to anyone else who entered!