Showing posts with label JoAnn Fabrics. Show all posts

Sunday, June 1, 2014

Finished Item: Simplicity 2153

I finished it! 

I have seen only cute versions of this jacket in the sewing world and when I found the waterproof coating at FabricMart, I had to make it. 


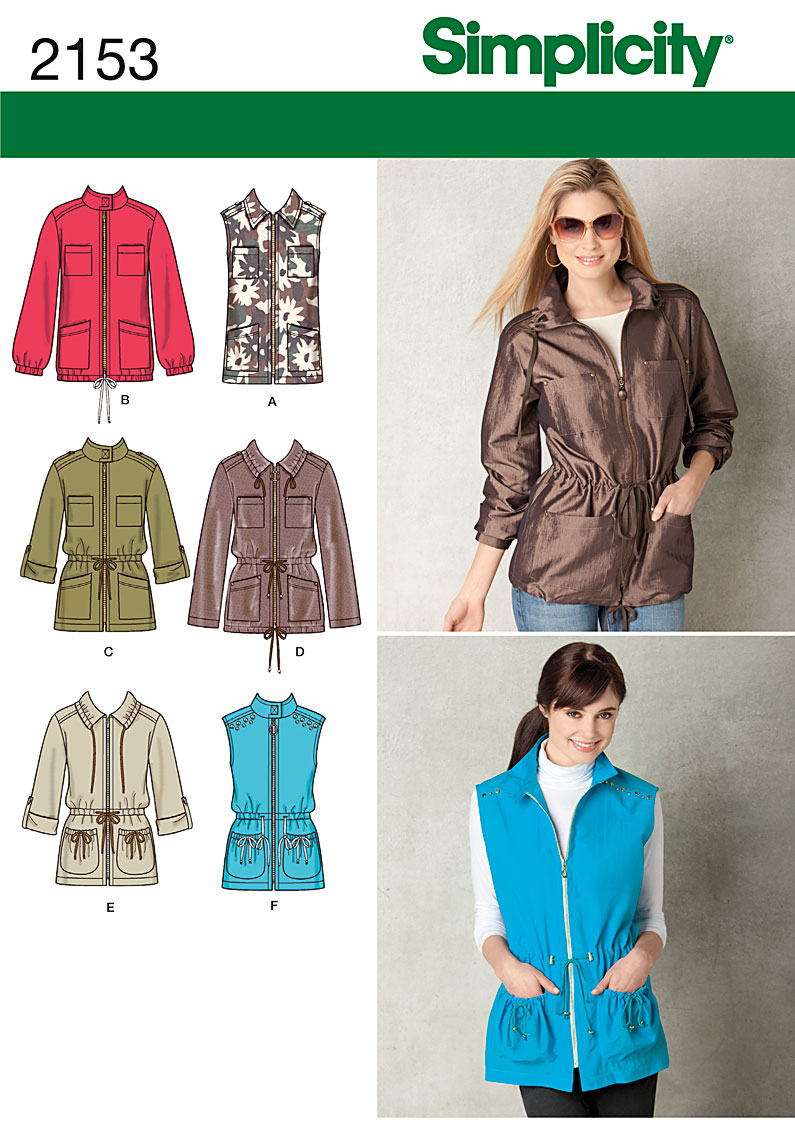
I decided I wanted view C but with the elastic in the sleeve hem, like A. Now, there are tons of warnings about the ease in this pattern. I guess it is all relative. Normally I am a 14 with FBA, 16 waist, 18 hip (or 14 shoulder graded to 16 bust and waist and 18 hip). I had the larger size range of this pattern so I cut the 16. I didn't measure or anything...I just went for it.

The jacket fits fine. It fits like a normal jacket.

Okay, I could use a narrow shoulder adjustment. And the sleeves are on the voluminous side...but there is NO way I could have/should have gone down a size. I had to give myself a little extra hip room so that it wasn't tight! So...yeah. YMMV and all that.

Photos GALORE!


POCKETS!!

I mean, that isn't like super, extra roomy...


Overexposed to show the details
Pockets!!!! Epaulettes! :)


My polka dot bias tape! :)


This jacket was moving right along, minding it's own business and then...

I decided it needed a hood. And muslined and it was meh. And muslined and then...whatever. No need. See, I enjoy sewing. I enjoy working out a problem, but I will move on if something is seriously driving me crazy. So, no hood on THIS one.

Adjustments:
  • Removed about 1" from the sleeve width (just did this while sewing)
  • Shortened the sleeves 1.5" (which was almost too much! Ooops!)
  • No interfacing except on the epaulettes. After seeing how the fabric behaved and seeing that a lightweight rtw jacket had no interfacing in the collar or the facings, I decided to leave it off. This fabric has quite a bit of body.
  • Instead of creating a tube and turning the back loop, I just handled it like you would belt carriers. Felt that was easier


Particulars:
  • Waterproof fabric from FabricMart ~2.25 yards (this fabric sews and presses AMAZINGLY!)
  • 24" Zipper from JoAnn
  • 1/4" cording from Hancock
  • Handmade bias tape (woohoo!) as casing and on facings
  • 3/4" elastic in the sleeves (about 9")
  • All interior seams serged. 
  • Yoke seams (front and back) topstitched


Mistakes:

  • Bought a 26" zipper and spent 2 days looking for a black 24" zipper.
  • Sewed the casing in place and realized I sewed it in the wrong place. Never mind the buttonholes that were sitting right there as guides.
  • 1.5" was almost too much removed from the sleeve length. I just made it.
  • Went to zip it up and couldn't. I had sewed the facing too close to the zipper tape and had to unpick the topstitching and facing stitches!
  • Sewing the sleeve elastic casing and ran out of bobbin thread...realized I had navy thread in the bobbin. Luckily the area is gathered so you can't see it!
  • Didn't make sure my toggle things were the right size for my cording! So I'll have to find a new pair.

I am in love with this jacket! It is fantastic! It feels good on and is sewn pretty dang well if I must say so myself ;-)

I HIGHLY RECOMMEND this pattern for an easy but stylish lightweight jacket. I now plan to make the vest too.

It's no surprise that SOMEONE now wants me to make them one too!

Sunday, February 9, 2014

Muslins. Who? ME?!?

I have been in sewing limbo. The desire to sew but midlevel mojo and NO TIME.

The kids had a very busy schedule this past week and I am still a bit under the weather, so I have not spent a ton of time in the cave.

I went down to repair the laundry bag (a few stitches came out) and ended up cutting another Deer & Doe Plantain tee in some of my white knit fabric that I scored for dirt cheap! :) It's thin which is good to know. It's hard to get a true feel for the weight of it before it's sewn up. So now I know that I'll need to allow for a cami underneath the tops I make or make lined things with it (or things with a deep enough self facing like NewLook 6108).


I still consider this a wearable muslin. And now I don't know if this pattern is worth me putting a whole lot more energy into. I like the scoop neck but I have to adjust the shoulder, lengthen the sleeve and reduce the flare a bit. I don't love it. I feel like there's gotta be another knit tee that will work better for me. In the photo the bottom is just serged. I'm going to hem it though I was playing around with leaving it as is.

I have a Lekala pattern that I'm going to try before I attempt another one of these.

Also, I muslined a hat!


This newsboy cap is a freebie by Waffle Patterns (HERE). It was just what I was looking for as I plan to make a hat for my little brother (he's totally turning 29!) for his birthday later this month. I was nervous as I know that standard one-size-fits-all hats do.not.work. But the designer said it came up "big" so I was hopeful.

Nope. It's 21" circumference. My head is 23"! And my brother, based on the hat size he wears is around 23-23.5" as well. 

I used the same fabric and lining as my B5927 jacket

It's too small! :)

I'll have to do better next time as I have that little point in the back that's wrong.

I have been trying to figure out how to enlarge it 2 whole inches. Part of me wants to try to just enlarge the pdf pattern when I print it (giving more depth and width). Part of me wants to lengthen the two pattern pieces 1" (increasing the side piece 2" total and the top would be an inch longer/deeper.) It takes SUCH little fabric so I can give it a try with some quilting cotton or leftover suiting til I get it right.


Or...I can spend $5 and buy Vogue 8869 which comes in sizes S-XL.


So...we will see! :)

My daughter decided she needed a scarf - mom to the rescue! Cotton Flannel was $2.99 on sale at JoAnn (plus my 10% off for being a PR member) and she has a new scarf for $2.70!

I cut the fabric in half so that I'd have one piece 72" x 22" (approximating 44" material). Then I made a tube and turned it. I then sewed the opening shut leaving a space to turn and hand stitched the opening closed. 20 minutes. Done and done.


She said she wore it ALL DAY on Friday and "This scarf is AWESOME!" was the text I received! :-)


Sunday, January 19, 2014

The MOST Possible Amount of Finished Items!

uhmm. I have a whole bunch of stuff to show!! Like...5 new things. FIVE! I made 2 pairs of pants and 3 tops.

Now, to be fair, the pants are my S2700 TNT pattern and one pair of pants was technically finished last weekend; well they needed hook & eyes and a button and pics. But you can't take pics during the week because it's dark in the morning and it's dark at night.

One top is Sew Simple 1523 which I'd just made. The other two tops is a new pattern BUT they're the same so...let's go!

Simplicity 2700, reviewed before...

Plaid pair: there was nary a plaid matching attempt. Nary. I was in an uhmm, mood, so I went to the cave and pulled this fabric out and cut. After I'd cut out the front pattern piece I said, Ooops. This is  a plaid. But I only had 2 yards so there was no way I could even try to ensure I matched. I just went for it. It primarily matches (LOL!) across the front and back and the side seams. The waistband? Not. At. All. I never tuck shirts anyway though...

The brown pair: Uneventful. The only mistake I made was in hemming. I might have to undo the hem because I took too deep a hem. I'll have to see how they look with my "work shoes" (which are kept in my office).

Both suiting fabrics came from FabricMart during the $2, $4, $6 suiting sale. neither has any amount of give compared to the last fabrics I made these pants from. Oops!! So they're butt huggy but that's okay. 

I serged everything before sewing, stitched the seams so I could leave them pressed open. Serged the waistband facing, removing 1/4" and then undrestitched and stitched in the ditch (I love the look and the idea of the bias binding on the facing but it's so dang time consuming! Oy!!) . I also placed my hook & eyes too far "in" and there's a weird flap at the end of the tab...again, since I never tuck shirts, this isn't a big deal. I think I'm going to make the next pair a flat front.

Also, NO VISIBLE ZIPPER!!!! Yay! I managed to do it right -and- I did not consult any source to insert my fly this time. It took a little while, but now I think I have "my way" of doing it.

ALSO, perhaps you knew this but I didn't; the zipper package has a template on it for topstitching the fly. I probably didn't know because this is what my zipper packaging always looks like:


But if you don't manhandle the packaging, you have this:

And then this:


Then, I made another Sew Simple 1523 top. You know, I had pegged this knit for a different pattern but seriously, why fuss with another knit top when I loved this one so much!?! I sewed this in 90 minutes from start to finish. I felt like a ninja warrior sewer.

THEN, because I was still amped up, I cut Burda 7866 (which for some reason I can't find on Simplicity's website now). Here's the link to the pattern on PR: 7866. I bought this pattern a long time ago after seeing some REALLY cute versions around the web and never sewed it up. Well, when I picked up that ocean blue knit from SR Harris, I knew it would become this top. How glad am I that I waited!!! I loved the top so much that it wasn't even half finished before pulling out a snake print knit and making another one up! 

So here are gazillion pics of everything! :)

***I was going to be more judicious with the pictures but I inserted them all in this weird "block" and now, if I delete one, Blogger deletes them all so...you're stuck


Simplicity 2700 in plaid  and chocolate brown wool/poly blend suiting from FabricMart 
Burda Style 7866 top in (double? Sweater?) knit from SR Harris
Sew Simple 1523 in chartreuse jersey knit from SR Harris
Burda Style 7866 top in (poly/lycra?) knit from JoAnn
I did such a good job on matching the waistband seams! And look at that blind hem!!!!


The cuteness of those giant sleeves!


"What? Huh? OH!! I'm using a PRINT?!" Uhmm yeah. No matching there.


I was getting bored


My goofball daughter. I told her I was putting this on the blog!!!!


Review for the BurdaStyle top:

Love. I love it! This top went together super fast (SUPER fast). The front and back is one pattern piece (the shoulder is cut on the fold). Then you cut out the neckline area. It looks like no adult head could ever fit through the hole that is created, but it does!! And I have a big head!

You sew the shoulder and side seam in one swoop and then attach the front and back yoke. Boom. Done.

It has very deep hems for the sleeves and top - 1 7/8". I really like the look of it.

Now, the neckband is weird. They instruct you to interface (didn't do that) the neck and then attach the facing strips. I hate facings on knits. It's weird. This has you attach the front and back to each piece and then tack it by hand. I did no such thing. There was no tacking. None. I sewed the dang thing on my machine. 

I think the top is a bit long without modifications (so if you're long waisted, you might not need to add extra length). On the snake print, I shortened the top and the yoke a bit so it wouldn't blouse over as much.

The size 14 took just about 1 1/2 yards of fabric err, more if you need to match prints ;-)


Now, I'm all tuckered out!