Showing posts with label Finished Projects 2016. Show all posts

Tuesday, October 4, 2016

Burda Challenge 9/2016 #113

Sometimes a plan just comes together!

So far, I have sewn from every Burda issue this year (even October!). The moment this preview was released I was thinking "must make that dress. must." And then the tech drawings came out and it was a surety. And THEN, when I broke my fabric fast, I saw this printed ITY and knew that this would be one awesome dress.

I went with my normal Burda sizing of 40 neckline/shoulders and 42 for the rest. Especially with the skirt being gathered (vs something fitted). I made no other adjustments for fit. Next time (I can see this in black!!), I will take out about 3/8" from shoulder to bust and about 5/8" from the back length.

Speaking of...I'm starting to question if I actually have a swayback or if I just have a short torso. I mean, I know my torso is short, but is that the reason I have issues vs. swayback?? When patterns have a shaped center-back seam, I don't have puddling. And I often find after the fact, that I need to ALSO shorten a bit at the side seam. Same for pants...I need to shorten front crotch length quite a bit, but I also take out a bit at the side seam of front and back to overall shorten the length from waist to crotch. Ahhh...ruminations.

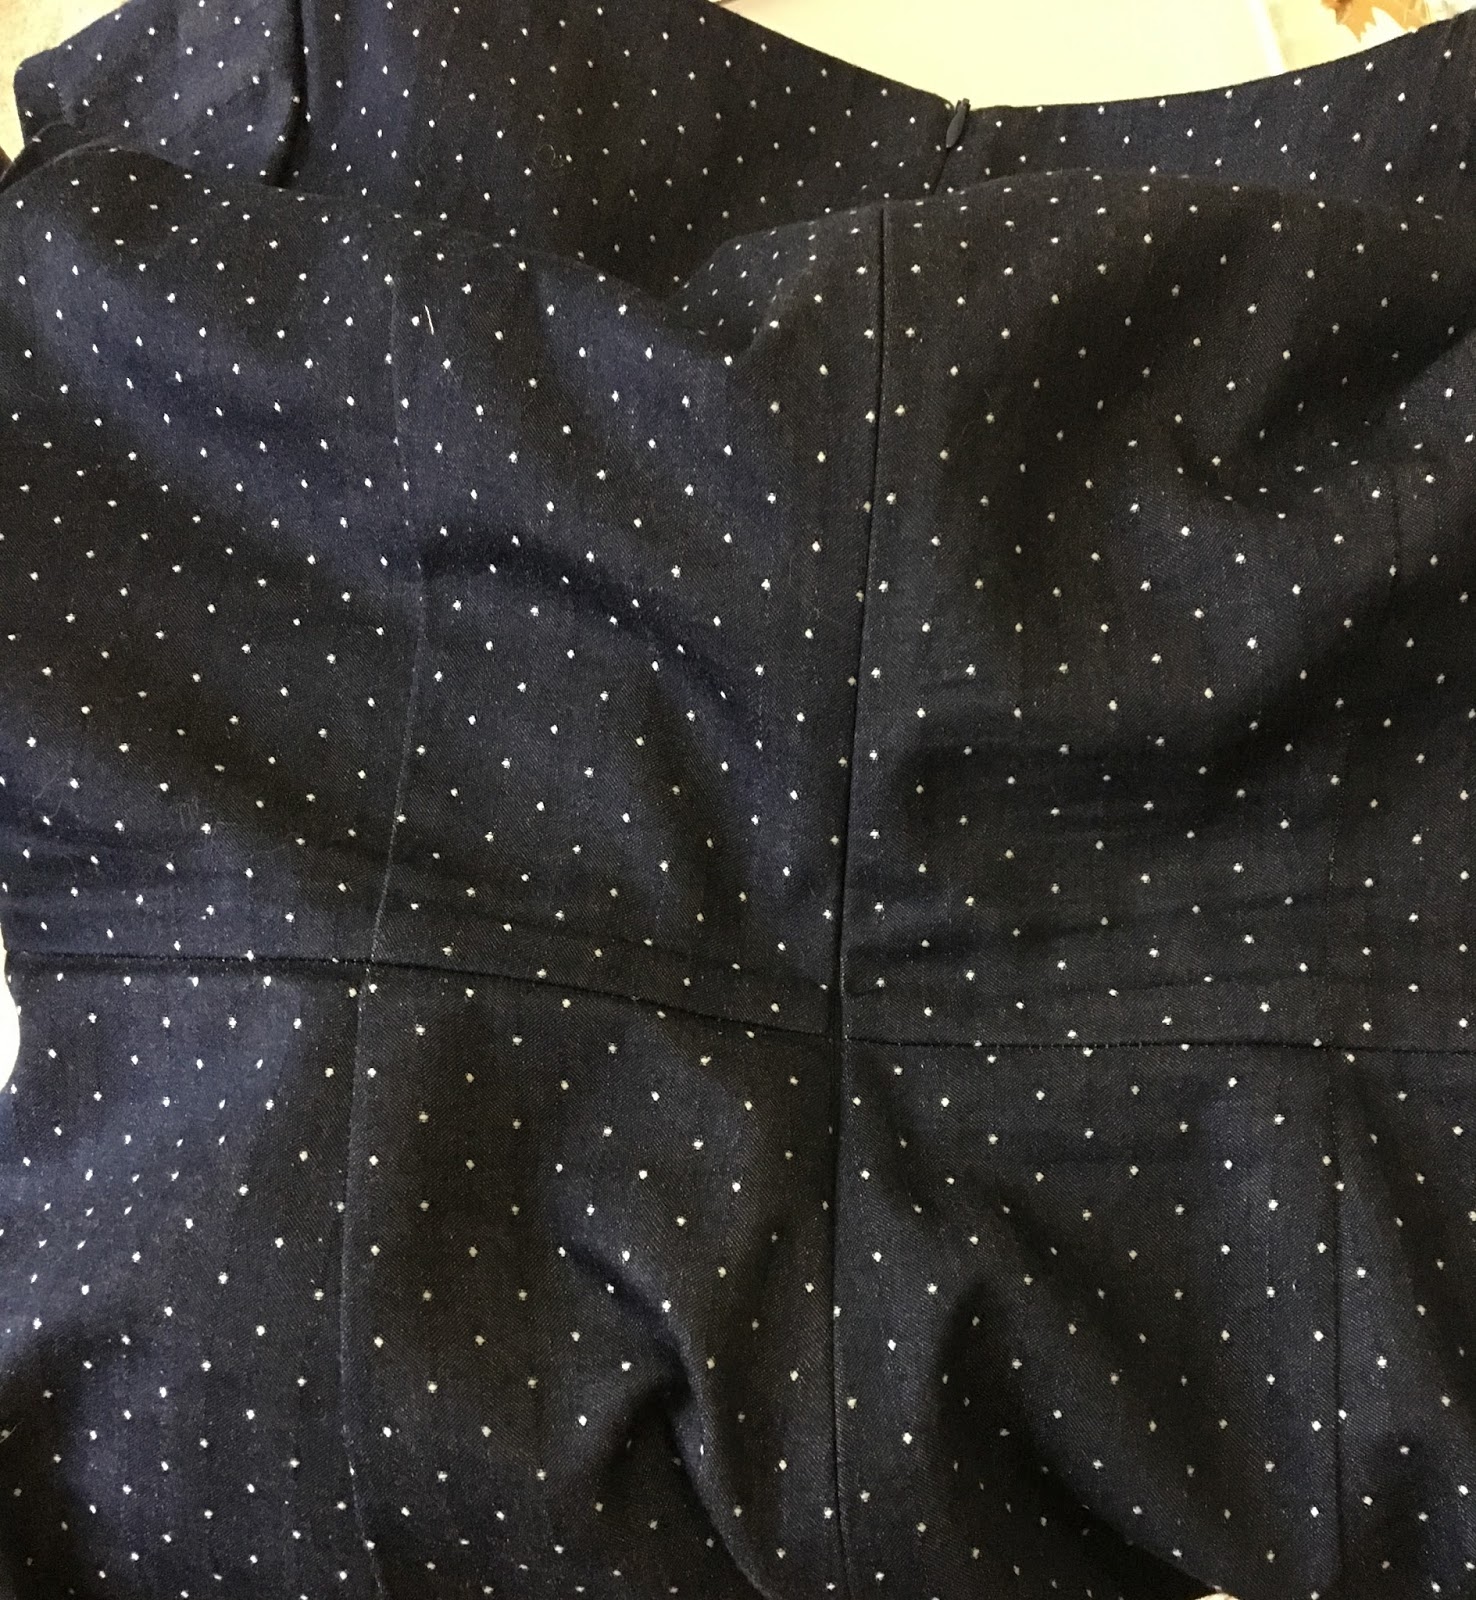
ANYWAY! Aside from wishing I'd taken out a bit of length in the upper bodice (or as a cheat taken deeper shoulder seams), I cut out my skirt rectangles and somehow managed to rotate the front skirt. When I assembled the back and went to put it on my dress form I stepped back and OOPS! LOL! The back was much shorter than the front. That also explains why I knew I'd cut the skirt to match the front bodice motif (mostly) and then it didn't. I just shrugged it off. :) So I have a few less gathers in front than intended. :)

We are heading into fall/winter so my photos will likely get progressively worse :( I don't have a good open area (that's what happens when you cut your living space in half!) and the sun goes down so early during the week. So you'll get to know my kitchen and yellow table well! :)


I ADORE this print and the overall color scheme!!!

The front IS riding up a little. Full bust problems. I'll fix that...


My super cheesy grin says it all! It's Love!

On the black version (whenever I get the fabric for it), I'll add a couple inches to the length. Though, by the time it's cool enough to wear this with the turtleneck and all, I'll likely wear tights with it anyway.

I finished the hems by double turning and stitching with a twin needle. I slip-stitched the collar facing down by hand. The instructions have you ditch stitch but that seems dicey with the type of fabric you'd likely use for this. No way was I going to try that with ITY! I did however attach the facing to the lining by machine. That was no problem. I always do this as a 2nd pass, so I can use the zipper stitching as a guide.

Oh and I did insert a full length zipper but it is unnecessary. A 9" would be fine. I'd also consider using a tricot fusible in the collar. The back stands up due to the zipper but the front collapses a bit.

I started my daughter's dress last night! I got the front and back bodice seams sewn and the front skirt.

 Today I hope to get the back skirt assembled and the zipper in. Then sleeves (they are raglan), skirt to bodice, side seams, neck binding, hem, done! By Friday night! :)


 Lastly, I was on the hunt for fun skirts (still) and dug up some older Burda mags that were gifted to me. ALL of these awesome patterns are from the 9/2007 issue. Burda always gets better with time it seems!  I think the pleated skirt has a place in my fall/winter wardrobe! I have a winter white pinwale corduroy that I think will be perfect.


Wednesday, September 28, 2016

Finished: New Look 6123

I previously sewed this in October 2014 for week 2 of the Fabric Mart challenge. I made a muslin and everything! I made it a second time later that month in ponte. When I went to my cousin's wedding last month, I wore the puple version and fell in love with the dress all over again.

I decided my polka-dot chambray would become another NL6123 vs S8014 (even though I love that pattern).

Both of my previous versions used the pleated skirt and I wanted to make the straight skirt this time. I pulled out the pattern and I had traced ALL of the pattern pieces. So I felt compelled to trace the other pieces this time and I'm glad I did. I didn't realize this pattern is now OOP. Boooo!

V.1 was lined and v.2 was a knit so I hadn't used the facings. I will say I find them just a bit shallow. I also want to raise the neckline a little - like 1/2". I am okay with a little cleavage during daytime, it's my tattoo that I prefer to cover up. Sidenote: I am totally going to look into laser removal. I don't hate it, I just hate the location now! But there's some tricky business to removing tattoos from brown skin so you have to find someone experienced.

Anyway. I used the facing as-is after having made changes to the bodice. So I have this happening on the inside...Oops.


Note to self: Add an inch to the facing! :-p

I assumed (oops) that the bodice was a 14 but it was a 16 and I traced the size 14 facings. Doh! I stitched them down which thankfully isn't visible because of the crossover.

Also, trying to preserve whatever amount of this fabric I could, I ended up cutting my skirt fronts too close to an edge that had a scissor snip. I interfaced it and took the seam a tiny bit deeper. Fingers crossed it stays put!

I made no other changes to the pattern from the original make.

  • Shortened bust dart (moved the point 'back')
  • Narrow shoulder adjustment
  • Gaping armhole adjustment
  • Removed width from center back tapering to nothing at waist
  • Swayback adjustment
  • Full butt adjustment


I could stand to add a tiny bit to the cap sleeve - maybe 1/2". I used an invisible zipper and topstitched the hem. I also tacked the facings down at the shoulder seams.


Matching at the top of the zipper


Matching the waist seam and darts


Really digging the vent and my red serger thread!!!! <3


The chambray cut, sewed and pressed as beautifully as cotton chambray does! Such a breeze to sew!

We're officially into fall here in Minneapolis and dusk arrives earlier. Plus the past 2 weekends have been crammed. I have had no time to photograph the gazillion finished garments I have.

I haven't been feeling well and am working from home today and figured I would FINALLY get this dress blogged (it's been finished since end of August/very early September). So I look haggard but just look past that. Okay? LOL!

These boots were the only shoes upstairs besides flip-flops...


I've really working out the fit for my back/butt on the CB seam!

You'll see (as do I now!) that my side seam is curved. I need more butt room (horizontally). Also, I've worn this twice already so the chambray has bagged out a bit in the seat. I'm sure it'll be fine when it's washed/dried.

***********************
DDs sweatshirt turned out SO CUTE! Again, we were jam packed when she was here so I didn't get photos of it on her...or even the completely finished garment. Her Thursday's are a bit more open so hopefully she can get a friend to snap a few for me.


I was going to add decorative side seam zippers but the style lines and the super-duper drapey fabric made it a no go. The sweatshirt sort of collapses on itself and the zippers made it stiff.


I used Burda 1/2016 oversized hoodie with hi-low hem. I used a size 36, view A (the other views are longer and have pleating or gathering in the back). I ended up adding a band to the hem instead of hemming it.

I made the gathers in front and attached the hood via serger. And turned it out and saw this:

Oh. Well then...

I unpicked from the bad gathering on the right as viewed to the other side and reattached via sewing machine (yeah, I learn sometimes...) and was  able to get the hood in correctly (fronts touching).


This is before the bands were sewn

I tried it on because it is pretty oversized and it looked weird (probably because it's still way small for me). Saturday morning she came to show me the sweatshirt on her body and I swear it was THE cutest thing. I said with leggings, she said "with huge pants!". Ahhhh to be 18 again.
Wait...well, no. No thank you! Maybe 26...lol!!!

So many things to do yet. I have my September Burda in under the wire (needs hems), DD needs a black gown for concert performances. Because I am smart sometimes, I am making the non-fancy version of her prom dress (e.g., no lace, no illusion, no tulle, etc). And I am making the bodice with a stretch velvet. New-to-me fabric but I think I'll be okay. Oh and did I mention she needs this for her concert on October 8th? And I'm joining the PR outerwear contest and sewing the Clare coat from Closet Case Files. Plus the other stuff I want to sew.

WHEW!

Monday, September 5, 2016

Drapey Cardigan Battle: Jalie 2919 vs Swoon Scarf Neck

I had the Jalie cardigan in my fall plans and was excited to sew it up in the wool jersey I've been hoarding for awhile. I snagged a 3.5 yard cut for $22 total last summer and knew it would be used for a cardigan. I made McCall's 6696 from wool jersey and I adore that cardigan. It is so lightweight while being nice and warm and it just feels good on.

I don't know how I found out about the Swoon cardigan but when I saw that Westmoon had sewn it up I was eager to give it a shot.

I printed it out, no problem there and then it gets a little funky. Honestly, Westmoon covered it all in her review here.

  1. There aren't lines for trimming the pages. The pattern pieces are tiled, and it does need to be trimmed, but there aren't lines for trimming
  2. The box to check scale is hidden well into the pattern vs being on the instruction page or early on
  3. The pattern is laid out really weirdly and is a paper hog
  4. The half sleeve is weird. Sleeves cut on the fold are weird
  5. The instructions. omg. Just, no. I mean, it's fairly intuitive but the instructions are just a no. French seam a knit? No, no, no.
Once you get past the minor annoyances (which are minor only because it is a free pattern. If I had paid, I would not be a happy camper about those things), it is a REALLY sweet pattern!!! 

I used a poly/rayon jersey knit from Fabric Mart. I really love this 'pattern/print' and it matches well with my existing wardrobe. It went together quickly and fits beautifully!

I sewed a size large and made no other adjustments. The princess seam hits in the right place, the collar drapes nicely, and the symmetrical sleeve works because the shoulder is slightly dropped.
(silly symmetric sleeve...I serged the sleeve on backwards and had to unpick the serger stitches. Booo!)

Many mentioned the sleeves were long; I am glad I didn't shorten them. I sewed a 1 1/4" hem and they are perfect. Lastly, I did a double turned hem (using Steam a Seam light and then topstitched), but did not hem the drape front. It really doesn't need to be hemmed. 

On the Jalie, I traced a size Y with the length of Q. Many had remarked about the length and I didn't want it too long. 
  1. This pattern also has a weird 'cut on the fold' half sleeve. I don't like that!
  2. MARK THE LINES! Please mark them. I only marked the top and end point and ended up getting off on some of them. 


I'd seen the pattern done both ways: where the tucks are outside and where they are inside. I wanted them to show so I pressed a crease, wrong sides together, and stitched at 3/8" for all 4. The wool knit takes a press beautifully. 

These sleeves are really long. After sewing it up, I removed 1.5" and hemmed it at 1 1/4".  I also did a double turned hem on this one.

So which pattern "wins"?

L: Swoon; R: Jalie


L: Swoon; R: Jalie


L: Swoon; R: Jalie


I prefer the Swoon drape over the Jalie
I prefer the integrated collar/drape of the Swoon over the attached collar of the Jalie

I like the length of the Swoon more (but that's an easy fix on the Jalie)
I prefer the front hem of the Jalie

I need a little more butt room in the Swoon - I will do that via slash and spread
The Jalie shoulder feels too long and the armpit too low
The wool knit is amazing to wear but...

The Swoon wins for me! 

I prefer it hands down and my fun black burnout knit will also become a Swoon cardigan! It just feels better on, even though the Jalie is done in yummy wool knit. I predict that and the color will cause the Jalie to get more wear than I'd expect. I have LOTS of blue in my wardrobe but no jacket or cardigan in a neutral tan/brown. I used to have a M6844 in a similar color but the fabric pilled like crazy and it didn't hang around in the wardrobe very long.

The outtake:

He's always in my photos.


Tuesday, August 23, 2016

Finished: New Look 6481

Didn't I *just* say at the end of my last post that I was going to try not to get distracted by shiny??

Sheesh.

In a FB group that I am in, someone posted some fall plans and it included the Decades of Style Three's a Charm jacket. I adored the lines but I always check Big4 and Burda before biting on an Indie pattern. Why? I know how they will fit and what adjustments I need to do. You all know by now that I balk at muslins! :-p

So I'm scrolling through the coat/jacket category on PR and see this:


Wait what? I've never seen that pattern before!?! It's PERFECT! Turns out it was a new one from the Fall release. Lucky me!!!! I had to visit the JoAnn in the crazy busy part of town but I got it! And then I kept thinking about it and this suiting that would be perfect for a LBJ and yeah, I started working on it when I got off work Friday :)

Let's clear something up. A couple of people have compared it to the Grainline Morris. IMHO, not.at.all like the Morris. Okay maybe 'not at all' is a stretch. It's a slightly cropped jacket. It is a much closer clone of the DoS jacket. I made a graphic!

See? 

Now, the Three's a Charm jacket offers far more opportunities to fit with all those wonderful darts (I really dig shoulder darts). And I prefer the lack of topstitching on the New Look (which you could of course, skip on the TaC. There are TONS of the TaC jacket up on blogs and I knew that I would never wear a jacket of this style buttoned so I decided to go ahead and gamble with the NL at $4.

However, based on the number of finished projects on such a wide variety of body types in an array of fabrics, I do think the TaC jacket could be a good buy at $12 for the PDF / $15 for the printed pattern.

Also, sizing on the NL vs DoS are comparable; The New Look is sizes 8-20 or bust measurements of 34-46. The Decades of Style is sized ABC but is for busts sized 30-46.

The big cheesy grin says it all - I love it!

I made a mistake right away with cutting. I very often cut size 14 and grade to a 16 at the side seam, eliminating the need for a shoulder adjustment. I then went and narrowed the shoulder 1/2". I have to add this back.

I did a 3/4" FBA and lowered the dart an inch. I also needed to move it back about an inch. The dart was sort of large to me so when I did my FBA, I had a big honkin' dart. I was surprised and redrew the lines to reduce some of the uptake. This was a bad move. I have folds but they are not because I need more room. When I pinch out just a bit more at the dart, the jacket lies flat.


I removed 4" in length from the sleeve and added a bit of width after measuring. I didn't do an actual full bicep adjustment because I thought it would be sufficient.

EEK!!

I'd set this very lovely pucker-free sleeve; I use lots 'o pins when setting sleeves:


Look at how smooth that cap is!!!!

And then I put the jacket on and holy moly was it tight!!!! LOL! I sat the jacket down, dejected and went to sit on the couch and drown my sorrows in a bowl of popcorn.

Revelation. Ok. Fine. Duh moment... CUT NEW SLEEVES :-p

I had 4 yards of this fabric snagged during a Fabric Mart sale. I'd paid $1.99/yd and thankfully, I did good. It presses beautifully and stitches up well.

After doing a proper 1" full bicep adjustment, I decided to add 1/2" to the sleeve cap. I'm not sure all of this extra was needed and admit that making this decision based on the too-tight sleeve was maybe a bad call. It's not bad but I can tell there's a bit of extra and it was harder to ease.
I can move!

The sleeve rotation - I notice this with jackets and then I had a lightbulb moment and remembered that Gail over at GKs Agenda blogged a fix for this. I'm going to try this on my next jacket.

I did a 3/4" swayback adjustment which is standard for me: 


I like the back fit

And because of basically solid black fabric decided to just serge all seams. In a print or color where I didn't have matching serger thread I'd definitely bind that center back seam for a little interest.

I also tacked the facing down at the point, at the cb seam and at the shoulder seams.


Sooo I pretty much am in love with and am wearing it today. Wearing the exact outfit actually that I blogged (different jewelry!) :)

Once I get some more fall sewing done I'll decide on what color to add next. It looked really cute over this black/white M6886 dress I made!

The outtake: that plant was attacking me!


Monday, August 15, 2016

Kwik Sew 4113

I had big plans to sew a dress to wear to the wedding this past Saturday and an outfit to wear for the 5K I participated in.


I wanted to Kwik Sew skort when it first came out! I thought I'd love it for my long walks. I picked up a couple yards of activewear knit from Fabric Mart and another yard from SR Harris. I initially planned to make the skort in gray and pink and this Burda tank top with gray bandeau and the rest in pink. I got the main part of the tank sewed up, tried it on, had a good laugh and trashed it. It was SO TIGHT! I may attempt it another time but not for now. I was going to sew the top from this pattern but lost my mojo (more on that later). I'm glad I didn't because I didn't even consider there would be a race shirt.

Also, I almost sewed up the navy activewear knit into the other view of this skort but I'm glad I didn't.

I sewed a size L (intended for hips up to 43.5" and my hips are about 43.5-44 inches. I removed 3/4" from the front rise and added 3/4" to the back rise of the shorts. I needed to add to the skirt back too.

One reviewer on PR mentioned that the shorts aren't snug enough. When I tried them on (several times!) they seemed fine. But during the race, no go. I had to continuously adjust them and it was so annoying. I will make another pair (or 2!) but not until I have some compression fabric to make the shorts from. Also, this knit was not wicking. Fine for the skirt but NOT for the shorts especially if your thighs rub together. I ended up having some chafing by the end of the race :/

The pattern though is fantastic. Everything went together really well and the design is pretty cute. I also really like the waistband width and how the elastic is applied. No casings, no visible stitching on the outside...the waistband/facing seam is sewn and the elastic is stitched just inside the seam line. And then you close it up and baste. I rarely baste things - just use lots of pins or in this case, the Wonder Clips came in handy. I think the clips are good for certain applications but I do not prefer them to pins...

Shorts and skirt are hemmed with a twin needle. I ended up popping the stitching on one side of the shorts. No doubt from yanking them down a dozen times.

Because of my OA (in both knees - boooo!), I can't run (yet). So I entered the walk portion and finished in 56:47.


It's so pretty!!!

Most importantly, we had a blast and have decided to make it an annual thing.


With Dolvett Quince from The Biggest Loser


As for my WDG...I was all set and SOOOO excited to work on the lace dress! And then I saw a couple versions pop up on social media and I was EXTRA excited.

And then, one day in the shower, I found a lump. I vacillated between *FREAK OUT!!!* and Eh, I'm sure it's nothing...When I went to my regular doc he said he felt it too, and ordered both a mammogram and an ultrasound. So, not unexpectedly, my sewing mojo was completely nil. On Thursday, the 4th, I got the all clear. But then I would have 8 days to get it done and I decided I was not up for rushing this project.

It'll happen, another time.

I ended up wearing my NL6123 dress that I made for my 4th anniversary, which we ended up not celebrating because I was out of town supporting my mom when her mother passed away.


This was after the ceremony so pardon all the creasing!


It was so fun to hang with the family and my cousin's gown was ah-mazing!


A young woman from their church made her veil and I was there when she was deciding on length and number of layers, etc. I thought the dress was beautiful but it being on a hangar was nothing like it being on her body. Just stunning. 


 I have my fall planning post almost done. I have an insane "want" list and am trying to narrow it down to 10 must-have projects. I want a solid plan to fill some holes, I want some things because I just WANT them, and I want to try to avoid being too distracted by oooh! shiny!! :)


Wednesday, August 10, 2016

An Oldie But Goodie...McCall's 6886

I really like the fit on this pattern and it's versatility. I have yet to make the v-neck version - one day. I've made this 3 times and whenever I finish one I think "I should make another one!" :)

This pattern has 124 reviews on Pattern Review, some of them multiples - it's a solid pattern.

As per usual, I sewed a size 14/16/18 - 14 at the neckline/shoulder, 16 at bust/waist and 18 through the hip. I make the neck binding based on amount of stretch in my fabric.

I got the bright idea to have the larger ruffle finish off the neck binding - it worked out beautifully! Yay me! Then it sat for a long time awaiting sleeves once I realized it was semi-sheer. When I came back to it, lightbulb! Finish the sleeves and hem the same way! LOL!


I used a twin needle and had a ton of tunneling. With this fabric, it works.

I was going to make a slip but just never got around to it. And then I ended up finding this Vassarette slip for $9. I'd still like to make one though. I went with a size L and the fit is okay. It's "reversible" for the neckline (straight or V) but that means the front and back piece are the same otherwise. So I technically don't have enough butt room. But $9 and I can wear my dress - win!


Also, here are better shots of the Burda pants. I ended up adding the bands to fix the length issue I created. They're okay but I won't make this pattern again. Too much work for just okay.


I had taken all these pictures inside and then my daughter pulled up. I ran outside to try to get her to take pics but she was "SOOOO HUNGRY!!" so I got one (good one!)


Love that outdoor lighting!


The side panel is ridiculous being a simple rectangle (on a Plus pattern at that!).
There are so many seams! I was sewing and sewing and sewing. MEH! Side panels connecting to front and back, the inseam, the front waistband, the yoke, the back waistband, the hem bands, stitching the rows of elastic...just sewing and sewing and sewing and serging and serging and serging.

SO many seams


OK fine, I'll stop whining now.

I do like the elastic back but still...that's because they choose a rectangular back waistband instead of shaping it.


I've done the x wrinkle adjustment and always have some. I don't care about minor wrinkling like this though because I don't stand, stock still, knees locked in life. So when moving, walking, sitting...they're fine.

I've given up on the idea of a woven slim fitting pant. I don't like stretch wovens very much for my bottom half. I'm going to plan to get some of this (AWESOME!) DKNY thick wool ponte knit from SR Harris. They had black and charcoal which are perfect. I'll go that route for fall/winter.


We can't take down any of the remaining graduation decorations until she leaves next week :)

More next post on the W.G.D. (it's on Saturday!) and I'll review my super fantastic Kwik Sew skort!

Thursday, August 4, 2016

Finished! Burda 07/2016 #117

First, here is the shortened Style Arc Susan skirt. I LOVE IT NOW! This length is perfect! I removed 4.5" all around. I opted not to hem because 1) knit 2) full skirt 3) print 4) lazy. I decided that I could always go back and hem if I find the unfinished hem bothers me. It probably won't. Reminder: I cut a size 14, used 1/4" side seams instead of 3/8" and used 1/2" elastic in a casing. I love the movement in this skirt.


My remote died and DD had to take the pics which interrupted couch time :-p Paired here with a simple cami and my latest J.Crew Factory blazer (I bought it in coral and navy and love them! 100% linen and fully lined).

I realized the print didn't "randomize" as much as I thought it would. Oops!

Burda Challenge - July!

I mentioned a couple (or 3) posts ago that I fell in love with this pattern when arianamaniacs on PR sewed it up sans the crazy neck wrap-around straps. And then she pointed out that it's a petite pattern and I was a goner. 


I sewed a 20/21 as per usual -- 20 (40) at the neckline and armholes and 21 (42) for the rest. 

I did a 3/4" wedge on the back skirt piece and a 1/2" swayback adjustment. Next time, I'll adjust the dart position. 


I really love the silhouette. Front bodice and skirt, back bodice and skirt with an integrated side panel. The only issue with this is that the zipper goes in the seam between the back piece and the side panel. It is near impossible to zip it alone unless you're super duper flexible. I'm not that flexible. 


I made one mistake - on regular Burda patterns I never add hem allowances so I didn't add it here. But it's already petite! I'll add allowance next time. Here, I've serged and turned up a 3/4" hem.


Invisible zipper, just to the left of the back strap. So awkward.


Insides are serged. I placed the strap after everything was all done. As you can see, I just topstitched it in place. It works for me. If I were intending this to be a bit dressier I would have added the bodice lining (probably even a full lining) which would encase the strap.

But I didn't want to line the sateen. 


I opted for black bias tape to finish the neckline and single armhole. Works just fine for me to have this topstitched. As long as it's nice and neat (thanks walking foot!), a casual garment is okay to have visible stitching IMO.

On the next version (I think I can own this as an LBD too!) I will widen the strap. I have like 5 of the same bra and placed the strap wearing one. But as you can see it's just too iffy to be sure it covers front and back at all times. On some photos it was covered but on most it isn't. I'll make that an inch wider for full coverage. 

I've had a rough week so I'm now completely unsure about getting the wedding guest dress done. We shall see.