Showing posts with label Hancock Fabrics. Show all posts

Saturday, May 7, 2016

THE PROM DRESS!

WHEW!!!!!! That was a doozy!!!


(in the first pic the belt had twisted around! haha!)


The inspiration


Copied from PR (cause I'm tired!)

I actually combined the bodice of Burda 03/2013 #133 with the skirt of Simplicity 2442. I decided to put the review under the dress because the bodice was more what I was going for than the (relatively simple) skirt of the Simplicity pattern.

This pattern is from the March issue; so it's the wedding issue! While I have good sewing skills; I do not draft or drape and needed to find a pattern to mimic the bodice lines and went straight to the March issues of the mag! AND I already had this issue in my collection. SCORE!

Pattern Sizing:

Burda tall sizes 72 - 88 (36-44). I used a size 36 with adjustments.

Fabric Used:

I used a satin from Hancock Fabrics in bone, antique gold lace and nude illusion both from Vogue Fabrics.

Pattern alterations or any design changes you made:

I cut the sleeve length in the muslin phase to give this cap sleeved look. I cut the bodice pieces in all 3 fabrics, changed the neckline of the satin to a sweetheart, and cut it down so that the illusion was featured. I cut the lace to mimic the sweetheart (3 cheers for applique scissors!!!).

After getting it sewn and ready to do the final fitting, the back was too small. I was going to leave a keyhole in back but the top would not meet. DD has a VERY broad back. So while the muslin was just fine, in the fashion fabric it was off by a good 2 inches.  So I cut the back to a V-shape and again, mimicked that with the lace and illusion. It worked very well.


She has on jeans under the dress here. 
Crazy kid!
She got tired of me making her get undressed to try it on!


The fix! 


I couldn't quite figure out how to do the satin waistband and tulle skirt integrated into the dress so with Catina's help (thanks!) I made the tulle overlay a separate piece. I measured the waistband and used the satin to make the belt. It is full interfaced and is closed in back with hook and eye.

I cut strips of the tulle about 8" wide and 'draped' it on the dressform. When I went to transfer this to the belt it looked wimpy. So I added another layer beneath with very wide pleats. Still too wimpy. So I add several panels of gathered tulle. "Make it work!" :)

I added 6 inches to the skirt length (Yes. 6"!). DD was wearing heels but moreso because she has a 34" inseam. I used a 1 1/4" hem on the skirt.

On the bodice I had to trim out a couple of inches in circumference. E.g., it would have worked better had this come in a size 34. I also removed about an inch in length from the bodice AFTER doing the adjustment to bring this from tall to regular. She has a short torso and long legs.

Lastly, the zipper goes up to about mid-back (just over the bra strap), as I didn't want to deal with a zipper in the illusion. In the end it really worked out great because of turning the back to a v.

To hem the illusion, I folded over the seam allowance (finger pressing works fine), sewed at 3/16" and then *VERY* carefully trimmed away the excess. Tedious but it gives a neat finish.

Conclusion:

I had some serious moments of doubt and panic that I could give her what she wanted. But I am SO glad that I took on this task! The dress is so pretty on her and I am very proud of my work.


More pictures!!!! I posted some on Instagram too. I've cut out the friends for the blog post photos. though.


I really love how the illusion hemming turned out! 


A glimpse of the back!


I mentioned Catina from PR helping me with some logistical stuff. But a special thanks to Jess who blogs over at Sometimes Sewist. She's gotta have a hundreds text messages about this danged dress! :) Lots of suggestions, lots of encouragement and lots of listening! :)

Sunday, May 31, 2015

Finished: McCall's 6659

I have to keep remembering Kyle's comment; my sew-jo doesn't "leave", it takes a coffee break! :)

I swear, as soon as I utter the words, "I don't feel like sewing" - BAM! I have an idea that must be executed NOW.

A few days ago I was up making my coffee, etc and about passed out from my big, fluffy fleece robe. Ah-ha! I need a summer robe! yes! That will be my next project!


I picked up M6659 recently, after it was pointed out on Sew Sorry, Sew Fat (the GOMI blog) that this was similar to the Carolyn pj's in style.  I will never make a full pj shirt like that as I would never, ever sleep in that. But the shorts, pants and robe definitely caught my eye.


I begin searching through the stash to find a cut of fabric that would work for the robe. It needed to be light but opaque and breathable. I had no 3 yard cuts that would suffice and decided I would see what Hancock had to offer since they had an additional 25% off fabric coupon available.

I found this linen/rayon blend on the Spot the Bolt table for... $1.79/yd!!!!! score!!!! The additional percent off didn't play but still. I bought all 4 yards.


This was on Thursday which, I immediately took it home and washed and dried it knowing I was going to sew the robe on Friday (I am typing this in my new robe by the way!).


My fabric was only 50" wide so I used almost the entire cut. There are a few decent sized scraps that can be used for contrast facings, etc. That front pattern piece is really wide so beware when choosing fabric.

Particulars:
Size 16
Added 3" to the length of view A
Shortened the sleeves over 2"
Added belt carriers
Added in seam pockets
Added a loop for hanging

It's so cool and comfortable!!!


I "drafted" (haha!) the pocket from the existing robe and placed it based on the existing robe placement

Do you see the sleeve length?!? I removed 2 inches at the l/s line and then hemmed it 1 1/4" instead of 5/8". These sleeves are LONG! I was always pushing my robe sleeves up so that prompted my decision to shorten them.


I used hot pink ready-made piping and absolutely love it! I sewed the piping to the band and used handy wonder tape to hold the piped band and robe front together. 

Also, those sleeves went in EFFORTLESSLY! YES!


The belt loops needed to be placed about 2" higher, OY! I made 6" loops and caught them in the side seam. Since they are loose, I can pull them up into place just fine...

You can see the inseam pocket as well...


I almost forgot my hanging loop!!! This was a tube that was turned out as well...


Before I had thought about it, I'd sewn to the two sides of the belt and turned them. Oops...I need to attach them to each other! I decided against 'fiddly' and just turned in about 3/8" on one side and slid the other open end into that one.

I did three lines of top stitching to secure. 

hey, this is the back...and it's a robe...no one will know (or care!) :)


I did what felt like endless miles of slip stitching to secure the band. I wanted so badly to stitch in the ditch but with the piping it was so danged fiddly that it made more sense to do it by hand as suggested.

I worked on it Saturday evening while watching 27 Dresses.


Lastly, on the sleeve, I serged the end and turned up 1 1/4" and twin needle topstitched. On the bottom hem, I serged but did a double turned hem, also twin needle top stitched.


Did you notice my thread colors?  Yeah, I didn't! LOL!


So a word of caution about just grabbing two of the 'same' thread spools...people put them back randomly I suppose. I'd bought these for my magenta coat but only ended up using one spool thankfully.


Verdict: LOVE!!

Tuesday, March 31, 2015

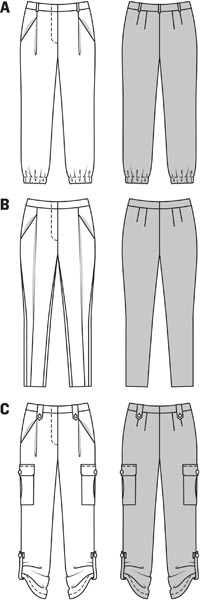
A Long Time Coming: Burda 6907


When this pattern came out I had to have it. I even considered buying it at full price because I WANTED IT!!! On April 23, 2014 I blogged that the paper pattern was cut. And for some reason, I never sewed them!!!

I realized all of my casual (non-work) pants are black; black S2061, black/white print S2061, black faux leather/ponte pants (RTW), black V1411...Eek! I need non-black weekend wear - STAT!

I know how to rid myself of these butt wrinkles (my full inner thighs are to blame) 
and will adjust for the next pair

POCKETS! :-D


I cut a size 16 based on a 45" finished hip. I am starting to side-eye my pants with slant front pockets so I left them off of this pair (however, I think that caused some front wonky-ness).

What drew me to this pattern were the cargo pockets with inverted pleat on view C - YES please!  Now that I've read through the instructions, view B is on the radar! View B's tapered leg is made by taking a pleat up the pant leg. So cool! I bet you'd need something with drape though to pull that off.


I was VERY apprehensive though that you have to finish the side seams to attach the pockets. Eek! But what if they need tweaking?! Leap of faith and all that...

I stitched and pressed the pleat and because my fabric unraveled if you looked at it, I serged the edges. Then folded in and topstitched at 3/8". When I attached them to the pants I used this as a guide and sewed 1/4" away.

I removed 1.25" in length. Burda is drafted for a taller person than I! I also straightened out the hip curve.

I measured front and back crotch length and removed 1.5 inches from the front. Good grief!!! I added 5/8" to the back. I could have done without it but I have zero patience for low or low-ish rise pants. Drives me insane to have to pull my pants up every time I stand.

Dislike: The cut on fly; I do not like this. IMO a sew-on fly gives a much cleaner finish.

Construction "zoomed" right along until I realized I forgot my belt loops - oops! I attached them with a zigzag at the end of the loop and then near the fold at the waistband. Then made sure I adhered the buttons really well.

Can we talk about my buttons?!!? I had a great large button for the front of the pants but didn't have anything in stash to match for the pockets and belt loops. I went to JoAnn on lunch and almost bought some 'meh' buttons but didn't. Later that day I went to Hancock and SCORE! These are absolutely perfect!


You can see a hint of the zig-zag stitching here for the belt loops. 
I used my paisley bias tape just 'cause :-)

That stain on the lower left pic? Fraycheck. Could not get it out. 
But I'll never tuck my shirt in so hopefully I forget about it :(


Love the front pleat detail, the pockets - everything!!!

Fabric is a suiting material from FabricMart. I am not 100% sure of the blend but am sure that it's a poly blend with a natural fiber (or two?). Maybe cotton, maybe rayon...

It has some drape, took a press with a little coaxing but frayed like mad.

And can we also talk about the versatility of olive pants?!? I had no clue! After doing some Google searching I learned that you can pretty much treat olive pants like you would black pants - score!!!


red chambray NL6104 shirt, black/white Burda 6911 knit top, bright green V1436 top, mint green RTW top, chambray RTW top.

It also looked great with white (duh!), cream, navy...ahhhh! So cool!


Thursday, March 19, 2015

Finished: Butterick 6169

Nope, I didn't think I would make a lined jacket right after making a lined coat either...I am SUCH a glutton for punishment! I did make that little knit top in between...

ANYWAY :)

I have wanted this simple kind of asymmetrical zip moto-inspired jacket for a good, long while. There was Burda 3/2012  that was almost there (not asymmetrically zipped). The infamous Style Arc Ziggi (collared and too outerwear-y) and Kwik Sew 3764 (collared)...the "ehhh...maybe" Simplicity 2056 (collared, outerwear-y)...The new Burda young 6800 (so much collar)...

So many not.quite.right. options. (I'm being super dramatic, I know)


And then I saw the Butterick pattern and said, YES! Yes, that's it!

And then I cleaned out my closet and knew I needed a gray cardigan or jacket. And then I found this extremely lightweight wool in my stash (purchased from a Spot the Bolt! sale at Hancock I believe). And THEN I found this white zipper with silver (nickel?) teeth. Ah yes. Yes please!

I am on a slow decline (wrt my weight) and decided to go for a snug fit now -- e.g., wearable over sleeveless tops (woven or knit) or close fitting knit tops with sleeves -- and decidedly more 'jacket like' 10-15 lbs from now.

I cut a size 14:
finished bust of 42.5" (just barely 3" of ease)
finished waist of 39" (mine is 34")

Miraculously, the fullness of the bust was in the right spot (I usually have to lower it) and the shoulder wasn't insanely wide (usually have to narrow it!)

I sewed the seams between the front and middle front at 1/2" and I did a 1/2" swayback adjusment.

The sleeve width was 14.5" and 15" is more appropriate so I did a full bicep adjustment using the Fit for Real People method of slash/spread on the upper sleeve only. YAY ME!

Scored a hardcover version of the book on 
PR classifieds!

I should have measured where the jacket would hit (high-ish hip) but didn't, so I ended up sewing the side seams at 5/8" tapering to 3/8" after the waistline.

The sleeves are pretty much the perfect length so if you've got short arms, make sure you check that.

Hmm...other things I love:
  • There's a back facing - THANK YOU
  • There's a separate pattern piece for the back lining that has additional ease built in and ease pleats - YAY!!!!!
  • You're instructed to cut the lining pieces slightly shorter (I usually do this anyway)
  • wool. Sew all the things in nice, well-behaved woven fabrics like wool, cotton, linen or blends of these. Goodness gracious <3
Things that made me sad:
  • Oh.my.gosh. You are to assemble the jacket and lining and join them. Then attach the sleeve lining to the sleeve and do some crazy slip-stitch madness. I don't even KNOW what they were saying because I was all 'AIN'T NOBODY GOT TIME FOR THAT!' in my head.
  • The tiniest, useless pockets in the history of all the world.
Things I did differently:
  • Interfaced the hem (jacket and sleeve hems) to get a nice, crisp finish
  • Made my own shoulder pads
  • Bagged my lining (so sorry, so lazy for miles of slipstitching)

And now I've got a moto-jacket of AWESOMENESS!!!!!!!!!!!!!!!!!!!!!!

If you follow me on Instagram you have been subjected to half a dozen in-progress photos :) Aaaaaaand now a ton more! haha!


Absolutely LOVE it


The back unzipped


The back, zipped. See how it doesn't quite fit around my high hip? it's okay...


On Lily


It's so cute zipped!


My hand is all the way in the pocket. They're SO tiny.


Nice and tucked away zipper


I couldn't get this side as crisp as I'd like.


I used a matching lining! :GASP: 

Here I tried it on over this oversized shirt and it still fit but boy was it snug! LOL!


It was also pretty cute over a dress, with workwear and now I want a floral one!!! **What would one line stretch cotton sateen with??

I also sewed 2 tops today  (V1436 and Burda 6911) that need the last bits of finishing so hopefully this weekend I can get them done and photographed!!

Yes, I am now done with 4 of my list of 10! lol! I have also changed my wardrobe (of course) so now only 1 top from the list needs to be held out until after April 1.


Thursday, March 5, 2015

Patience is not MY virtue; Simplicity 2508 Finished!

In my last post  I talked about the initial process; tutorial for bound buttonholes and bagging the lining, etc.

Technical recap:
Size 16 (44.5" finished bust; I am around 39.5")
Adjustments; sewed 1/2" seams on front princess and side seams
100% wool coating in magenta from Hancock Fabrics
100% polyester pongee lining fabric in baby pink from FabricMart
Bound buttonholes tutorials by Iconic Patterns and Julia Bobbin.
Bagging the lining tutorial by Grainline Studios

(Need: small FBA, shift bust point down 1", lenghten sleeve 1/2", raise pockets 3/4-1", back facing)

Yep; this is kind of a LOOK AT MY NEW COAT!!!!!! photo dump.

But each pic has something to say!!! :)


Lining is baby pink poly pongee from Fabric Mart


I am in love with this collar. Like, it's SO cute!!!  Next time I will draft a back facing. Having it lined to the neckline is just weird.

I did triple stitch for all of my top stitching so some of those curves were hard to navigate (like on the front yoke!) but it helps it stand out nicely.


The bound buttonholes. Swoon. They make me happy. I found it VERY hard to transfer the exact location/shape/size of the buttonhole to the facing to make the windows. Need to do more research on how to do that cleanly.

Also, try as I might, I couldn't get all of the silk organza to turn to the inside (a peek of that is in the pic below).

The welts are basically just flaps?? The pocket is constructed like a normal in-seam pocket and the welt is caught between the front and pocket lining. After stitching the pocket closed, turn it all out, press it well and topstitch to the side front piece.


Again, the curves were hard to top-stitch and next time I might just square them off. BUT it was really hard to turn these things right side out! Oy!!


This photo is MUCH more true to the actual fabric color. It's a really deep, rich pink.


To ensure the light pink lining didn't peek out of the yokes, I used a dark berry lining. This is the lining I'd originally set aside for this coat but the color was just off enough that it clashed rather than coordinate or contrast. But for the underside of the yokes; it works.


Uhmm, I have no pics without my hands in my pockets. Too excited. LOL!


When Scandal goes off I'm going to press it again so it's nice and crisp.


Pretty cute buttoned up too! I mean, is that collar not SUPER CUTE?!?! And OMG the length! It's perfect!

In this pic you can see the princess seam fullness is too high. I'll definitely move the bust point down for future versions.


That's my "I'm stoked!" face! If I could be wearing it right now while I eat popcorn and type, I totally would. (I think the last button needs to be like a smidge (is that a word?) lower!)


Side view. I have *very* slight shift in hem from front to back. I ended up sewing the princess seams and side seams at 1/2" for a total of 1" additional room. So this is why I think I'll do a little FBA when I adjust the bust point.

Notes from my earlier post;
the sleeve tabs are NOT too high. They are fine.
There is  NOT too much sleeve ease.
The pockets ARE too low.
The sleeves are *just* right for me. I will be adding 1/2" to the pattern.

Other notes:

I do not own a clapper but even the random piece of pine that I use for setting snaps helped a ton for flattening seams. I had to apply some pressure but it really did help.

I saw lots of suggestions to interface the entire front and I didn't. My front right piece (with the buttonholes) grew over an inch!!! OH MY GOSH. I don't remember if there was a suggestion to stay-stitch but next time I'll either be sure I stay-stitch through the body or interface the entire front piece.

I'm on the fence if I should top-stitch the coat fronts. I feel like it doesn't need it but I get happy when I look at the collar and welts with their top-stitching!!! :)

Tomorrow it'll be about 12 degrees F when I head out for work--I'm wearing it!