Showing posts with label Finished Projects 2014. Show all posts

Monday, December 29, 2014

Finished: McCall's 7093

Hopefully you had a fantastic Christmas (if you celebrate it!). We had a great one!


Airport selfies with mama y papa, and my baby girl too!


I got a Hancock gift card as one of my Christmas gifts and promptly spent it!

I couldn't stop thinking about both tops here and while waiting for my parents to get ready yesterday I cut out 7094 (on the right). I washed up two cuts of rayon challis -well my son did...he washes my fabric often!- and one of them shrank up a lot. The other one, not so much...but neither of them were enough for view D (top image).

So I cut 7093 instead! hahaha!


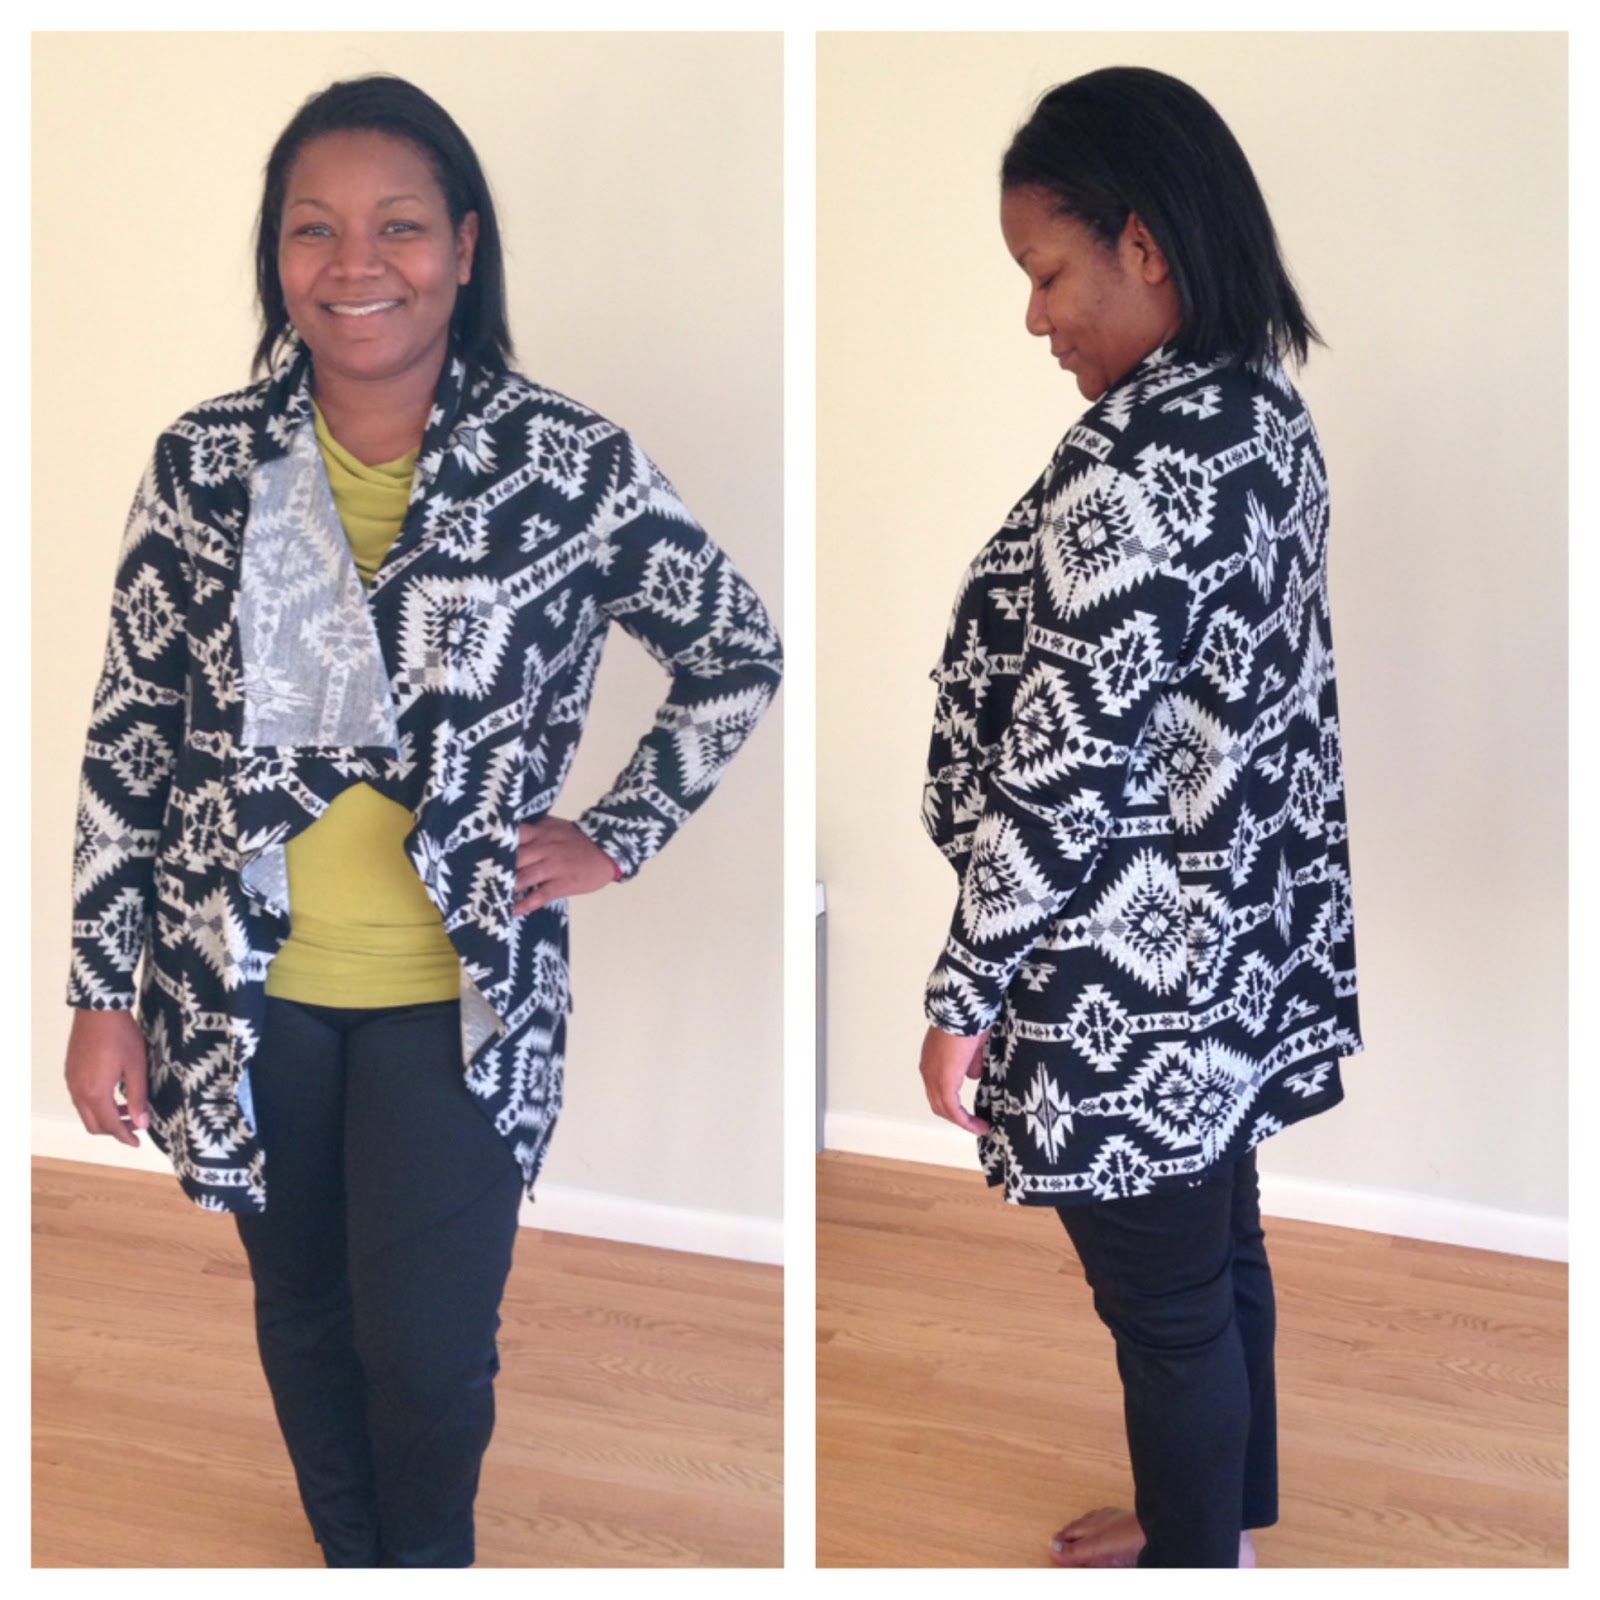
I decided to use black as a contrast for the pockets and thought it would be cute to have the sleeves be contrasting too.

I'd estimate this pattern took me about 3-3.5 hours to complete.

I sewed a straight size 16. I used 1/2" seams at the front raglans and 5/8" at the back.
I sewed 1/2" side seams and did narrow hems.

There was something funky about the bias binding for the neckline. They had you cut a bias strip and fold it in half, and stitch in place, trim, fold to the inside and top-stitch. No problem. EXCEPT it didn't seem wide enough. I double checked that it was supposed to be sewn with a 5/8" seam allowance and didn't see anything contradicting that. Next time I'll adjust for it.

They have you hem the sleeves and then set them, and I attached them first because, raglans. But the sleeves are kind of fluttery (I can't find the right word!) and hemming them resulted in some wonkiness of the top stitching. I ripped out stitching 3 times and I think as a result, stretched out the fabric.

I am NOT a fan of where the sleeves hit on me. But I know better re: cap sleeves. I don't think it looks bad, just not my favorite. I had my mind on cap sleeves because I didn't have a lot of fabric. When I decided on black contrasts, I could have gone with the longer sleeves - duh.

Also, I think I'll shorten the sleeve dart just a tad next time.

On to the important stuff...the pockets.

Easy. Peasy. There's no weirdness there; it's very straightforward. The top of the pocket is hemmed and then it's basted onto the inset piece. It's then caught in the seam between the front and inset, and the other side on the side seam. Boom. Done. Pockets! They are meant to have a slight drape to them, but I think that's illustrated in the pattern art.

It has a pretty exaggerated hi-low hem so if you aren't into that, beware. I really like it!!

The print on this fabric is so dreamy and I love it paired with the black. Yes, the challis came from Fabric Mart. :)


Thursday, December 18, 2014

FINISHED: IH Kimono Tee & My Jelly Roll Quilt!

The quilt was a huge hit!

I was over the straightline quilting after oh, line 15 or so. I posted on PR and got the "there are no rules!" response and ran with it! LOL!

I mimicked the beginning pattern on the other end and did some random lines in the center. One section is all crazy but hey, that's character!

The endless amounts of bias tape that I made didn't make me happy with it's 1/2" width so I ended up using storebought. It performed fine but I wish it were a deeper shade of pink. No matter, I'm sure it'll be well loved regardless.


OMG! mitered corners are some kind of black magic and I couldn't do it. I ended up doing some kind of overlap and sewing it down and yeah...

**************************************

Since my wrap dress turned out a little flirtier than I originally planned and since winter is back in Minneapolis (it was 50 last weekend), I was thinking of something FUN I could wear today on my day off to the ortho.

Yesterday I scored a jean jacket at the thrift store. It's a little snug but it has some stretch and it'll be fiiiiine over thin tops and dresses. I decided it would look REALLY cute layered over the kimono tee but I needed some color!

I had this gorgeous Maggie London ITY in the stash (yep, Fabric Mart) and recently bought stretch lace that SURPRISE! was a perfect match!

I forgot to adjust the sleeve opening but remembered to add length! I added 3/4" to front and back. I did a much better job on the vneck this time :)


Worn with the thrifted jacket, black S2061 pants, and brown boots (I like brown and black together when other, brighter colors are thrown into the mix!)


THEY'RE OFF!

I am ecstatic with my 'new smile' and allllllll the days and weeks were well worth it! :)

Tuesday, December 9, 2014

FINISHED: McCall's 6884

Like many women, and most busty women, I love a good wrap dress! I had a few that were closet staples over years and they've since gotten too small (hahaha! THEY got small; I did NOT get larger!)

I have several wrap dresses in le 'ole pattern stash but wanted quick and easy. So I went with M6884.

I thought I'd cut this pattern out before, but I realized, when I pulled it out, that I got annoyed that the 4 different views are all on ONE pattern piece and there's like a thousand lines; cut here for A, here for B, here for C, here for D. Meh. So I put it away. I almost put it away again this time! :) Knowing I was mostly interested in views A and D, I went ahead and cut it instead of tracing.

I envisioned an easy going dress that I could layer over tights and boots and look all fabulous when I take a me-day and finally(!!!) get my braces off (9 days!).

Like I said in the last post, I was suspicious of it's booty-liciousness and got it to the point of trying on yesterday. I stuffed it in my work bag and ended up trying it on in the bathroom.


So yeah, a little more than what I was bargaining for to visit the orthodontist! :) That fabric at the hip is because I do not curve NEARLY as much as the pattern did! 

I started with a size 16, which has finished bust of 39.5 and hip of 42.5. I sewed it with 3/8" seam allowance because I was skeptical - so adding 1" all around - and then ended up removing all that excess in the hip. Also, using the 3/8" sa in the sleeve made it PERFECT. 

I do need to add a wedge at the back pattern piece for my behind. It's higher in back than in front.


It feels shorter than it looks.

Instead of turning and stitching the neck opening, I made a long strip and serged it in place, and then turned and stitched that. This fabric isn't happy being sewn just two layers. It needed a nice thick base to feed through my machine -or- stabilizing with fusible. I used the fusible on the front skirt openings (which provide adequate coverage, by the way!) and did a double turn and stitch on the hem and sleeves. 

I didn't intend on having long sleeves and if I did, these wouldn't quite cut it. So beware of that.

Oh and I fully intended to add about 6" to the ties because I wanted to wrap them around. Totally forgot and they are too short to come back around to the front and still look good.

Shorty ties when wrapped around
Front band
Hem - look at how neat that is! Go me!!
Coverage on the front skirt

I really like how this came out and can't wait to make the long version next summer with this gorgeous ITY I have.

Oh and like someone mentioned on their blog recently; unless I say otherwise, my fabric came from Fabric Mart! LOL!!!

I have this in 3 colorways and it's all lusciously soft and presses nicely!


LOVE it!!!!

**Oh, almost forgot!!! Since my photographer is now a busy working woman :) I found a way to get pictures all by myself! This was taken at like 9:30 p.m. and the color is pretty true, but we have what I'd guess is 1 gazillion watts in our dining room light (it has a dimmer, but on full blast - woah!). I propped my phone up and used the timer (yay iPhone!) and after about 8 tries - score!

Now I have put a tripod for cell phones on my Christmas wish list. Woot!


Thursday, November 27, 2014

Burda Strikes Again!

I never got additional pics of the dress soooooo let's just discuss the particulars, shall we?


"Must-have dresses with integrated kimono sleeves, narrow skirt added to the bodice, fitted to the waist with an elastic casing and charming fan-shaped waist folds. Dress A has striking shoulder seam openings."


I love Burda's descriptions! hahahaha! STRIKING SHOULDER SEAM OPENINGS!!!!!!

I cut a 14 neck/shoulders, 16 bust and waist and 18 hip. I used black ponte that I scored nearly 10 yards of when Fabric Mart had a sale. So I might be doing All Black Everything! (music reference) :)

Construction of this is very straightforward. The are where the bodice and skirt pleats meet is so insanely bulky!!!!! I definitely had to baste and take it slow going over that section.

I chopped 2.5" from the hem, and didn't add the elastic at the waist. I would probably never wear it unbelted. Something went haywire with the neck binding so I ended up turning it to the inside and topstitching - problem solved.

THOSE ARM OPENINGS! That is probably my only gripe with Burda - mag and envelope patterns - they think everyone has super svelte arms!

I loved wearing the dress and think it's a fun LBD to have in my wardrobe!!

**********************************

I've been wanting to make my coat but my hand has been kicking my behind and cutting all that heavy fabric is not in the immediate future. Soon. SOON!

I went back and forth and back and forth on whether or not I was going to sew something to wear for Thanksgiving. I knew we weren't going outside (it's 7 degrees F. Seven.) so I was going to make a dress or skirt but I need to get more practical with my sewing so I went with a new shirt!

Even though the mercury is way lower than it should be, it's still fall darn it! I sewed up one of the shirtings I got with my Fabric Mart dollars using Burda 7136. I mean, I just used it, so why futz around with something else?!

The pattern calls for 1 3/4 yard of 44" fabric. Ignoring my plaids (which I had to do), I still had to do acrobatics and cut some pieces on the cross grain!

Sheesh.

I cut the fronts single layer and did it matter? nope. Still off. By like 1/2!!!  But I love the shirt enough that it doesn't bother me.

This fabric is COZY. It's super soft and washed and pressed like.a.dream. Still a few yards available at $4 per. (here)


I did my FIRST ever bicep adjustment! It's a silly fiddly one but - yay! My arms are not constricted by my sleeves. Whoop!

See the off-ness of the plaid? Meh. 

Somehow I managed to have 13 matching buttons in my stash. I have realized though that I'd like slightly smaller buttons for my sleeve but I only had what I had. Because my hands have been hurting I sewed the buttons on by machine, pulling the threads through to the back and tying a knot.


Look at those plackets! ;-) None are backwards - yay!
Last time something wonky happened with my collar and here I feel like it's a little short. Eh. It'll be alright. I did a narrow hem, like usual.

I decided it SHOULD have navy topstitching because? I like blue. The directions have you stitch the front bands down, then just turn that section up at the hem. That is not so clean. I did it so the inside of the band at the hemline is enclosed.


I have room for my arms!!!!!!!!!!!!!

I wore it with my V1411 legging-pants today for Thanksgiving. Plenty of room for turkey and stuff.

DD picked out my necklace and loved my cocktail ring.

Saturday, November 15, 2014

Finished Items; Burda 7136 & Vogue 9032

Because I've made V9032 already (here)...

Dear Butt Princess Seams, how do I love thee?
Let me count the ways!

I really love this pants pattern and must refrain from making 18 pairs of the same pants. This time I used a poly/rayon/lycra suiting fabric from Fabric Mart (here). It takes a press well, has some drape but is not at all wrinkly. It was $4/yd and I like the color and it behaved well during washing, drying and construction - win!

I made no changes (intentionally) from the last pair. I was cruising right along and then realized I was supposed to put the zipper in AFTER the pockets. Because the pockets are 'caught' in the zipper area. So I had to do some rigging. But I mean...that's the inside so... :-)

Serger was loaded with grey and white so the inside is finished with grey and white! I did not do the bias tape on the facing. I really love that little feature but it feels so time consuming.

The deep hem I LOVE!!! It provides such a nice weight to the pants.


And I finished my shirt! yay!!


I decided to cut a size 14 which had a finished bust of 41" and do a FBA of 1/2" - for a finished bust of 42". I thought that would be plenty of room. I have diagonal lines so I am thinking I needed maybe a bit more length over the bust. I made a narrow shoulder adjustment of 1/2".

I measured the sleeve and could have sworn I was 'okay' with the bicep width but they are a bit snug there.

Those dang blasted pockets.

I wanted them but now I want to rip them off. Bleh. The real issue is my sloping left shoulder (which I never account for because I know I should kinda make a separate front pattern piece and fix it but that's too much like right!). When my shoulders are relaxed; the pocket droops/slopes! Grrr!

There are wrinkles in the back which honestly don't bother me :oops:! I hope the fit police don't get me.


I LOVE it tucked in, but I rarely wear my shirts tucked so...

I realized my sleeve placket doesn't bother me. It makes me chuckle every time I realize it's backwards. Like, it's not an ever-present "OMG MY SLEEVE PLACKET IS BACKWARD" thing...

What's really funny is that on the correctly done sleeve placket, I ended up doing the buttonhole on the wrong side! hahahaha!!!!!

I started unpicking the stitches and then thought, 'ahh, what the heck. The button will cover most of it' and I left it.

What else...
*The sleeve went in perfectly and I am almost wondering if there is too little sleeve cap ease.
*The cuffs are a bit narrow (someone, Graca??, mentioned this. Like there isn't even 1/4" to seam the sides of the cuffs, it's weird.
*The placket has 5/8" seams which is just too much. I was surprised this wasn't pared down to something more manageable
*The sleeve length was perfect for me. But I have somewhat long arms for my height. When I made B5678 and all my 8,013 M6844 cardigans I added 1" to the sleeves.
*I didn't follow the placement suggestion for pockets or buttons cause...Boobs.
*I used darker thread for my buttonholes for some contrast - I like it.
*Fabric is some crazy nice shirting from Fabric Mart, bought with ma' winnings. Woot! (the photo showing the buttonholes is closest to the true color)

First time doing plackets, SUPER proud of my edge stitching, 
clean finished yoke and nicely set sleeve!


This was also my first time doing a flat-felled seam! And umm...unless I make a shirt for one of the dudes, I probably won't do it again. So fiddly. So. So. Fiddly. I did not enjoy that process at all. 

Something weird happened at the collar. I don't know if I accidentally cut a size 16 collar or what but it was as I was trimming the seams that I realized I shouldn't have bulk where I was cutting. Well, that's because my collar comes all the way to the end of the collar stand (vs ending 1/2" or so away). It also doesn't bother me. I will double check things for next time though.

When I first got my machine, I made buttonholes. Like that same day! I was amazed that you can make buttonholes!!! and they were pretty good. Eventually, I started to realize my machine does not make very nice buttonholes and they were coming out uneven and pretty janky.

I was going to go to a sewing store that has an open sewing night and use of their machines for the buttonholes but they had no open sewing FOR THE ENTIRE QUARTER (insert mock outrage!). 

Lo and behold my machine stitched some pretty freaking awesome buttonholes. I wanted to hug it or pet it or give it cookies - something. And all 11 of them are perfect. Perfectly consistent buttonholes.

Sunday, November 2, 2014

Finished Item: In House Belle Bow Blouse

I've been posting a lot the last week - sorry!  But if I have something to share...I like to share! :)

I posted 4 tops, trying to decide which I'd add to my wardrobe this month:


I really want to make that McCall's top because it kind of reminds me of the Bruyere with it's general shape ( I can change the gathers to pleats) but I really wanted the Vogue top because it made me swoon the minute I saw it. 

I cut all the pieces out for V1387 on Friday while at home (I had the day off!). I read the directions and for some reason I got scared of it! I mean really, it isn't "difficult" but I have the pattern pieces nicely arranged on the ironing board and NOT the cutting table. Boo me! 

Friday night, while waiting on trick-or-treaters, I started assembling the Belle blouse (I really dislike the pdf thing. Goodness gracious I dislike it.) I cut the pattern pieces out (sometimes I trace, sometimes I don't. This time, I didn't!) that night and sat it aside.

I didn't even have much sewing mojo Saturday and started working on the pattern later on in the day. I chose this crazy print cotton voile that I'd picked up from SR Harris earlier this year. I don't know what made me choose this, maybe just because I love voile so much? Every time I pulled it out to use it, I knew I had to choose my pattern wisely due to the print. Oh and choosing a crazy print meant mistakes could be hidden but it also meant markings would be hidden! I swear it was as if I never made any markings on the damn thing at all when it came time to sew. Grrrr!

Not feeling like making a muslin, I decided this would be a wearable muslin. And based on finished measurements, I cut a size 12.

Wait -- It is imperative to note that this top is drafted for a D cup. Can we just clap or fist pump or pelvic thrust or something about this?! No FBA. Oh. Yeah!


The pattern has shoulder gathers and release tucks at front and back. The side seam has very nice shaping too!


Do you spy my tucks?? :)

Now, you may notice that fold of fabric in back. When I finished it, it fit so beautifully and then I turned to the side and WHY!?! Where is that fold of fabric coming from?!?! I have to assume it's some major swayback issues. When I extend my back to make it straight, the fold disappears. I ended up 'raising' my tucks another 2 1/2 inches in back to eat up some of that excess fabric. Believe me that this is much better than it was initially.


Before we talk about the other technical stuff, let's see more pictures!


The instructions mentioned they produce a clean finish on the yoke. I honestly couldn't quite understand the directions but I know how to do the burrito yoke method; which is what I did.

neat-o!

The tie collar connects from the front and there is a notch their to match, and another notch at the yoke seam. Well, someone sewed from the wrong notch and had to finagle the collar in place and ended up just serging the seam. But with the tie-neck you'll never see the serged seam anyway.


The sleeves are cut on and are hemmed with a narrow hem. 


There isn't a button band but there is a facing. I find this absolutely fantastic. 


And the front piece has the little excess cut out already to make a nice, clean finish on the hem. swooooon.


 And I had these tiny buttons in stash - score.


Now that we made it through a monster post (are you still there?? helloooooo?) :)

The pdf pattern went together fairly well. There were a few spots near the end that didn't perfectly match up at the markings, so I went by the size lines. 

The pattern has 1/2" side seam allowances, the front facing attaches at 1/4", the collar is 1/4", the yoke seams are 3/8", the tie is 3/8" at cb and 1/4" for the rest. This was NOT fun. I had to make a list because like, seriously. 

I read the directions before assembling the top and then ended up still doing my own thing and made some parts more complicated than they needed to be...but it worked out! 

Ah and fabric. The pattern calls for 1 5/8 yards of 60" fabric. Maybe my fabric wasn't quite 60" (but it wasn't as short as 44/45") but there was no way I was fitting those pieces on that fabric. I will have to check it on fabric that I know is wide enough but on this fabric I could not fit the tie on the bias and ended up cutting them on the cross grain. Everything still fit together just fine, but you lose that drape that the ties would otherwise have. This fabric is quite crisp so the bow can be unruly if not tied just right. 

I've been wanting a bow front blouse for like, ever. I really like it and have visions of an ivory challis with black collar & bow. 

Also, I think I have to buy the Kimono tee too. I like the shoulder gathers and the yoke. It's officially on my wish list!


Friday, October 31, 2014

Back To Our Regular Programming!

:)

I have read every comment and wholeheartedly agree with you all. I love sewing and as a whole, I love the sewing community!!!! Let's get back at it!

FINISHED ITEMS!!

So, I've already written my October wrap-up and was going to post it today, but I have new stuff to show - woohoo!

When I got back in town from my work trip, I knew I needed to get started on my daughter's dress for her Sugar Skull/Dia de los Muertos costume. I couldn't make myself start it. Finally on Sunday evening I decided I had to sew something simple to jumpstart the mojo.

I had been meaning to do another version of my RTW copy top that I made for the FM contest and with 2 pieces and a banded hem, I decided that would work perfectly. I had this AMAZING rayon jersey from Fabric Mart and it was washed and ready to go. I assembled it on the serger and went to do a narrow hem on the neckline (the same as I finished the first one) and all hell broke loose. Suffice it to say that after removing stitches for the fourth time, I had all but given up, "But the fabric feels soooooo nice" I thought to myself, so I decided to bind the neckline. THEN, my sewing machine was happy sewing on it. WHEW. The inside isn't perfect and with all the ripping out I'm sure I stretched the neckline out a bit. I will have to add bra strap carriers - but that's okay. Because of the nightmare, I said, forget that noise, and banded the sleeves too. I *LOVE* it.


The fabric is very silky and luxurious feeling. WINNING.

So then I started her dress. This dress had the right shape and I thought it was SO cute. Why did I not say to myself, "Self, this has too many pattern pieces"


At least I was smart enough to leave off the pockets! This dress has 10 pattern pieces (x2) and pleats. It was Thursday evening and I was struggling to just get it finished. So it wasn't fitted much at all and some finishes leave much to be desired.  

I cut a straight size 12 and ended up doing 7/8" side seams. I used an invisible zipper instead of lapped. I chopped off like 4" from the length and did a top-stitched hem.

It's a little big in the upper body but she loved it. And I think it'll come in handy for her!


The dropped waist and pleats are fantastic! 

She wanted a peter pan collar but I just didn't have time to do so. I ended up bias binding the neckline.

I was off work today and I'm coming down with a cold so I was intent on relaxing today. I chilled for most of the morning and then decided I need to get sewing! :) I got myself too afraid ton start up on V1387 so I decided on 'easy knit project' -- again. Lazy.

Butterick 5789, view D. I sewed a size medium using my brand spanking new sweater knit from FabricMart.


There were instructions for finishing the collar such that you didn't see the stitching but I wasn't bothered by serger stitches so I just -zip- serged it in place. I did have to hem that entire, freaking, thing as a narrow hem. I cannot promise you that it's 5/8" and I cannot promise you that it's completely even...but it's done! :)


I don't like it buttoned though :-( It looks weird on me when it's closed. 

And I'm thinking the waterfall style just isn't for me. Maybe because I'm busty? I don't know, I realize I don't love my Vogue cardi with the waterfall and don't love this one either. 

There was no print matching attempts. Well, there was but I couldn't make it happen with the sizes of the pattern pieces and 2 yards of fabric. It doesn't bother me though. 

My pants are v.2.0 of Vogue 1411! :-D  I have a whole lot of this Maggie London ponte in black. I was smart this time and stocked up on it. It's such a good weight for so many things!


The stitching still looks super cool on all black!