Showing posts with label Fabric Mart Fabrics. Show all posts

Saturday, July 18, 2015

Finished: McCall's 7193

EEEK!

I cut this out Friday night and finished it up this afternoon. At around 4.5 hours, I consider this a pretty quick make!

I didn't feel like making a muslin and decided to use a size 14 neckline and shoulders and a 16 everywhere else (I will give myself more hip room next time). I used a magenta poly crepe from Fabric Mart (still here) which handled fairly well. I used a size 10 needle and slightly contrasting thread.


See? I think more space across the back will stop it from hanging up on my butt. However, this will NOT stop me from wearing this top!


Usually with narrow hems I serge the edge and use that 1/4" line as a guide. I didn't feel like messing around with tension (to prevent stretching things out), so I just stitched a scant 5/8" line and then folded on the line, and then turned the raw edge in to the fold. Not too bad.


I serged the side seams (there were too bulky for French seams), used French binding for the armhole opening (as per the pattern), and slip-stitched the yoke facing (as per the pattern).

Yes. I followed the directions.

If you make this, you should just follow the directions. So yeah, If you're not super experienced...just follow the directions...

LOL!!!

They have you narrow hem the front and a portion of the lower front. Then sew the side seams and apply the French binding (I love this by the way). Then you sew the yoke and yoke facing together at the neckline and armholes. You sew the yoke to the front and back and then slip stitch by hand. 

I was all "I'm not doing all that hand sewing!" but I am SOOOOO glad I did! It really looks great!

The color in the last pic is most true. I cannot wait to wear my new top! I'll likely make the sleeved version at some point and would like to make the other view too but would muslin that. I wouldn't want that front portion to turn into maternity wear.

Now to start on my bright cottons and rayons! :)

Sunday, July 12, 2015

FINALLY Finished: Butterick 6182

I started this skirt over a month ago. So hopefully I can remember all of the details!

I have been wanting to add some skirts to the wardrobe and am very happy with my B5760 straight skirt pattern but wanted some variation. It seems like what's available is either straight or LOTS of volume by way of gathers, pleating, etc. I was really drawn to this skirt after seeing a couple versions made up.

Based on finished measurements, I cut a size 16. I could have done a 16 front and 18 back. I think that'll be my default with skirt patterns, especially if I decide to muslin. It just seems to work better than futzing with the back pattern piece to make it larger or the front piece to make it smaller. We can just do whatever works, right?? :)

This fabric is a printed linen that I received (free) from Fabric Mart when I won week 4 of the Fabricista's contest. It was still quite stiff when it washed up which I thought would make it perfect for this skirt.

Once the waistband was sewn on, I couldn't zip it. I thought it was due to err, *that time* and cast it aside! A couple weeks later, I went to try it on again and it was still tight through the high hip and waist so I knew I needed to let it out a bit.

A couple more weeks passed and I removed the invisible zipper and switched it out for a lapped, and let out the side seams about 1/4" (for an additional 1" total) from the waist through about 1in above the bottom of the pocket.

Perfect.

Except...didja notice a couple weeks then a couple more? Yep, it was that time again. So now, that the skirt is all done, it is loose at the waist. Ay yi yi. I'm not redoing anything. It just sits lower than intended.


I just used this cardigan for pics...I never wear it closed so ignore the gaping


I like these pockets! 

Oh, how could I forget...I HATED THE WAISTBAND!

The pattern piece for the waistband is over 6" wide **the pattern piece is just over 6" meaning the finished width is about 2.5"**. It is a straight band. My swayback is too pronounced for that and it looked terrible. I literally cut it half. So my finished band is just about 1" wide. 

There is bias facing applied to the pocket opening which I absolutely loved. I used rayon challis for this as my fabric is quite stiff. The pocket sits so nice and flat.


My lapped zipper with slightly wonky stitching...

In the end, I just wanted the danged thing finished. I serged the bottom and catch stitched it by hand. I decided that with my fabric, that would work better than a topstitched hem.

The verdict? Meh.

I like it. As in, if I saw it on a hanger or on someone or something I would think, "oh, that's a cute skirt..." But I don't love it. 

As with most of my iffy makes, I WILL wear it at least once before I decide it doesn't work for me.

****************************

After getting all 'woe is me' about not having much sewing time this month and barely having the energy to sew,  I made a little short term plan for July and August (yeah, yeah, I know, I will probably change those plans!)

I saw a cute dress that was colorblocked aqua/teal/navy and decided that would be the scheme of my next Vogue 8805! But I had no aqua. And Jess of Sometimes Sewist gave me some other suggestions! One was gray and I was really excited about it once I was able to get home and see the 3 fabrics together.

She also suggested white, which I wish I had a nice white ponte because that would have looked NICE. (sidenote: Now, I will have to have ONE more in white/kelly green/navy!)


It needs side seams sewn and then finishing (hems, neckbinding, hook and eye)...but I just got home after 6 hours worth of softball in 90 degree heat and I am far too tired to even think about it.

Until later!

Saturday, March 21, 2015

Top-A-Palooza! Burda 6911, New Look 6104, Vogue 1436

Hey, I warned you there would be a sew-a-palooza!! Of course now I'm burnt out! :) This is one epic blog post - sorry - but easier to just do it!


Vogue 1436 caught my eye when it was released. I love a good shirt and the details on this one were especially nice.

I would love to have used something sort of drapey but am not friends with those types of fabrics currently ;-) I chose a cotton lawn from Fabric Mart in "spring green".

When I pulled the pattern out I was surprised that I'd chosen the larger size range. I must have done that because of the pants...So I was stuck with a size 16 which, I normally cut a 14 and FBA. However, I have noticed that I do in fact need a 16 in Vogue patterns! Perhaps just a smaller FBA. Hmm. We will see on version 2 because there WILL be another one!


Next time I'll do an FBA and rotate the dart into the pleats (I know how to do that now!). Something went wonky with my casing for the strings. It's not noticeable but next time I'll baste it in place. It must have shifted while sewing the collar on. 


See? Need an FBA for extra length over the bust. And, I totally needed a full bicep adjustment. Sheesh. And the sleeve is just a bit too long. But not much, 1/2" max.

I removed 1" from the length as a 27.5" finished back length made me all crazy. I like where it hits now.


I love the front pleats and the mandarin collar! And I did my first rouleau! yay!!! I was so petrified about that and was going to leave it out. But once again, Fashion Sewing Blog TVs YouTube channel to the rescue! It was pretty danged easy.

The sleeve closure! LOVE!!!!!!  This is totally what drew me in to this pattern. Swoon. I had used a nice purple washaway marker to make all my marks and had the top ready for closures so I decided to wash it. Aaaaand of course washed away all my markings! LOL! So I just eyeballed the snap placement on the sleeves and this one is a little snug against the D-ring.  The pattern called for 1/2" rings but I could find no such thing locally. I used 3/4" rings.

Burrito method baby! The pattern of course has you folding the sa and topstiching and al that...nope. I'll just burrito it thankyouverymuch!

The saga:

I decided I had to do snaps vs buttons and went to look for my snap tool. Couldn't find it anywhere. I knew I had it because I used it in February for the Burda crop top. Looked high and low. Nothing. So I bought another one. (Of course I found the first one, this morning). 

Anyway, I set the 'male' side just fine and did the smaller ones on the sleeves. And then went to set the others. First one - great! Second one? All h3ll broke loose! I reset that thing 5 times. I thought I was going to ruin it! I moved on...Came back to the second one and set it. Great! 

Uh oh.

I had done one of them backwards. COCONUTS!! (A replacement word my then 3 year old nephew used when I told him "aw crap" was unacceptable)

I found a sturdy pair of tweezers and popped it off. Well I popped one off. The wrong one. SERIOUSLY!  Then the last snap well...I realized I had run out of 7/16" snaps what with all the ones I RUINED. Hmmph. The last snap is a 3/8". Shhhhhh. It's only 1/16th smaller, no one will notice! haha!

In the end, all is well with the green top :) It's a great addition to my spring/summer wardrobe!

*****

Next up was Burda 6911. I had 3 yards of this striped fabric so I figured it if it went horribly wrong, I could cut another one. I was feeling confident though after reading all of the reviews on it. 

The front is so convoluted that there was no finished bust measurement, but there was a finished hip measurement (I also measured the waistline too for that finished width). This top had tons of negative ease but I was afraid to cut an 18 because I didn't want the neckline to be big...yet I had no clue how to add to this crazy shaped front pattern piece!

I sewed the center front seam at 3/8", the shoulder seam at 5/8" and the sleeve/side seams at 1/4" (with the exception of the sleeve hem and under arm - those were at 5/8").

I did the majority of the construction on the sewing machine. Just easier to manage all those odd seams vs using the serger. I did finish the side/sleeve in one pass on the serger...but the bulk of the work was on the front pattern piece.


I wasn't sure about it when I finished it and then my friend said that it was hypnotizing her into staring at my boobs. HA! And then my husband was holding my phone hostage, staring at the picture, and then told me to "send him the pic" and that if I "wear that out in public I am "traveling down a slippery slope". (he jests, of course). :)

I like it and I like it A LOT with a cardigan/jacket. And I will be making it in grey for the wardrobe contest.


Also, this top is LONG. Is there draft for someone 5'8" or something!? I chopped 1.5" off the bottom and did a 1.5" double turned hem. 

I did an excellent job matching those seams on the front and side - yay me!!!

Do you see that line on the side view? I think now that I know that's the underbust seam, that I can do some sort of cheater FBA to get more bust room. I will also remove some of the curvature through the waist -- I'm not nearly as hourglass-y as Burda thinks ;-)


SOMEONE didn't read the directions thoroughly and stitched a gorgeous back neck band. When I went to attach the front to back I realized I was supposed to fold the back band to the inside. I didn't want that unfinished intersection so I handled it like one would a cowl. Wrapped the front facing piece around the back and stitched. It worked really well on one side; not so much on the other. I then topstitched the back with a twin needle.

The two lower pictures show 1) the front facing. So nice not to have to finish that front V! It gets caught in the sleeve seam! and 2) the twist is done by leaving a small hole in the end of this fold. Instead, I stitched the seam and stopped short of the dot; and then stitched up part of the other side so it would be reinforced on both sides of the hole.

*****
The last palooza top was one I made previously, New Look 6104. I've made it 3 times before; the first one was too big, the second was a lovely purple chambray that I had to sew with smaller seam allowances. But I didn't yet have my serger and it unraveled right through the seam. The last one suffered from bad fabric. Sigh.

This chambray is so nice. I originally got it for a shirtdress but I think it has too much body.


I like it more with my cardigans/jackets. The length is so perfect.


I cut a size 14 and did a 3/4" FBA (which I didn't know how to do yet the other times I made it!). I seem to still need more length over the bust.


I harvested a bunch of buttons and zippers during my closet clean out. I got these from an Express shirt and flipped them over so the text wouldn't show.

And I made PAISLEY bias tape! Yes! YES!!!!!

I used white thread cause uhmm...lazy?

I had JUST been complaining about how crap my buttonholes are lately on my machine and then it performed pretty well today. I think it's fine when it's real super sturdy fabric. Buttonholes on knits? Nope. My machine says NO.

So now I've got 5 of my list of 10 sewn, and one is being held off on til the start of the contest. I don't think I can sew the other 4 before March is out, I have to start my daughter's semi formal dress.

I'm tired. LOL!

Friday, February 6, 2015

In Pictures: Stash, Some Sewing and a Special Day

I was on the wagon and then...boooooom! CRASH! The E-O category was on sale for 50% off + an additional 20% off coupon and all heck broke loose.

The beautiful sweater knit was sold out by the time my order was filled - WAHHHHHH!!!!! There were 26.5 yards when I ordered :( It must have been really popular! Ah well.

The damage: 


Knits
(bottom 3 solids are ponte)

Solid green and pretty printed ITY


A slinky jersey


A cotton/lycra knit (the color is very vibrant! let's hope it stays that way!)


This jacquard double knit feels amazing!


Coating - I must have missed where the herringbone said it had metallic threads.
I don't know if I like it. The other is solid black and SOFT!


Wovens


A 'buy the piece' boucle


Pinstripe for pants


More plaid- I keep buying it but have yet to sew it!


Yes, there's a huge stack of this suiting. I have a plan!


Pretty lace


More pretty lace!

The solid green is a soft cotton lawn that shall become the new Vogue Anne Klein top.

******************************

I was mojo-less and in an attempt to make it show up, I sewed new machine covers. I later realized it was over something that was unresolved. And then that matter was resolved and then - yay! My mojo returned!!! 

I was going to use a Butterick pattern I have and then decided I was NOT going to cut pattern tissue to cut rectangles! I measured length/height/depth of my machines and added 1/2" for hem/seam allowances.

I sewed the top to the front and back, sewed the long seams on the sides and then finished with the short seams. I made sure I pressed it well and then hemmed.

I added a white strip to 'break up the pattern' a bit and decided to hand embroider it. I interfaced this strip of fabric and then used a decorative stitch to attach it to the front of the covers.


The mat was based on uhmm...a scrap of fabric I found after making the covers! LOL!!!
I interfaced the "outside" of the pocket, sewed a facing to it and then attached front to back. I turned it out of the top of the cover and then just topstitched it shut (it's hiding under the machine anyway!)

I then did double lines of stitching to make pockets. 

If I did this again I would make the pocket piece slightly wider so that there was more slack.


hand-embroidery! :-)


The serger cover is still awaiting it's embroidery but now I have a scrap catcher - YAY!

************************

My son, my youngest, turned 15 years old today. My how the time flies :)


Thursday, January 29, 2015

January Wrap Up


This month I sewed:
  • Style Arc Sandra jeans - 1.5 yds
  • Vogue 8597 top in navy ITY and animal print jersey - 3.25 yds
  • Vogue 9032 pants - 2.25 yds
  • In House Kimono tee - 1 yd
  • McCall's 6996 cardigan - 7 yds (photos to come, promise!)
    1. grey/cream striped French Terry-2 yds
    2. navy wool jersey - 1.75 yds
    3. animal print jersey - 1.75 yds (for my mom)
    4. animal print ponte - 1.5 yds (for my dd)
  • New Look 6261 lace/ponte dress - 2.75 yds
  • Burda 1/2015 #108 skirt - 2.5 yds

That's 20.25 yards out this month!

2 cardigans
1 dress
3 tops
2 pants
1 skirt
2 gifts

Favorite: Has to be my black V9032 pants. That fabric is divine and I wish I had MORE of it.

Biggest accomplishment: my jeans! Of course!! I am waiting (IMPATIENTLY!) on the PR jeans contest to sew another pair.

Fail: Miraculously; I have no wadders this month! Let us cheer!! If I had to choose a fail, I'd choose the french terry cardigan. The fabric is like, scrumptious but it isn't as awesome as I pictured it in my head. I'm still trying to figure out how I can make it better.

Because 1) I hate picture-less posts (idk why) and 2) I may have gone fabric shopping...Here are a couple of pics of things I'm excited to get my grubby little paws on


Sunday, January 25, 2015

FINISHED! New Look 6261; The Lace Dress

Ah but wait!!!! GIVEAWAY WINNERS!!!!

THANK YOU for all of the positive messages on my sewing/blogging anniversary post! I really love interacting with everyone in the sewing community!! All of you awesome ladies really enhance what is a gratifying way of life hobby!  :-D

:Drumroll:

Prize A: A free PDF pattern from In House Patterns
Accordion3 is the winner!!!!
Send me your email address and pattern preference and I will get it to Alexandra.

Prize B: A 3 pack of McCall's/Vogue patterns
Carol G is the winner!!!
Send me your size preferences for V9032, M7093 and M6996 and your mailing address.

Prize C: A $15 gift certificate to Fabricmartfabrics.com
Myra is the winner!!!
Send me your email address and you will get the gc info directly from FabricMart

I gotta tell you; random.org REALLY wanted Shams to win! Haha! Her number came up more than once! :)

My email address is sewcraftychemist --at-- gmail --dot-- com

******************************

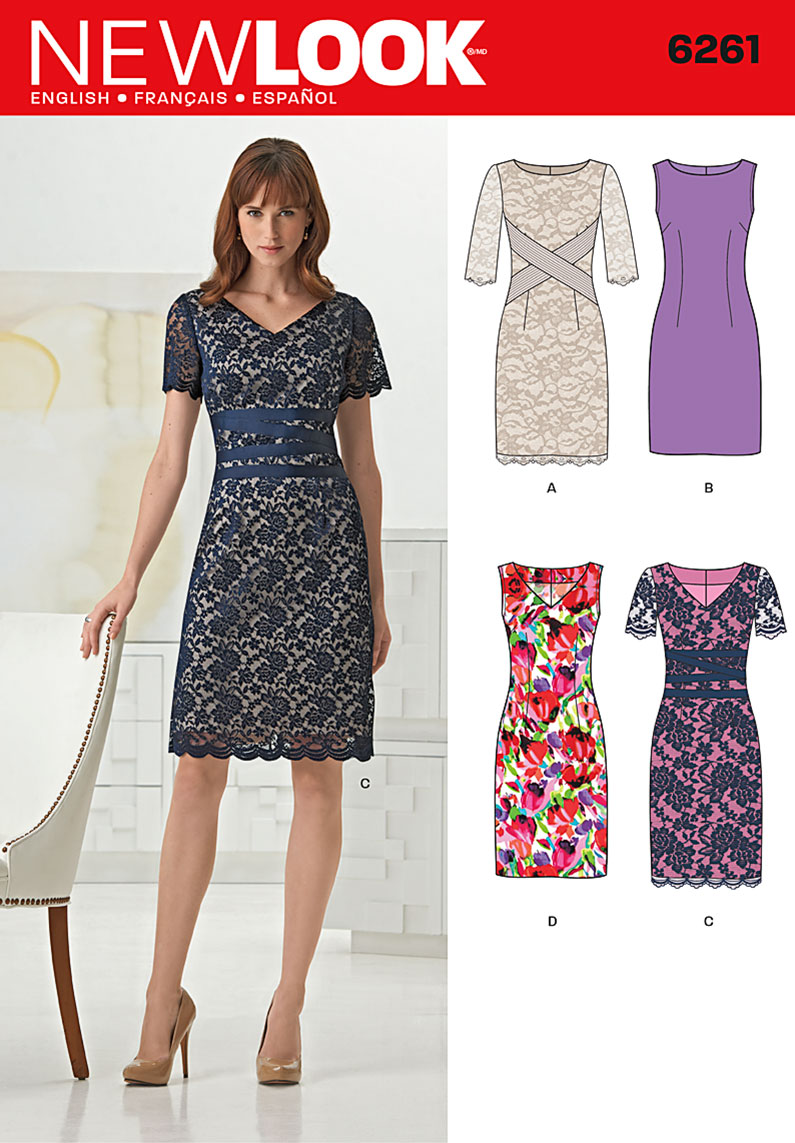
Nearly a year ago, when the spring New Look patterns were released, I was all aflutter over 6261. I muslined it(!) because I wanted to make it to wear to a fundraising event. But I never did.


Browsing online, I came across this Tadashi Shoji dress:


I decided I had to have a black lace/nude lined dress!!!!

((Apparently this pattern was completely inspired by Shoji??))


Anyhow, I remembered the nude (latte) ponte in my stash and set out to get lace. I very, VERY rarely buy fabric from Hancock or JoAnn (ok, I will probably never buy fabric from JA again...) but I didn't have time to order anything and didn't feel like driving to SR Harris.

There were several nice laces at Hancock and initially I was going to go with a stretch lace and lo and behold I found the beautiful, ever-so-slightly-metallic lace print. 


And then the lady at the cutting counter said it was $2.39/yard.

WHAAAAA?!?!!? SOLD! I bought all 4.25 or so yards. 

 And THEN it occurred to me that I had THAT pattern! And THEN I remembered that I had already muslined it!

I  mean, the stars were truly aligning in favor of this dress.


I really wanted the bands :( But they were fabric strips cut on the bias and topstitched with 8(!) rows, each 1/4" apart. There's no way I had time for all that.

I REALLY liked the look of 1.25" grosgrain ribbon that I had in stash (I have an enormous ribbon stash from my defunct Etsy store!) but I did not have enough to do the bands. I settled for 3/4" satin ribbon. I like it though...Jazzes up the front a little bit.


I did a decent job fitting my major swayback and look at how nicely the back neckline is lying!! 
Do NOT look at my tummy pooch. ;-)


I wasn't sure but yes, my right dart is really a bit further than it should be.
Hard to mark that lace...

But my invisible zipper! <3


If you're afraid of invisible zippers; don't be!
Get an invisible zipper foot and it becomes the easiest zipper to install!

I was going to have sleeves; leaving them unlined. But hubby thought it looked odd because the "nude" of the dress did not "match" my darker "nude" arms beneath the sleeves.

Did I give you enough quotes??

I said, eh. that's fine. I don't need to be setting lace sleeves ANYWAY. And I used storebought bias binding. But knowing I wanted no visible stitching, I hand stitched them in place.

yes. Another thing I said I hated doing which I now relish. Go 'head, shake your collective heads and say "told ya so" :)  I did a really quick catch stitch on the facing.


Other notes:
I sewed a size 16 with 14 neckline. I didn't need an FBA. Go figure.
I did a 1/2" narrow shoulder adjustment and 3/4" swayback adjustment.
I removed about 3/4" from the back neckline tapering to nothing about mid-way between neck and waist.
I used lightweight fusible on the facing and interfaced the zipper area.

wait.

I have seen Wash Away Wonder Tape talked about but WHYYYYY did no one tell me to stop what I was doing and immediately get some in my stash like at that instant? Why?!?! That stuff is AWESOME!

I probably used WAY too much on this project but OhEmGee I did not have to do a million, zillion miles of hand basting! WIN!

I entered this in the Bargainista Fashionista contest on PR. I wasn't going to but since I completed this dress for just around $10 per contest rules (~$18 if you include zipper, pattern and bits and bobs) and the Tadashi dress is $228; figured I may as well.

When I slipped the dress on, it felt SO good. I love being able to create everyday basics, but times like THIS is when I am really all warm & fuzzy about my ability to sew.

The outtake:


I got a ton of compliments and a crazy amount of double takes. Okay guys, do I really look that bad Monday-Friday?!?! Hahahaha

As styled (Mirror selfie--sorry!). I wore pantyhose too. I abhor pantyhose. Especially control top. ::insert violent looking emoji:: but I waited til the last minute and had to go to Target.

this necklace was the perfect (simple) accessory.
Side swept hair is "my thing" for going out.
And soft makeup. 
My arms look very glowy; even though it's only 32 degrees in Minneapolis!