Showing posts with label Butterick 6169. Show all posts

Sunday, May 3, 2015

Last of April: Butterick 6169 and New Look 6373

Remember how I said my mojo was waning?? All it takes is one new "shiny" and I'm toast. All the time! :)

On Thursday I was minding my business and happened to find myself in Hancock. Now, I've made zero sewing related purchases since the beginning of April and decided I could afford a couple new patterns. McCall's were on sale for $1.99 and the new jumpsuit was calling me!

But what else did I see...New Look 6373! One that I'd completely forgotten about!


Deciding that would be a good mojo booster, I pulled out a floral ITY knit that I had slated for Simplicity 1355, another jumpsuit.

The NL pattern is intended for lightweight wovens and has a bust dart. I cut a 14 bodice - would normally perform an FBA but since it's a knit, I did not. And I cut a 16 bottoms (in a woven I generally take an 18). I used the size 14 crotch length/point in front and 18 in back.

I eased the front pattern piece as I was NOT going to stitch a dart in ITY! I also did not bother hemming the flounce and cut it with my rotary cuter.

Again, because it's meant for wovens there are facings which I eliminated. I sewed the right side of the flounce to the wrong side of the bodice and flipped the flounce to the outside. I then did a twin needle stitch around to secure it. This meant: no finishing the flounce, no neckline finishes, no armhole finishes...Ahhhhhhh so fast and easy!

The straps were caught in the twin needle stitching and then hand stitched to further secure them. Because the ITY has so much drape, I decided to insert elastic (just larger than my ankle measurement) into the hem.

If I were to make this in a knit again, I would add elastic to the straps to better stability and would add maybe 1/2" or so to the bodice length. It doesn't blouse as much as the pattern pic. I FULLY intended to add the drawstring but forgot. Oh well...


I really, really, REALLY love this! 
And I have no problems going to the bathroom!

LOL!!!!!

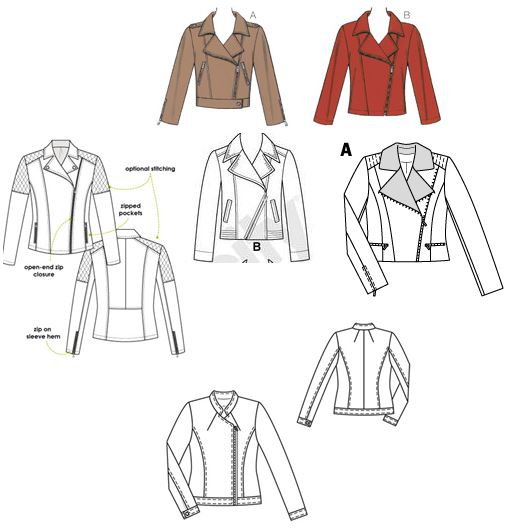
I then decided I had to finish my jacket before cutting anything else.

Wait...LIES. I tried making napkins and had several failed attempts at mitered corners...

B6169 was previously sewn here. The ONLY change I made this time to the pattern was to eliminate the seriously tiny pockets. I can't use them in the gray version so figured there was no real reason to add them here.

On Saturday I realized I only had sleeves to set and lining to bag. I as able to get finish it up Saturday afternoon/evening.

I really love this jacket!!! I don't know how easy it will be to integrate into my wardrobe though. Right now I feel like I can only wear it with jeans and maybe black or gray bottoms. We'll see. I'm also thinking I need to seriously stay away from the floral fabrics :-p


I decided it was best to just let the print be random so that I wouldn't look like a couch.


I only had 1 yard of the yellow pongee lining so I used this navy acetate for the sleeves

This cotton pique was so amazingly nice to work with it! I've never sewn anything with pique and it just sewed and pressed so well!!!

The sleeves went in absolutely perfectly. I used fleece to gather/as sleeveheads and left out the shoulder pads. 

Zipper is a really nice YKK from stash (SR Harris and their $1 long zippers!!) It is totally meant more for outerwear but this fabric is so stable that it's fine. I didn't even interface the area first...

Again, this fabric is densely woven compared to the gray wool I used last time so I didn't interface hems or anything. I bagged my lining courtesy of Grainline's tutorial (LOVE). And I was again smart enough to complete my lining (sans sleeves) BEFORE sewing the jacket. I find I don't get as bored that way ;)

Happy May!!


Thursday, March 19, 2015

Finished: Butterick 6169

Nope, I didn't think I would make a lined jacket right after making a lined coat either...I am SUCH a glutton for punishment! I did make that little knit top in between...

ANYWAY :)

I have wanted this simple kind of asymmetrical zip moto-inspired jacket for a good, long while. There was Burda 3/2012  that was almost there (not asymmetrically zipped). The infamous Style Arc Ziggi (collared and too outerwear-y) and Kwik Sew 3764 (collared)...the "ehhh...maybe" Simplicity 2056 (collared, outerwear-y)...The new Burda young 6800 (so much collar)...

So many not.quite.right. options. (I'm being super dramatic, I know)


And then I saw the Butterick pattern and said, YES! Yes, that's it!

And then I cleaned out my closet and knew I needed a gray cardigan or jacket. And then I found this extremely lightweight wool in my stash (purchased from a Spot the Bolt! sale at Hancock I believe). And THEN I found this white zipper with silver (nickel?) teeth. Ah yes. Yes please!

I am on a slow decline (wrt my weight) and decided to go for a snug fit now -- e.g., wearable over sleeveless tops (woven or knit) or close fitting knit tops with sleeves -- and decidedly more 'jacket like' 10-15 lbs from now.

I cut a size 14:
finished bust of 42.5" (just barely 3" of ease)
finished waist of 39" (mine is 34")

Miraculously, the fullness of the bust was in the right spot (I usually have to lower it) and the shoulder wasn't insanely wide (usually have to narrow it!)

I sewed the seams between the front and middle front at 1/2" and I did a 1/2" swayback adjusment.

The sleeve width was 14.5" and 15" is more appropriate so I did a full bicep adjustment using the Fit for Real People method of slash/spread on the upper sleeve only. YAY ME!

Scored a hardcover version of the book on 
PR classifieds!

I should have measured where the jacket would hit (high-ish hip) but didn't, so I ended up sewing the side seams at 5/8" tapering to 3/8" after the waistline.

The sleeves are pretty much the perfect length so if you've got short arms, make sure you check that.

Hmm...other things I love:
  • There's a back facing - THANK YOU
  • There's a separate pattern piece for the back lining that has additional ease built in and ease pleats - YAY!!!!!
  • You're instructed to cut the lining pieces slightly shorter (I usually do this anyway)
  • wool. Sew all the things in nice, well-behaved woven fabrics like wool, cotton, linen or blends of these. Goodness gracious <3
Things that made me sad:
  • Oh.my.gosh. You are to assemble the jacket and lining and join them. Then attach the sleeve lining to the sleeve and do some crazy slip-stitch madness. I don't even KNOW what they were saying because I was all 'AIN'T NOBODY GOT TIME FOR THAT!' in my head.
  • The tiniest, useless pockets in the history of all the world.
Things I did differently:
  • Interfaced the hem (jacket and sleeve hems) to get a nice, crisp finish
  • Made my own shoulder pads
  • Bagged my lining (so sorry, so lazy for miles of slipstitching)

And now I've got a moto-jacket of AWESOMENESS!!!!!!!!!!!!!!!!!!!!!!

If you follow me on Instagram you have been subjected to half a dozen in-progress photos :) Aaaaaaand now a ton more! haha!


Absolutely LOVE it


The back unzipped


The back, zipped. See how it doesn't quite fit around my high hip? it's okay...


On Lily


It's so cute zipped!


My hand is all the way in the pocket. They're SO tiny.


Nice and tucked away zipper


I couldn't get this side as crisp as I'd like.


I used a matching lining! :GASP: 

Here I tried it on over this oversized shirt and it still fit but boy was it snug! LOL!


It was also pretty cute over a dress, with workwear and now I want a floral one!!! **What would one line stretch cotton sateen with??

I also sewed 2 tops today  (V1436 and Burda 6911) that need the last bits of finishing so hopefully this weekend I can get them done and photographed!!

Yes, I am now done with 4 of my list of 10! lol! I have also changed my wardrobe (of course) so now only 1 top from the list needs to be held out until after April 1.